Specific


Well y’all, this has been a long week of speculoos-related goods.  

A long and delicious week.
I’m ready to share some other stuff, though, so this is the last Biscoff post… for a while, anyways.


These little bars are brunettes- not blondies.
That’s because they have too much going on and I cannot possibly describe all of that in a single title.
Thus, brunettes.  They’ve got speculoos and all the accompanying spices, brown butter, maple, white chocolate, butterscotch, and a sinful glaze.
They’re just a little darker and more complex than any run of the mill bar cookie.
They’re a good way to end this lovely week.

Biscoff Brunettes
cookie portion adapted from Picky Palate
ingredients:
for the cookies:
4 tablespoons unsalted butter
1/4 cup white chocolate chips
1/4 cup butterscotch chips
1/4 cup maple syrup
1/2 teaspoon kosher salt
1/2 cup speculoos spread (make your own!)
2 eggs
1 cup flour
1/2 teaspoon baking powder
1/4 cup granulated sugar
(optional) 1/2 cup white chocolate chips
for the glaze:
2 tablespoons butter, browned
2 tablespoons maple syrup
big pinch sea salt
3 tablespoons confectioners sugar
directions:
Preheat oven to 350 degrees F and lightly grease an 8×8 pan.
Brown the butter in a heavy bottomed pan.
Once it is browned, stir in the chips and maple syrup and continue stirring until they melt.
Add in the salt and speculoos spread and mix until all in combined.
Beating quickly, add in the eggs; continue mixing very quickly so they don’t scramble.
Add in the flour, sugar, and baking powder and mix to combine.
Finally, stir in the white chocolate chips.
Pour into pan and bake for 25-30 minutes, until a tester comes out clean.
Right after you take the cookies out of the oven, whisk all of the glaze ingredients together.
Pour over hot bars and allow to cool.
Slice and enjoy!

Can’t Trust That Day

Today’s post is brought to you by the letter B.
 
It’s Monday, people.
We could all use more chocolate and butterscotch on Mondays.
It’s tough going- I know.  I’m currently taking my 3rd of 4 AP tests. 
I chose blondies as my last meal.  And I chose well.
When I say bbbbblondies, it’s because I cannot possibly call these what they really are without sounding like a crazed sugar addict- 
brown butter brown sugar banana butterscotch blondies.
 
They’re gooey and sweet and rich, studded with more mix-ins than batter, and hit the spot straight out of the oven/freezer.  (More on this in the recipe itself)
 
They take 5 minutes to throw together, 25 minutes to bake, and, if you’re being very patient, 30 minutes to thicken and become dense in the freezer.
But you don’t have to do that, not if you’re ever so hungry.
 
These make Mondays just a tad bit more bearable.
Catch y’all on the flip side of these last two tests. 
Bbbbblondies
adapted from smittenkitchen
ingredients:
8 tablespoons (1 stick) of butter
1 packed cup light brown sugar
two big pinches coarse sea salt
1 egg
1 medium banana, mashed (about 1/2 cup)
splash vanilla
1 cup of flour
1/3 cup butterscotch chips
1/3 cup chocolate chips
1/3-1/2 cup chopped pecans
directions:
Preheat oven to 350 degrees F.
Pam spray an 8-inch round tin or an 8×8 square pan.
Brown the butter in a large saucepan.
Once butter is browned, beat it with the sugar until the mixture looks like very, very wet sand.  
Add in the egg and the salt and beat on medium speed until mixture has lightened in color and most of the sugar is dissolved, about 2 minutes.
Beat in the banana.
Stir in the vanilla, then beat in the flour until the mixture is homogeneous.
Stir in the mix-ins.
Pour batter into prepared pan and bake for 20-25 minutes, until top is shiny and gives slightly to pressure.
The trick for super dense, gooey blondies: 
Let your blondies cool most of the way on a rack in the pan, then transfer the pan to the freezer and freeze for 30-ish minutes.  The gooey center will become dense.

Creamsicle

Now that spring/summer is finally/almost here, oranges are on their way out.
(I’m trying not to jinx the weather, people.  The weather gods are a fickle bunch.)
In a few short weeks- days even- oranges will be forgotten among the lovely rhubarb, luscious berries, and, my favorite, the stone fruits.
(Now I want a peach. Ugh.)
 
But tis time.  Oranges, like most citrus fruit, are for wintertime enjoyment.
You might still have a few lying around; slowly losing their juicy interior and their peel becoming ever so slightly wrinkled.
Juice ’em.  And make these bars.
Honestly, the prep for these takes about 20 minutes.  Start to finish.  
Then it’s just 25 minutes in the oven.
Even if you are making something else on the side and keep running out of eggs and butter and needing to run downstairs to your storage fridge like FOUR times. FOUR.
Even if your gosh darned can opener is being moody. 
 
These bars go from your mind to your stomach in less than an hour.
They are so creamy and dense, the way good lemon bars should be- but they’re orange bars. 
They’re sweeter and have a softer, mellower flavor, in the best way possible.
Seriously addictive.
 
I cut mine into tiny little 1 inch squares, because that means I can eat 5 at once. Duh.
I was going to be super lazy and post this as a wordless Wednesday.
A few problems with that:
a) I’m not a cool enough blogger for that.  I don’t do wordless Wednesdays or WIAW or weekly rewinds.  My blog is clearly lacking in the W department.
b) Without words, it would be difficult for me to describe how awesome these bars were.  
c) I’m bossy and I want you to make these.  How can I do that without YELLING AT YOU?
GO MAKE THESE. 

Orange Bars
for the crust:
adapted from Joanne Chang
8 tablespoons butter
1/4 cup sugar
1/2 teaspoon kosher salt
1 cup flour
1 egg yolk
for the filling:
adapted from Martha
4 egg yolks
1 can (14 ounces) sweetened condensed milk
3/4 cup orange/lemon juice (juice from 1/2 lemon plus enough orange juice to make it to 3/4 cup, it took me about 1 1/2 oranges)
big pinch salt
confectioner’s sugar, for dusting
directions:
Preheat oven to 350 degrees F.
Grease a 9 x 13 inch baking dish.
In the bowl of a stand mixer, cream the butter until softened. 
Add the sugar and salt and beat on medium-high speed until extremely fluffy and light, about 3 minutes.  
Scrape the bowl and add the flour.
Mix on low speed until just beginning to combine; add the egg yolk and mix on low speed until everything is combined and the dough is forming small crumbles.
Transfer the dough to the pan and press out evenly.
Freeze for 10 minutes.
Bake for 10-12 minutes, until firm but puffy and slightly golden.
Meanwhile, whisk all the ingredients for the filling together.
Pour over hot crust and bake for 25-30 minutes, until the filling is firmly set.
Remove from oven and let cool, then freeze for 30-45 minutes if you want a very dense bar (how I like them). 
Remove from the freezer and cut into squares; let thaw and dust with confectioner’s sugar before eating.

Chewy Gooey Louie

 
Anyone need any more proof of American absurdity? (probably not, but here goes)
 
English: confetti
French: confetis
Finnish: konfetit
Portugese: confete
Spanish: confeti
German: Konfeti
Greek: komfetí
Swedish: konfetti
 
 
American: funfetti
 
I never keep box mixes around the house.  
I find it faster, easier, and more delicious to weigh out the few ingredients needed for a cake: flour, sugar, baking powder and/or soda, etc.  
This is not to condemn box mixes!  This is a no judgement zone, people.  
I get it.  
Chaqu’un a son goût.
 
I started out with mixes (Heck, who didn’t?!).  
My parents bought me an Easybake when I was a wee little one.  And I loved that thing.  
Let me tell you.
I distinctly remember hanging onto my dad’s arm at heaven Target, begging him to buy me some more dry mix packets.  Oh Lawd were those delicious.
I moved on to boxed cake and brownies when I was eight-ish, and by the time I was eleven, I was baking from scratch, and I never looked back.
 
 
Last Friday night, my lovely, darling teammates gifted me a funfetti cake mix for “Senior Night”.
So obviously, I walked into practice on Saturday with a big box full of these gooey butter cake bars.  My team went nuts over them; there’s a distinct possibility that people were eating them on the court during warm-ups… But hey, totally not my fault.
These bars are based off of the infamous St. Louis dessert, the gooey butter cake.
Sounds super healthy, right?  
These bars taste like a combination of a cheesecake and a shortbread cookie.
Buttery, sweet, chewy, and very, very gooey.  
Wonderfully so. 
Leave it up to Christina Tosi to transform the gooey butter cake into easy, sliceable bars made with a cake mix.
These just might convince you yet to keep a box mix in your pantry.

P.S. Have you noticed that chewy, gooey, and Louie all rhyme, but are spelled in distinct ways?  Mind blown.

Gooey Butter Cake Bars
exceedingly lightly adapted from Momofuku Butter Bars
ingredients:
for the crust:
1 box cake mix- I used funfetti; choose a vanilla-flavored mix
4 ounces butter, melted (browned if you’re feeling frisky)
1 egg
for the filling:
8 ounces of cream cheese, softened
2 eggs
16 ounces powdered sugar
big pinch sea salt
splash of vanilla extract
directions:
Preheat oven to 350 degrees F.  Line an 8×8 inch pan with parchment paper.  
Stir together your cake mix, butter, and 1 egg, until a stiff and slightly crumbly mixture comes together.  Press into pan.
Beat the cream cheese and eggs until fluffy, then beat in the powdered sugar, vanilla, and sea salt.  Spread the mixture over the crust.
Bake for 30-35 minutes, until the center is cooked but still jiggles slightly when shaken. 
The edges should be golden brown and puffed.
Allow to cool completely (seriously!  I put mine out on my porch in below freezing weather to let them completely freeze before even attempting to cut them).  Cut into desired squares.  They will not be neat, nor will be the consumption of them.  There is absolutely no way around it; they’re meant to be messy!

Morning Lullabies

 
“If you have good thoughts they will shine out of your face like sunbeams and you will always look lovely.”
-Roald Dahl
Short and sweet for today.  
 
These bars are absolutely killer.  The nutella, raspberry jam, and brown butter shortbread and crumb combine into a not-too-sweet and nibbly treat.  
 
What’s more, they can be made super quickly (and with one bowl and one spoon.  No mixer nonsense here.).  
 
I whipped these up last night because I had had a long, hard day and was inspired by the Bonne Maman raspberry jam in my fridge.
 
Waking up to them in the morning?  Best. Breakfast. Ever. Laaaaa! 
 
 
Those cookies you see were a bit of an experiment.  I ground my own pistachio flour (Pistache. Pistache. Pistache.), then combined it with honey into crunchy (and shippable) butter cookies drizzled with chocolate.  I also made some salted honey-pistachio butter with the extra chunky bits of pistachio flour.  Love!
 
I’ll be back soon with some ideas for lovey-dovey baked goods.
And some slightly more involved posts.  Perhaps.
 
 
Nutella, Raspberry, and Brown Butter Bars
ingredients:
480 g flour
2 sticks butter, melted and browned
50 g sugar
40 g cream 
6 g kosher salt
good quality raspberry preserves (or any other fruit); I used about 2/3 of a jar of Bonne Maman
150 g nutella, heated gently until it is liquidy and easily spread
directions:
Preheat oven to 350 degrees F.  
Stir the flour, sugar, and salt together in a bowl.  
Pour in the browned butter and cream and stir until crumbs come together.  
Press half of the batch into a greased 9X7 pan (These would also work in an 8×8, I’m willing to bet).  
Spread the liquid nutella evenly over the crust, then dollop jam over.  I used just shy of a cup of preserves, which was pretty conservative.  If you want more fruity flavor, just add more jam.  Either way, don’t spread the nutella or the jam all the way to the edges of the bars.  Rather, leave about a 1/4 inch empty space around the edges.  Once the jam dollops are smoothed over the nutella, sprinkle the rest of the crumbs on top.  
Bake for 35-40 minutes (a note: the bars will look pale golden when done, but they are difficult to judge.  Grab a relatively large crumb from the top and pinch to see if it is crumbly and thoroughly baked.  If so, pull the bars out.  I used a convection oven, so my bars were done around 33 minutes.  If your oven runs colder, do the crumb test to be sure.)  
Allow to cool completely, then slice into squares.
 

Sand in the Vaseline

 
Last week, my bake sale was pushed back a day, due to a day off from school, thanks to Sandy.  Now, I’m not complaining, mais elle nous a posé un vrai lapin (She stood us up) where I live.  I hope anyone whom she didn’t is safe; my heart goes out to those without power or heat who are bracing for the next big storm.  
 
Life has been a little hectic for me lately, as you can probably tell by my lack of posts.
 
Being a senior in high school, the big deadline was November 1st for my college application.  It was down to the wire.  A real nail biter.  By the time I finished typing that last essay, it was 10 o’clock and the last trick or treaters had already dissipated into the night.  Hitting submit was a relief, for about two minutes.  Then the post-application panic set in.  
 
Now, a week later, I’ve submitted to a pretty much constant state of being on edge.  


 Also, it’s November
Which means I’ve been spending every waking minute some time planning Thanksgiving.  As in, the menu, the shopping lists, the timetable, the seating, etc.
Call me Liz Lemon. Please?
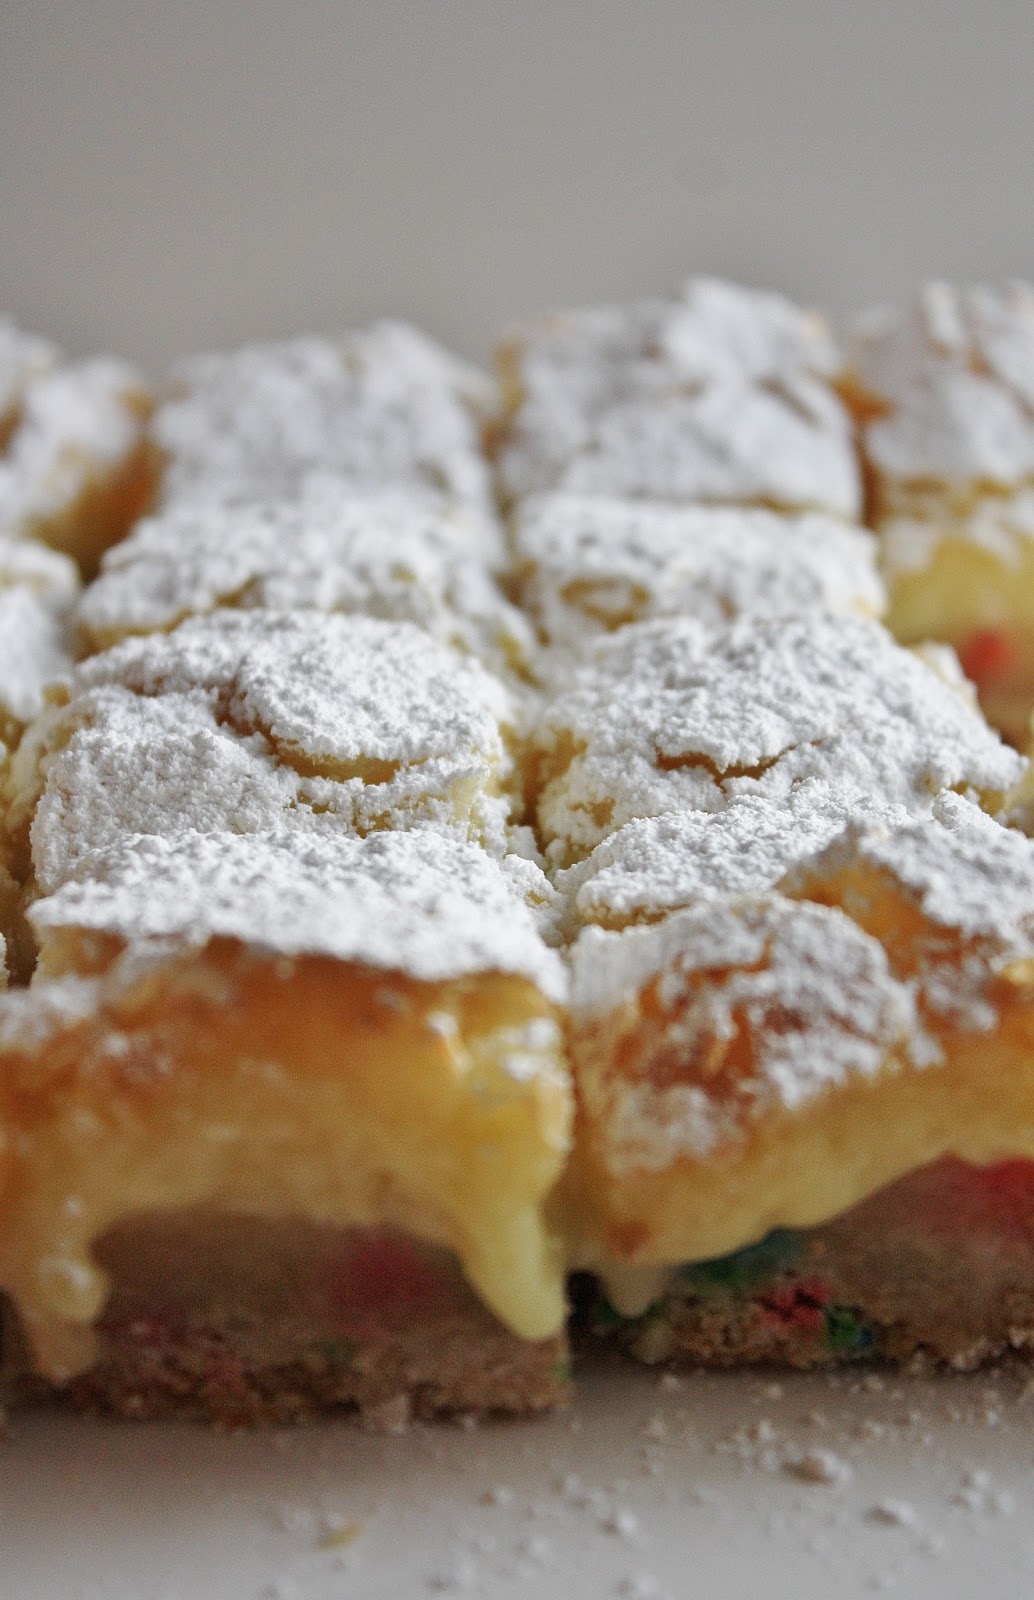
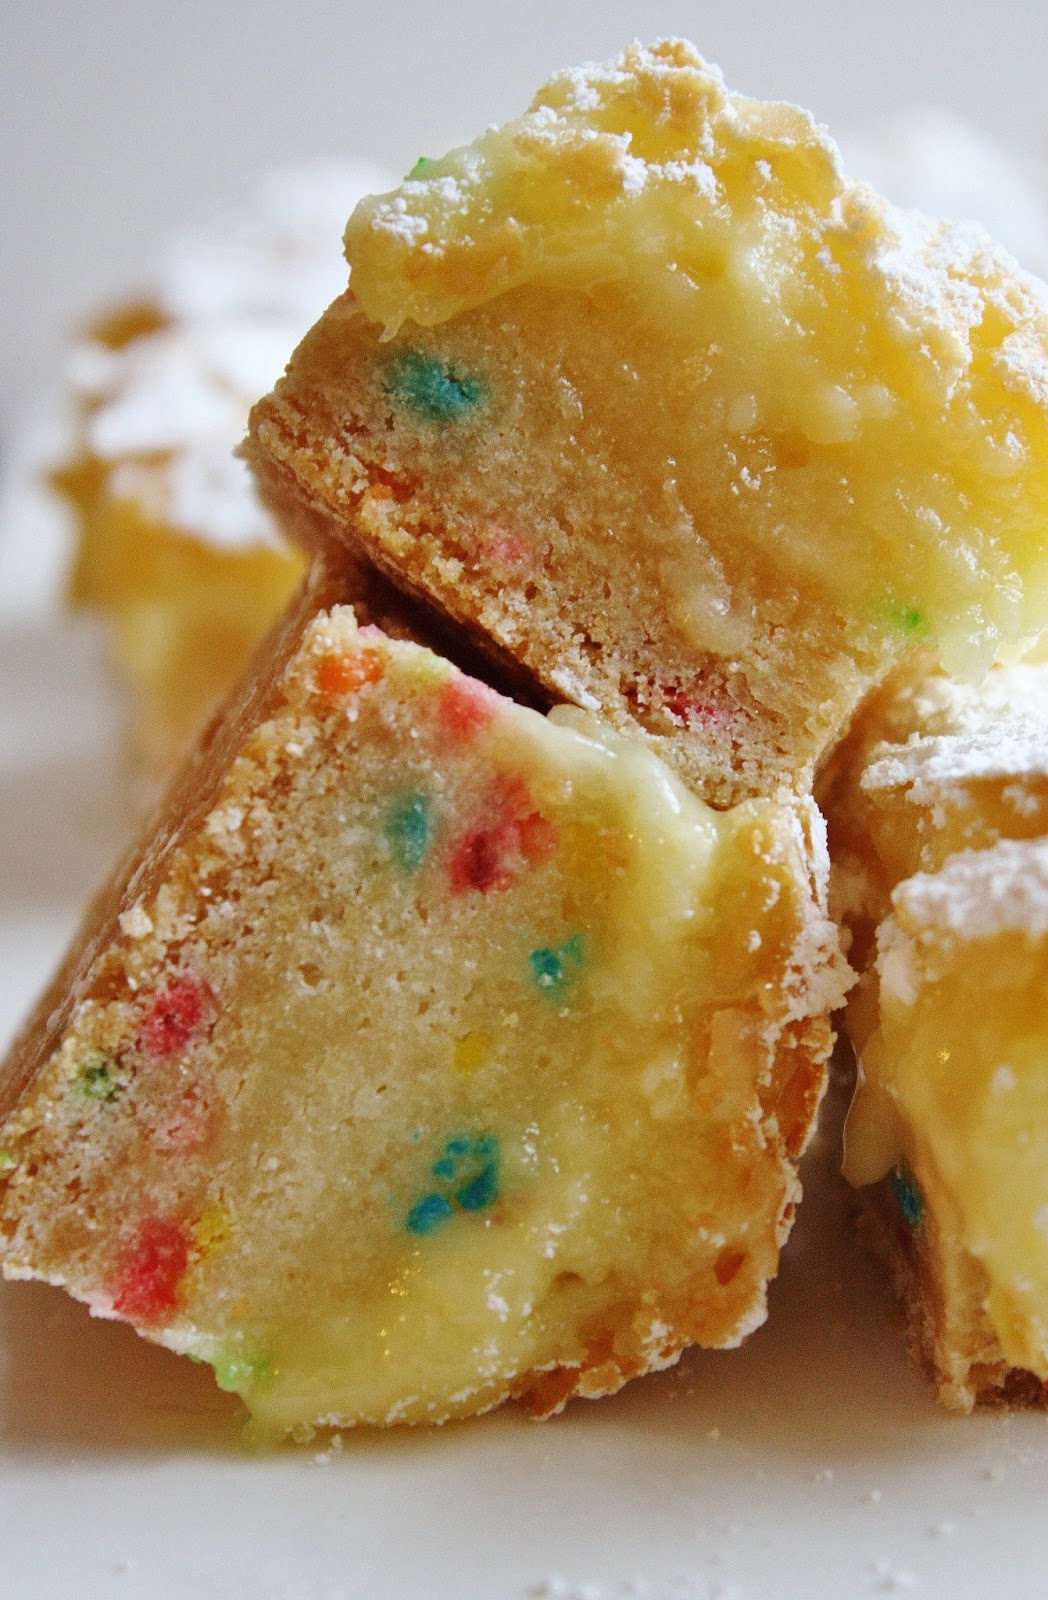
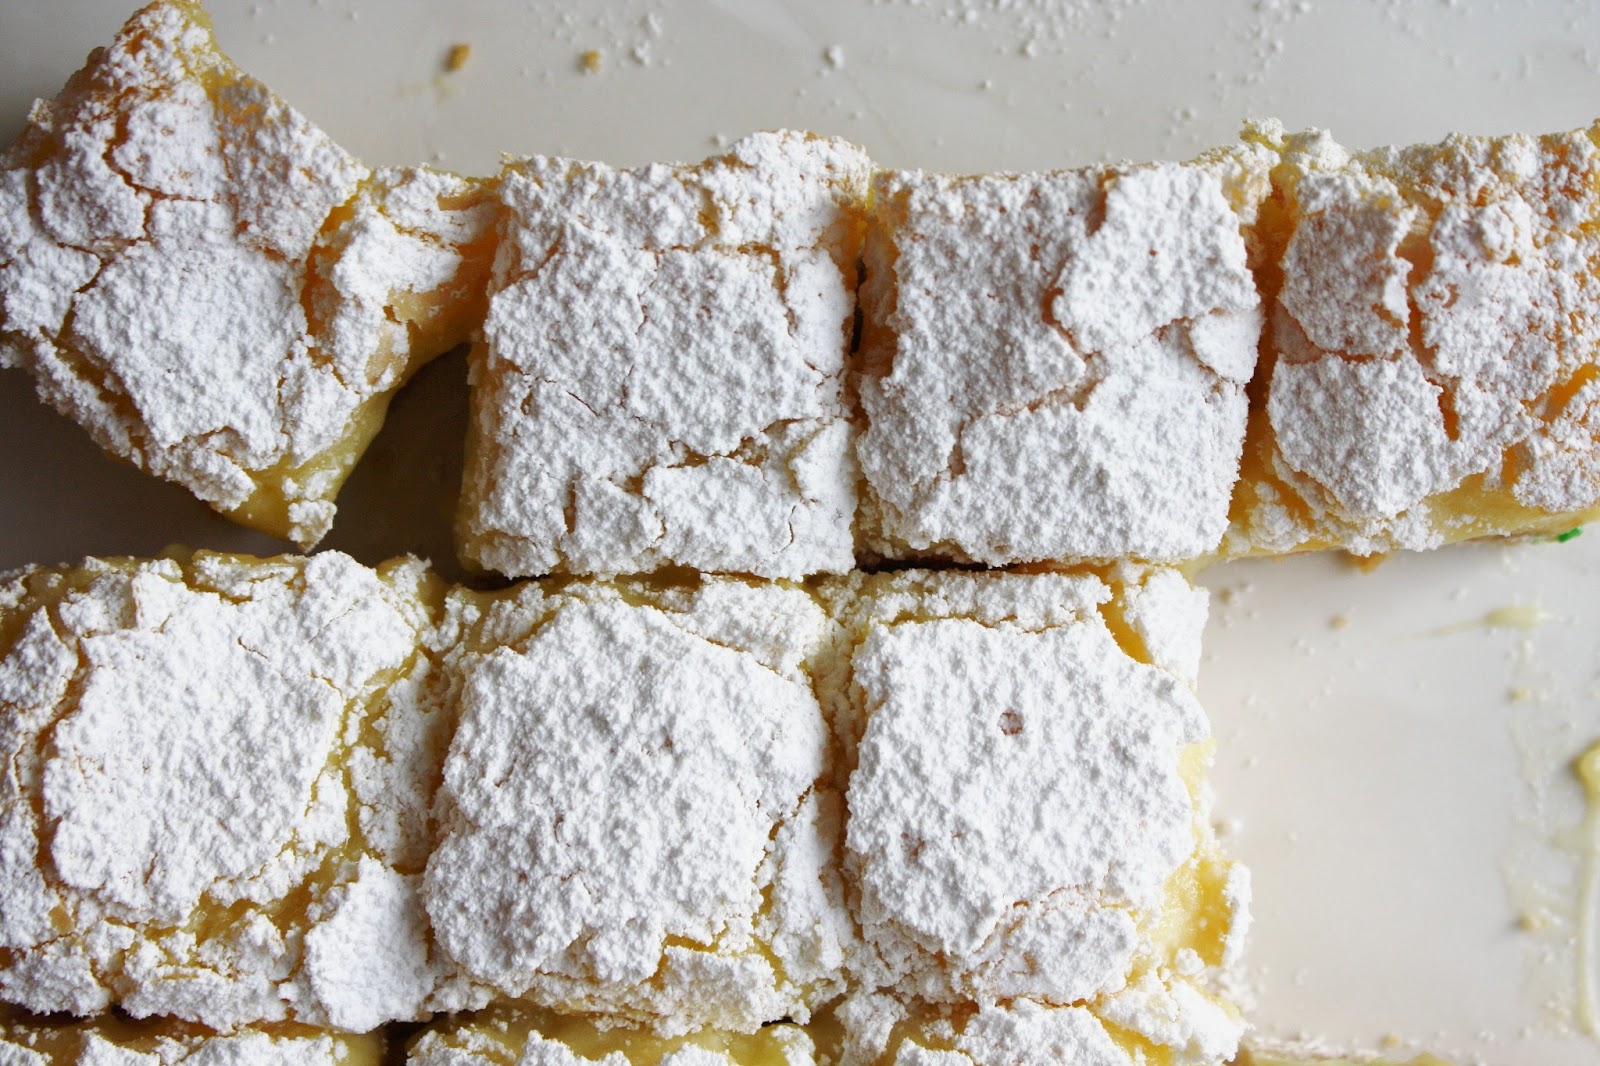
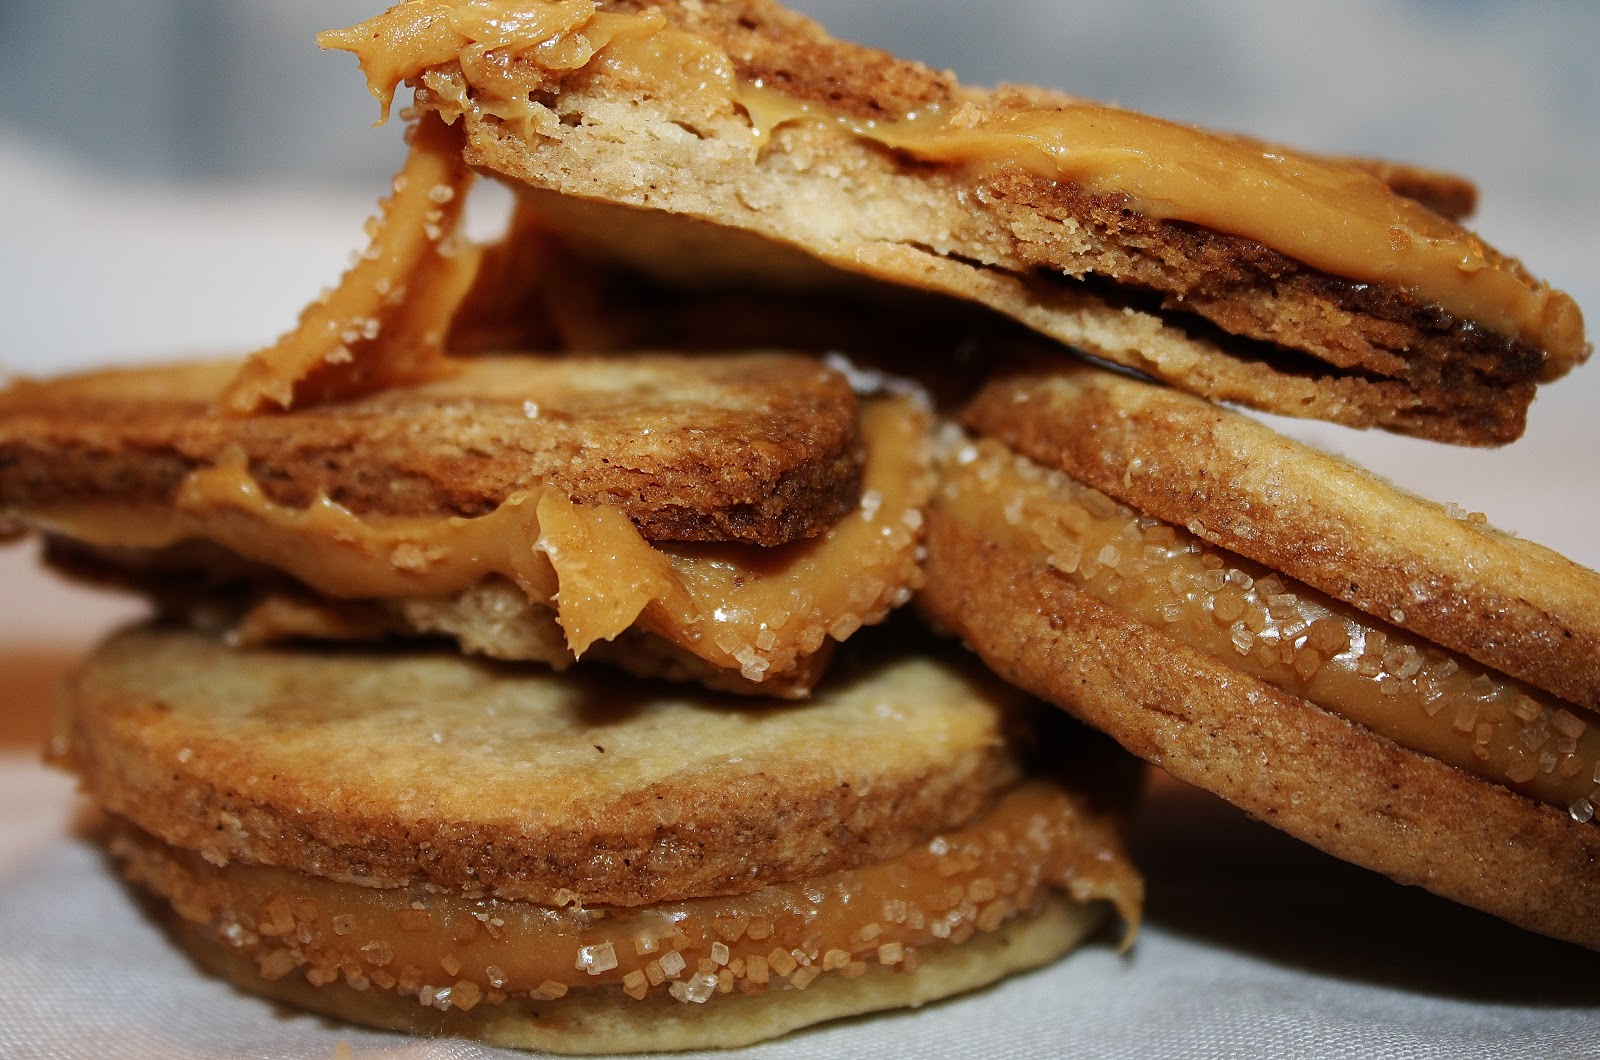
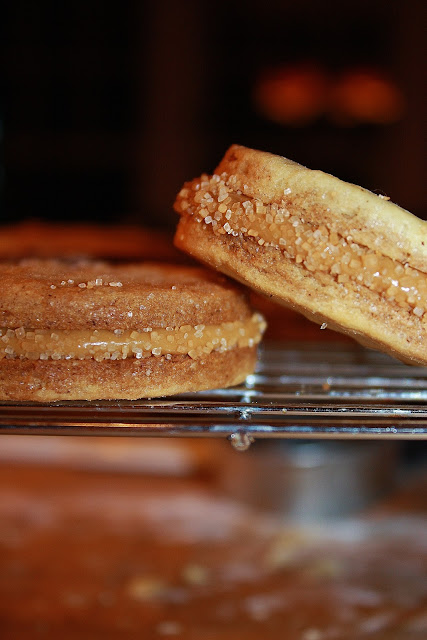
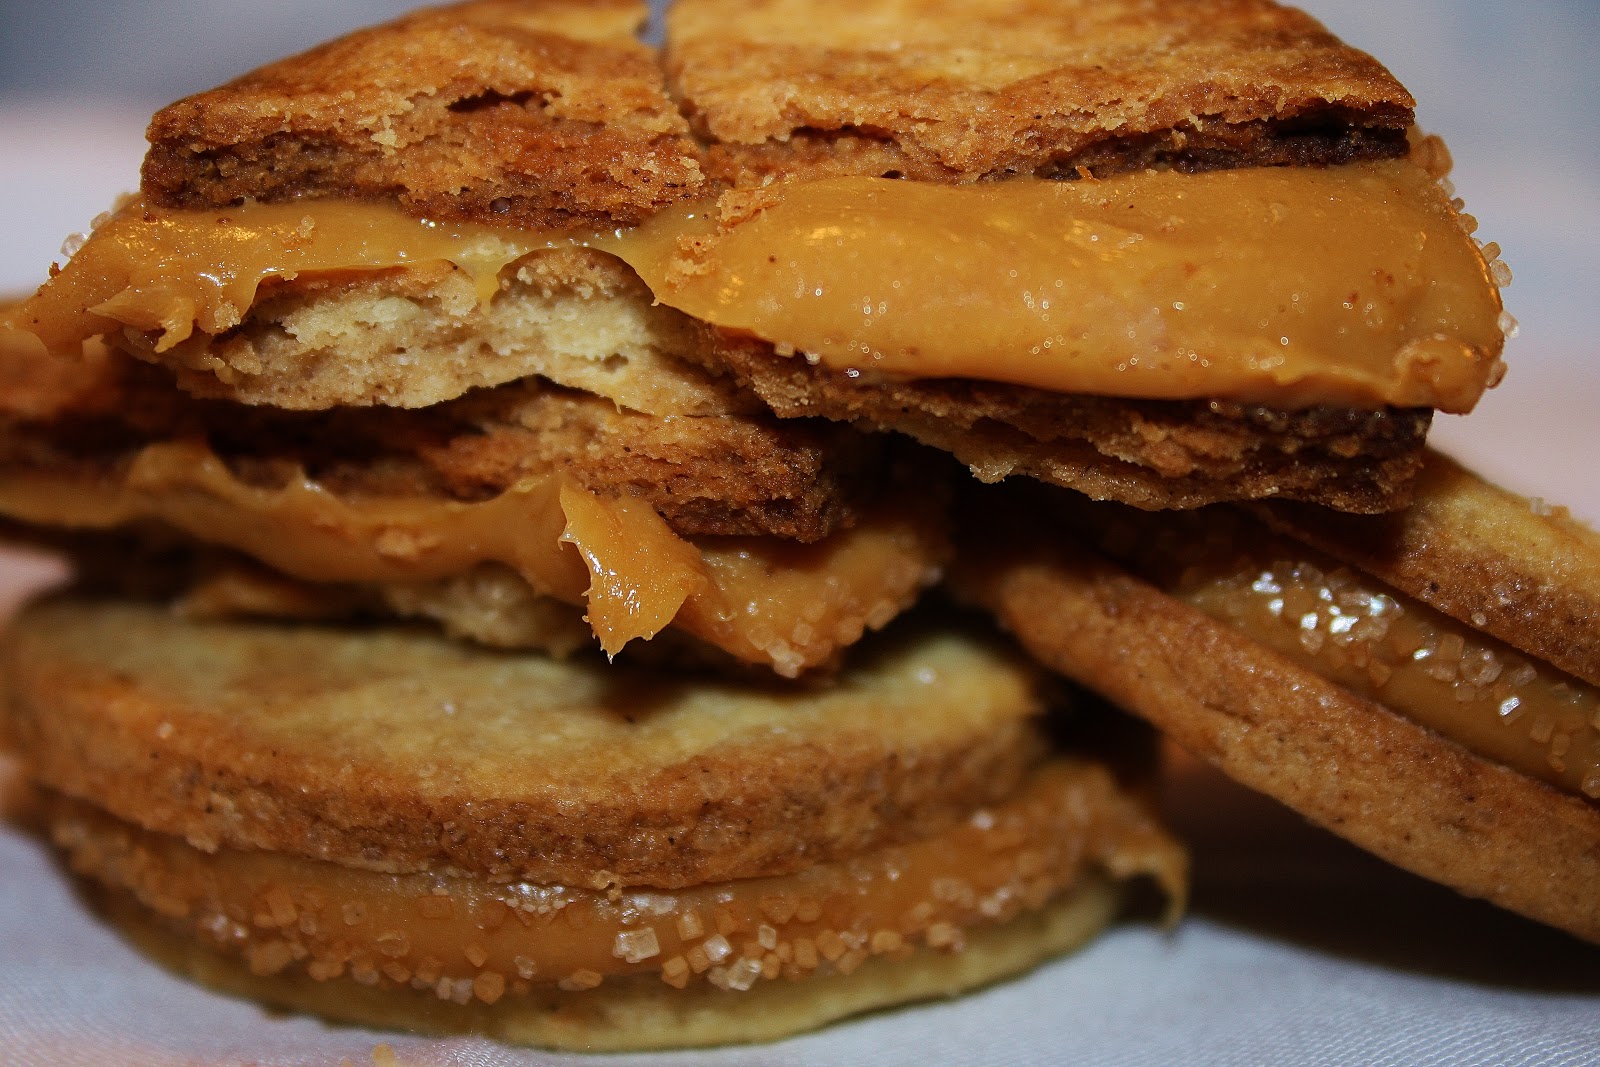
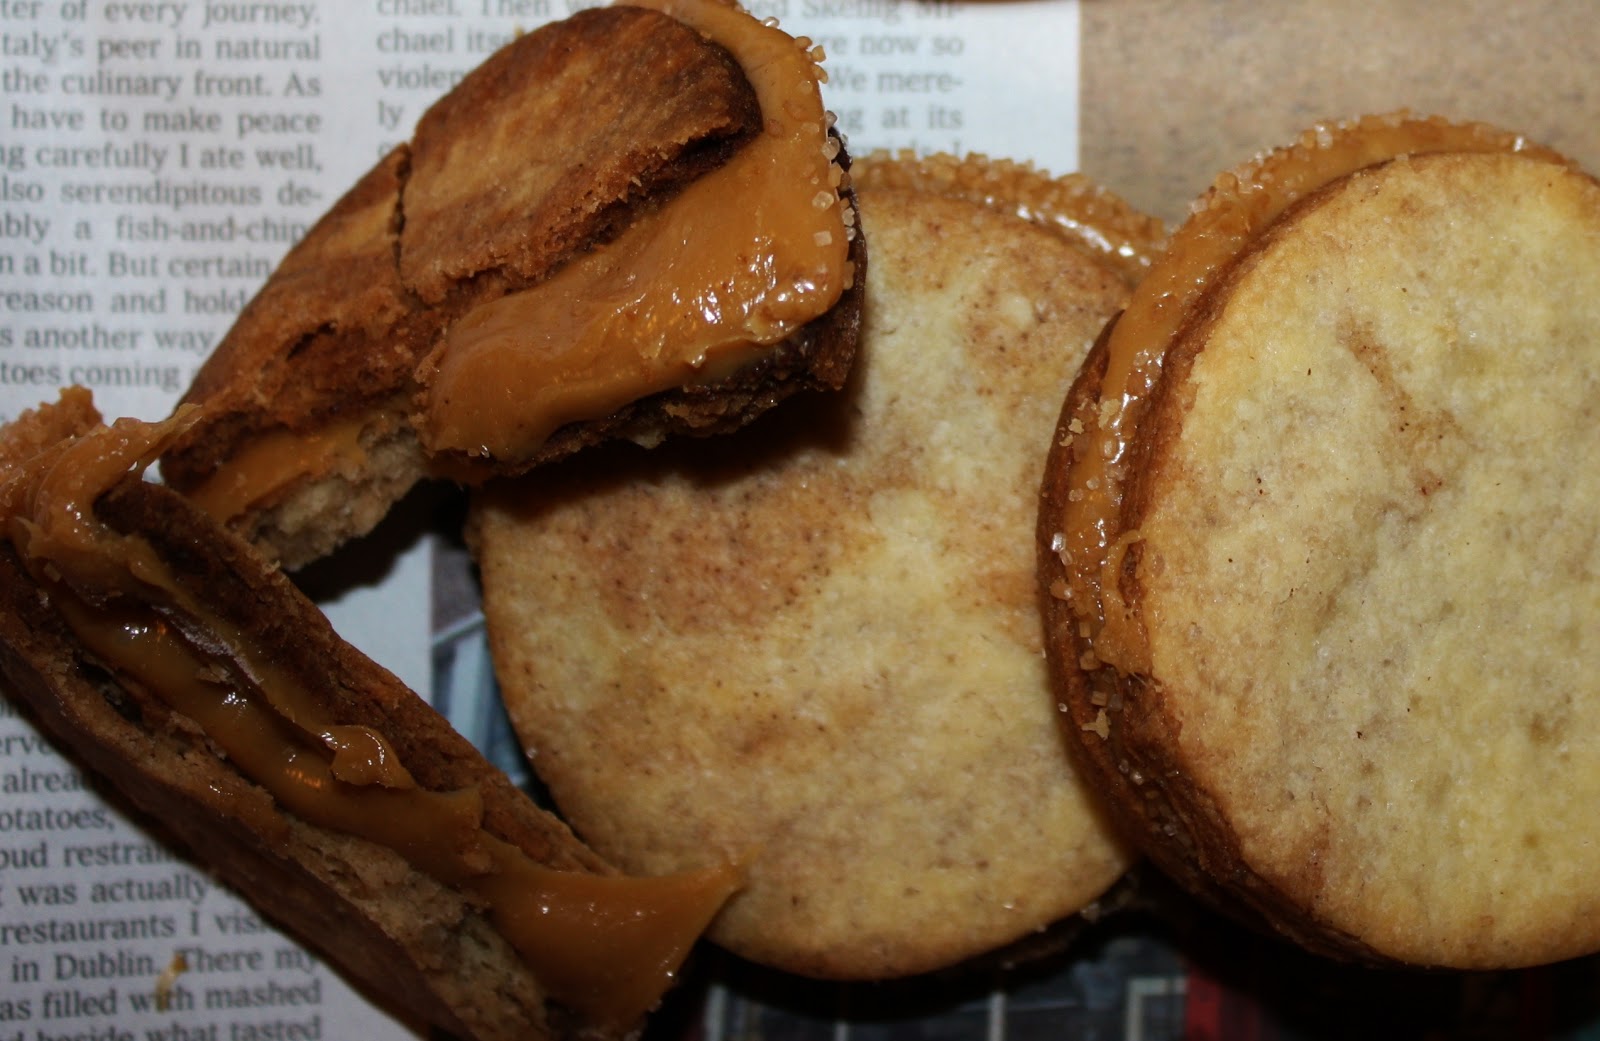
To help get in the holiday spirit, make these cinnamon cookies.  Cinnamon and dulce de leche are commonly mixed flavors in Latin America; many recipes for cajeta (goat’s milk dulce de leche) call for a pinch of cinnamon.  These butter cookies are super flaky, with cinnamon swirls, and pair perfectly with the sticky, salty filling.
 
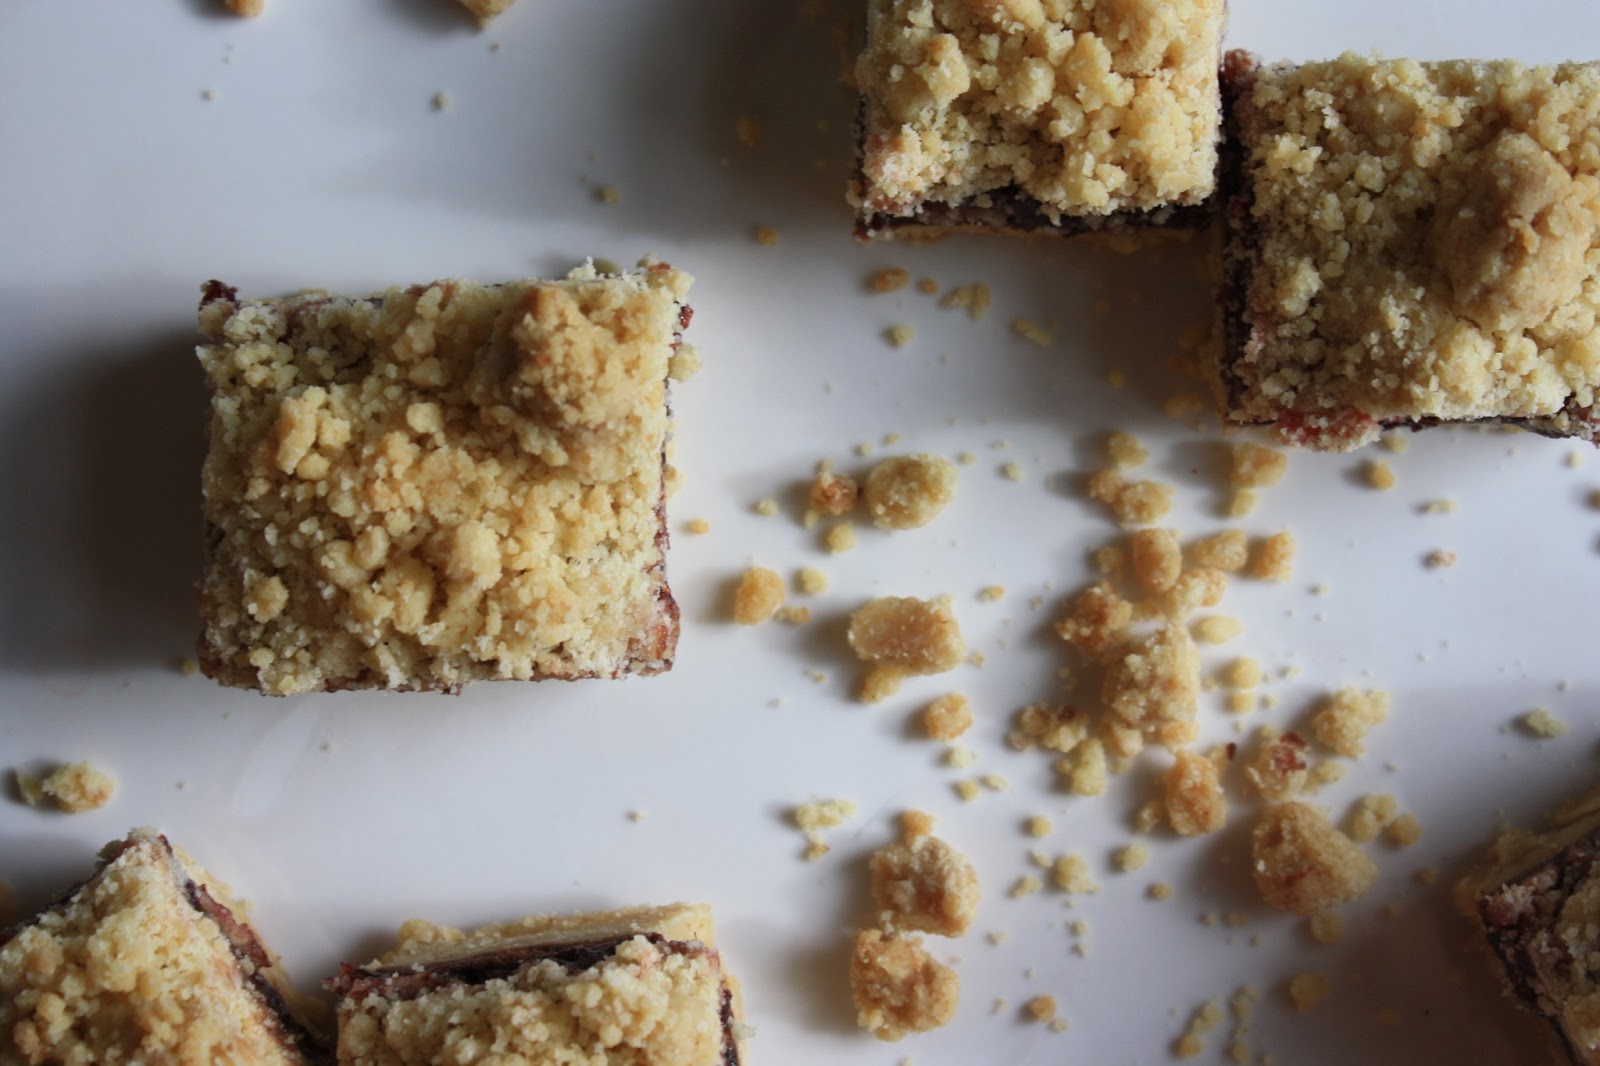
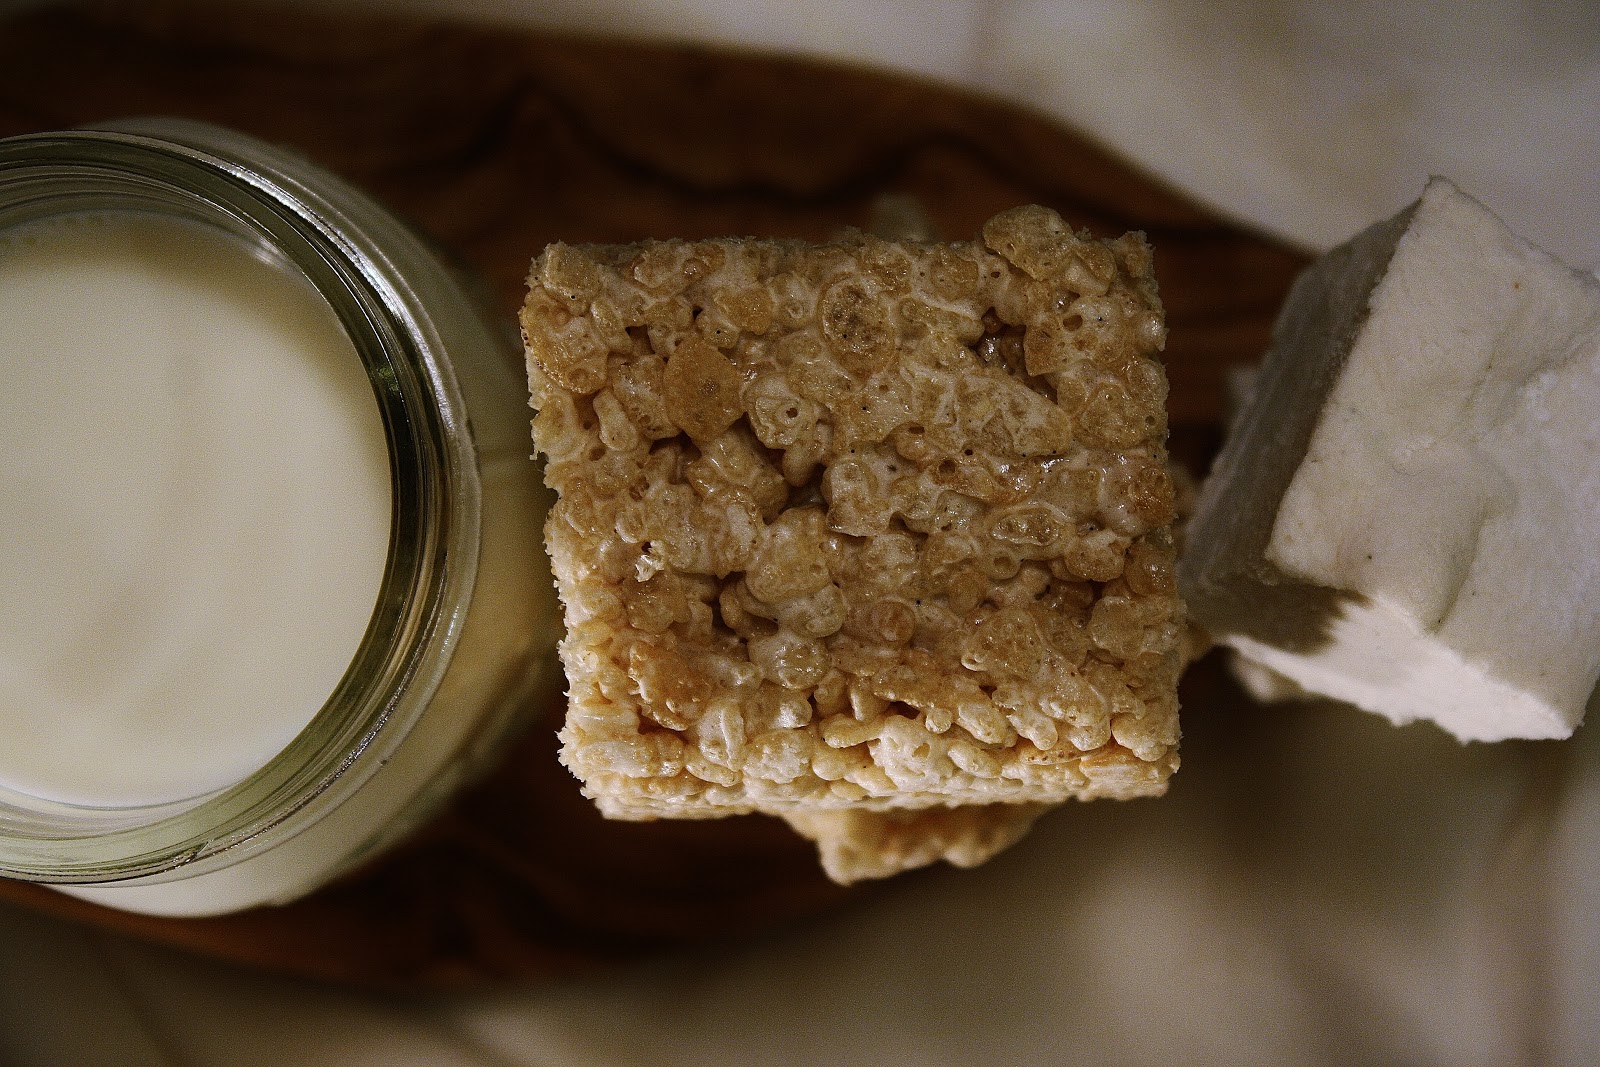
Into comfort food?  Then make rice krispies instead.  Except make them better.  Start with the marshmallows. No corn syrup or refined sugars and no artificial flavoring allowed.  They are so much better.  Fluffy, springy, and soft, with a mellow maple undertone and little flecks of vanilla.  Add those to a little bit of browned butter, mound up a mountain of rice krispies, and press into a buttered pan.  Beautiful, and so much healthier than those little blue packages.  

Cinnamon Swirl Cookies with Dulce de Leche
adapted, in part, from smittenkitchen
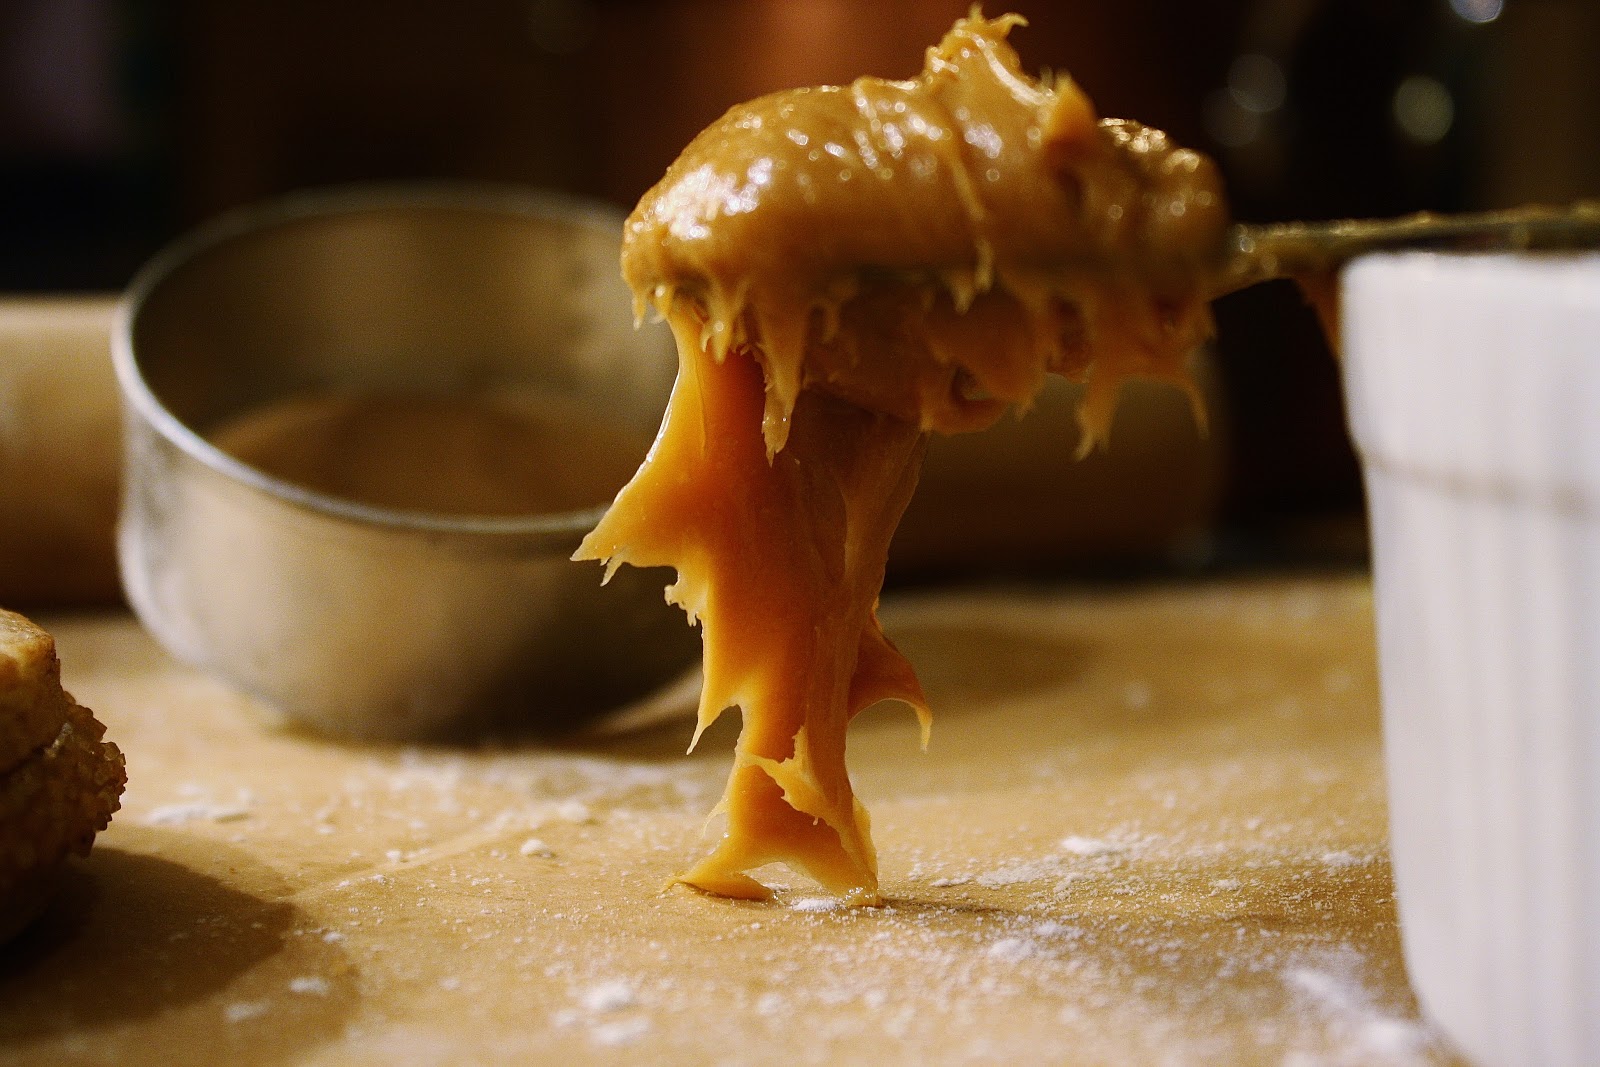
for the (quick) dulce de leche:
ingredients:
2 cans sweetened condensed milk
a few healthy pinches of good-quality sea salt
directions:
Preheat oven to 350 degrees F.  Pour the milk into an oven proof dish, and sprinkle with sea salt.  Put aluminum foil over the top, and place in the oven for 30-40 minutes, checking and swirling often to avoid overflow.  Once toffee colored, pull from oven, add another pinch of salt, and let cool.  
for the cookies:
ingredients:
4 ounces (1 stick) butter 
1/3 cup confectioners’ sugar, sifted
1 egg yolk
splash vanilla
big pinch of salt
1 cup flour
2 tablespoons brown sugar
2 teaspoons cinnamon
directions:
Preheat oven to 350 degrees F.  Cream the butter, sugar, and salt together until fluffy.  Add in the egg yolk and a splash of vanilla extract, and mix until combined.  Add in the flour all at once, and mix until a dough forms.  Weigh out the dough, divide in half, and add half of the dough back into the mixer bowl.  Add the brown sugar and cinnamon in, and mix until combined.  Take the vanilla dough and knead it together with the cinnamon briefly, until they begin to swirl together.  Roll out the dough to a 1/8 inch thickness, and cut out cookies.  Gather scraps and reroll.  Bake cookies, spaced 1/2 inch apart, for 10-12 minutes, until they are starting to be golden at the edges and the centers are no longer puffy and soft.  Let cool, and fill with dulce de leche.
 
Brown Butter, Maple, and Vanilla Bean Rice Krispies (Snobby Krispies Treats)
for the marshmallows:
adapted from Gourmet, via smittenkitchen
ingredients:
1 tablespoon plus 1 1/4 teaspoons gelatin
1/2 cup cold water
1 cup unrefined sugar (I used evaporated cane juice)
1/4 cup maple syrup
big pinch salt
1 egg white
scrapings of 1 vanilla bean
mixture of 1/2 confectioners’ sugar and 1/2 cornstarch (about 1/3 or 1/2 cup)
directions:
Oil a 9 x 12 pan.  Add 1/4 cup of the water to the bowl of a stand mixer, and sprinkle gelatin over top to soften.  In a heavy saucepan, cook the maple syrup, last 1/4 cup water, salt and sugar until a candy thermometer reads 240 degrees F.  Pour syrup over gelatin.  With the whisk attachment, beat mixture until thick and nearly tripled in volume.  Meanwhile, beat the egg white with the vanilla bean scrapings until stiff peaks form.  Once the gelatin mixture is done whipping up, beat in the egg white until just combined.  Scrape marshmallow into pan, dust the top with confectioners sugar mixture.  Chill until firm, at least 3 hours and up to one day.  Once marshmallow is firm, turn it out onto a cutting board and slice into pieces using a well oiled knife.
for the krispies:
ingredients:
3 tablespoons high-quality European butter (I used Kerrygold)
10 ounces marshmallows
8-9 cups rice krispies
directions:
Butter a 9 x 12 pan well.  In a heavy saucepan, brown butter.  Once browned and nutty, add in marshmallows, and stir well until they are all melted and homogeneous.  Add in the rice krispies and stir until all the krispies are coated, but not inundated with marshmallow (you may need to add more so that the bars aren’t too sticky).  Scrape into the pan and press down with a buttered spoon.  Let cool, then cut into bars.