Droopy Drupes

Seriously Easy Stone Fruit Tart | La Pêche Fraîche

They had been elegant in the tree, tiny coquettes
blushing more and more until I picked them,
then they were minimalist and matte-colored
in wooden bowls, so barely furred one couldn’t
help but clothe them, enclose them with your hand,
caress each one thoroughly before taking a bite,
exploring the handsome freckles left
from some minor blight.

—Jennifer Grotz, Apricots

Seriously Easy Stone Fruit Tart | La Pêche Fraîche

This is an interruption of the berry desserts that have smartly marched across your screen for what must feel like ages.
(Chocolate, long forgotten, is making an appearance soon.  Promise.  And then at least one more berry post. Oops.)
But this post...This post is devoted to stone fruits.

Peaches and drupes (stone fruits) are some of my most favorite fruits… of course, La Pêche Fraîche is a dead giveaway.

There haven’t been an overwhelming number of peach/apricot/plum posts, however.
(The last I mean to remedy when plums charge in in all their autumnal glory.)

Seriously Easy Stone Fruit Tart | La Pêche Fraîche

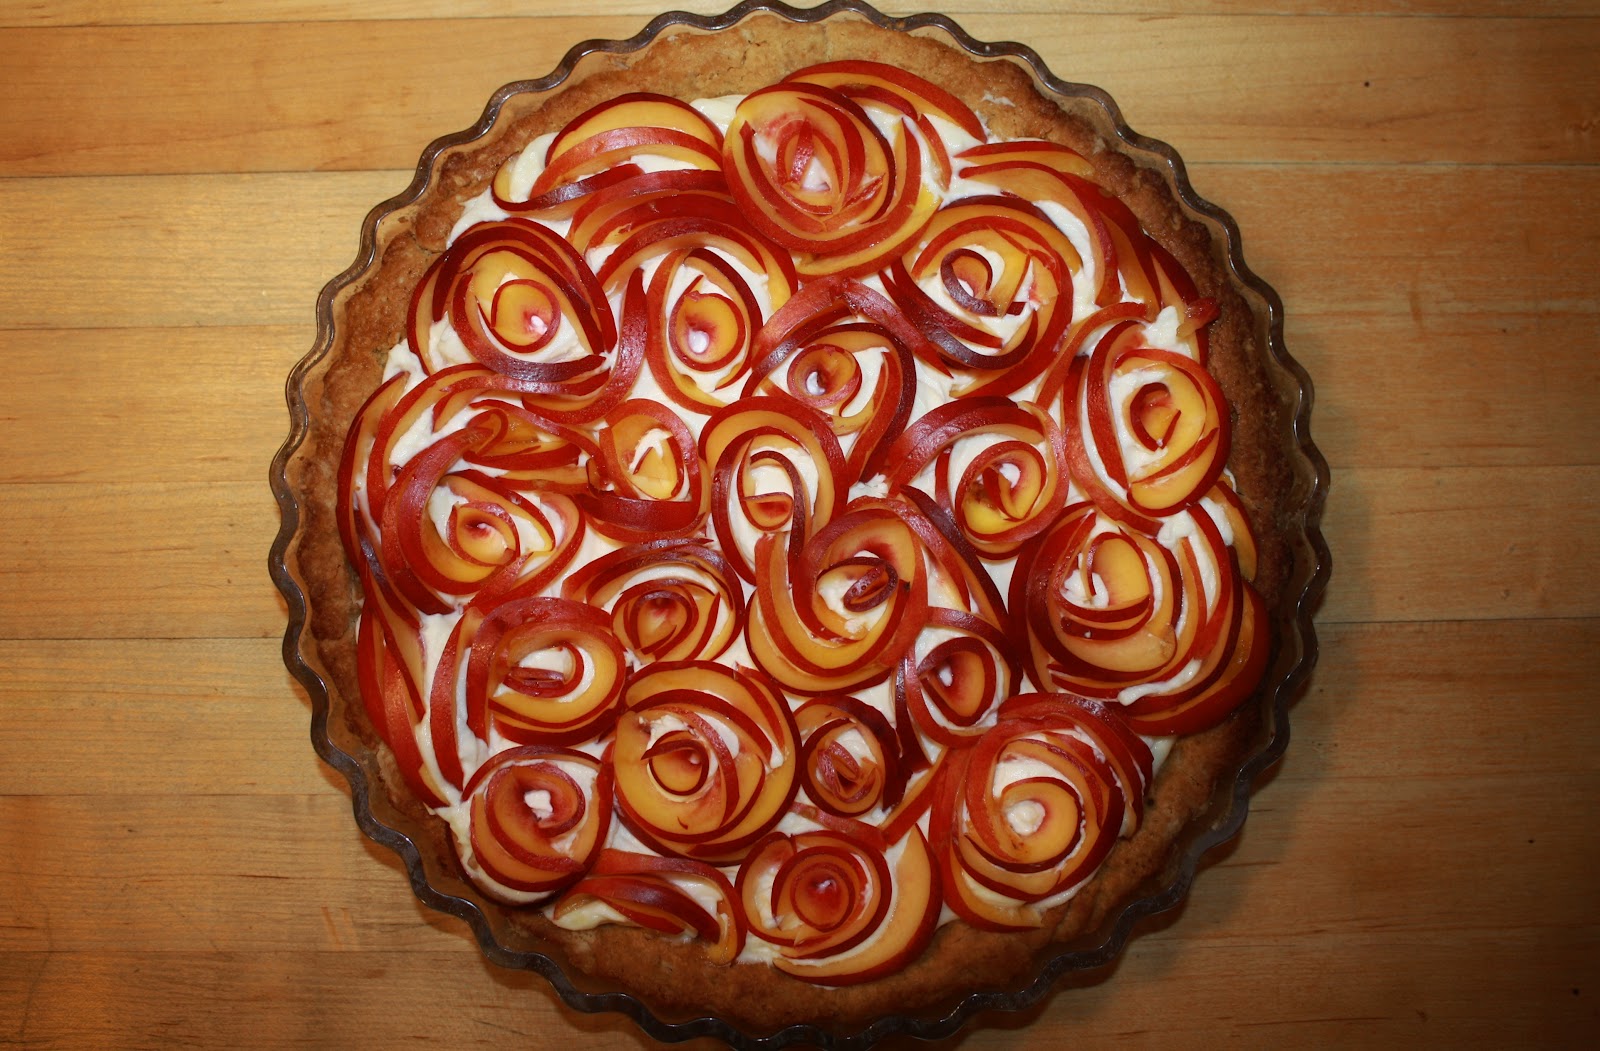
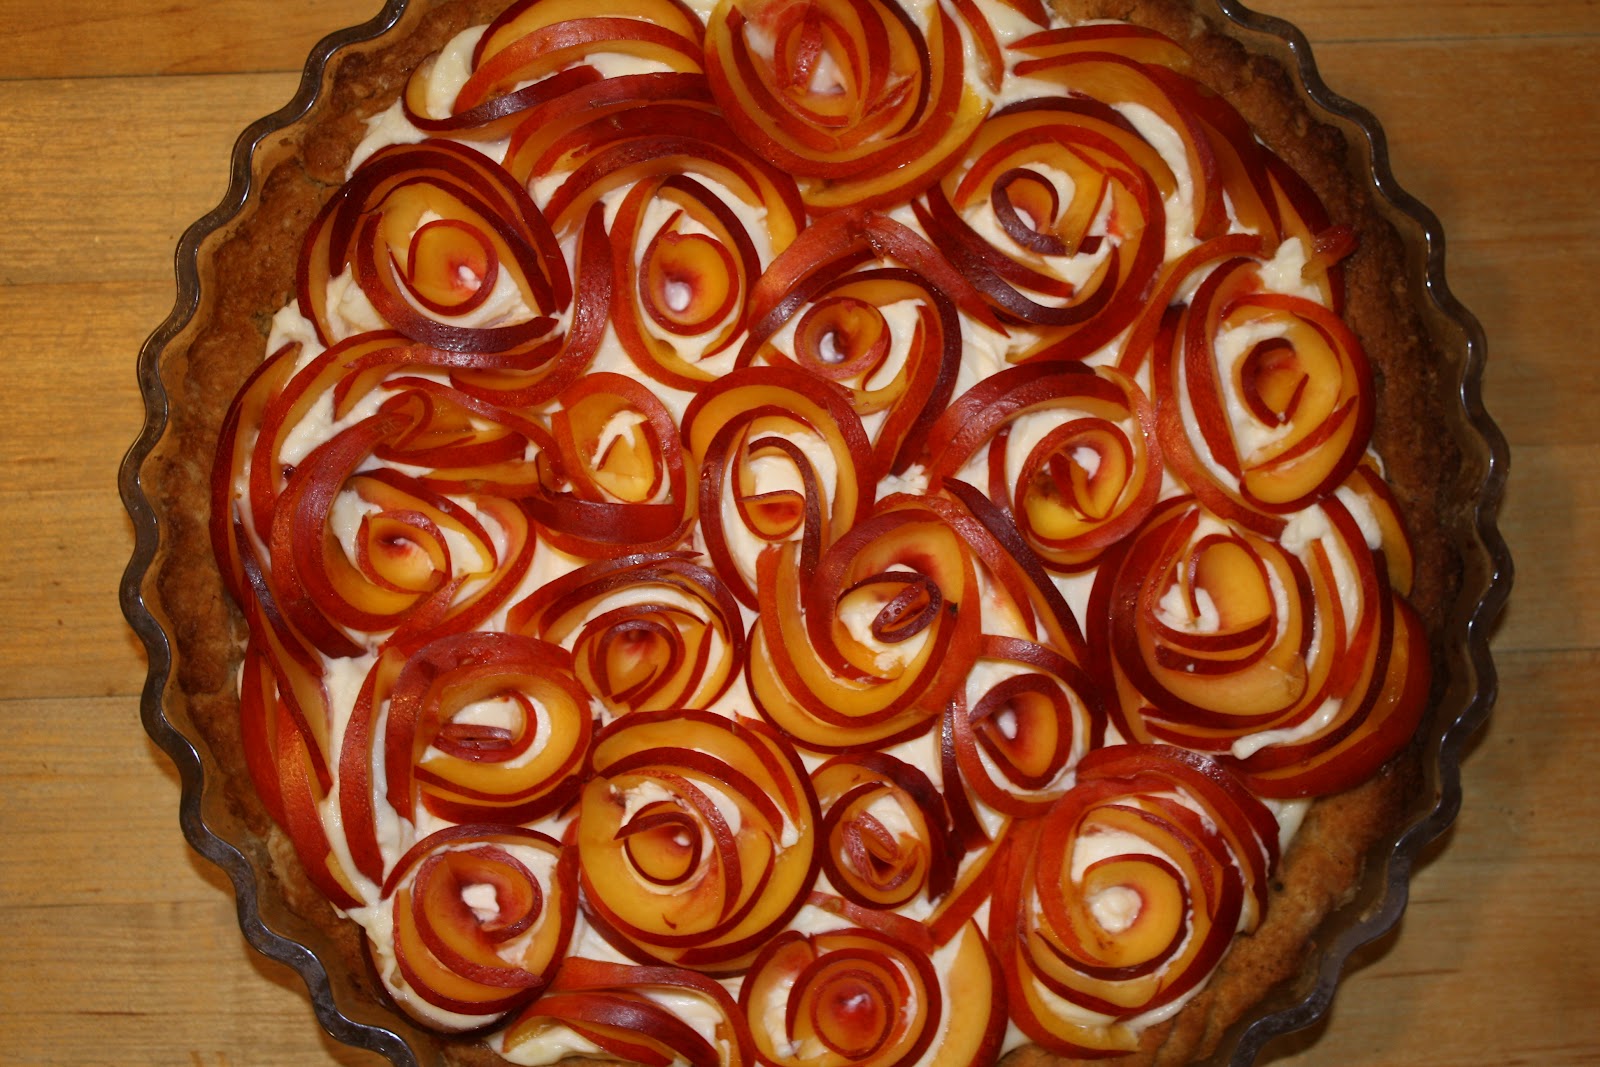
There was this (pin-happy) celebration of 100 posts, an ombréed, OCD tart filled with all of the sweetest, ripest stone fruits I could find.
Or this giant slab pie, perfect for feeding a crowd, complete with an utterly absorbing, fun-to-make lattice and homemade vanilla ice cream (le duh).
This simple peach tart, made and shot quickly.  Very much a throw-together tart, skin-on, that comes out as a whole much greater than the sum of its parts.
This old (old!) rendition of Cook’s Illustrated’s perfect peach pie.  It was delicious, but still didn’t manage to convince me that peeling peaches for pie is utterly necessary (such a headache!).

So… This is not very many posts, seeing as I’ve racked up nearly 250 over the lifespan of the blog.  Eeep!

Seriously Easy Stone Fruit Tart | La Pêche Fraîche

I don’t quite have enough of my own links to really devote a link-love post to stone fruit, but fear not!
I have compiled a few absolutely mouthwatering peachy bits and bobs from around the blogosphere.

Let’s start with the unfairness that is Laura’s glut of peaches, no?
*Pouts* whyyyyyy don’t I have such beautiful peach trees bursting with life around me?!  Add to those ripe peaches her maple coconut granola and that right there is a proper summer breakfast.

More elegant simplicity with the seasonal fruits: Kristin’s olive oil pound cake, tinged with citrus and served simply with fresh peaches and coconut whipped cream is a dream come true.

Uggghhh. Slay me, Michelle.
Bourbon + brown sugar + peach pie.  Give me the pie and 5 minutes and you will regret giving me the pie at all.
That thang is a work of beauty right there.

More bourbon + peaches, with brown butter and maple and melty vanilla ice cream, too.
Alanna always has the best photographs.
These in particular left me salivating and wondering why in the heck I haven’t made a thousand crisps and eaten them all hot with cold ice cream.  This must change.

Be still my beating heart.
Custard cakes have been on my mind (read: pinboards) lately.
Then Sam went and added ripe, custardy in their own right apricots and my world turned upside down.
OMG. That vanilla bean custard layer…
(P.S. Can’t wait for that prune cake.  I looove prunes.)

Seriously Easy Stone Fruit Tart | La Pêche Fraîche

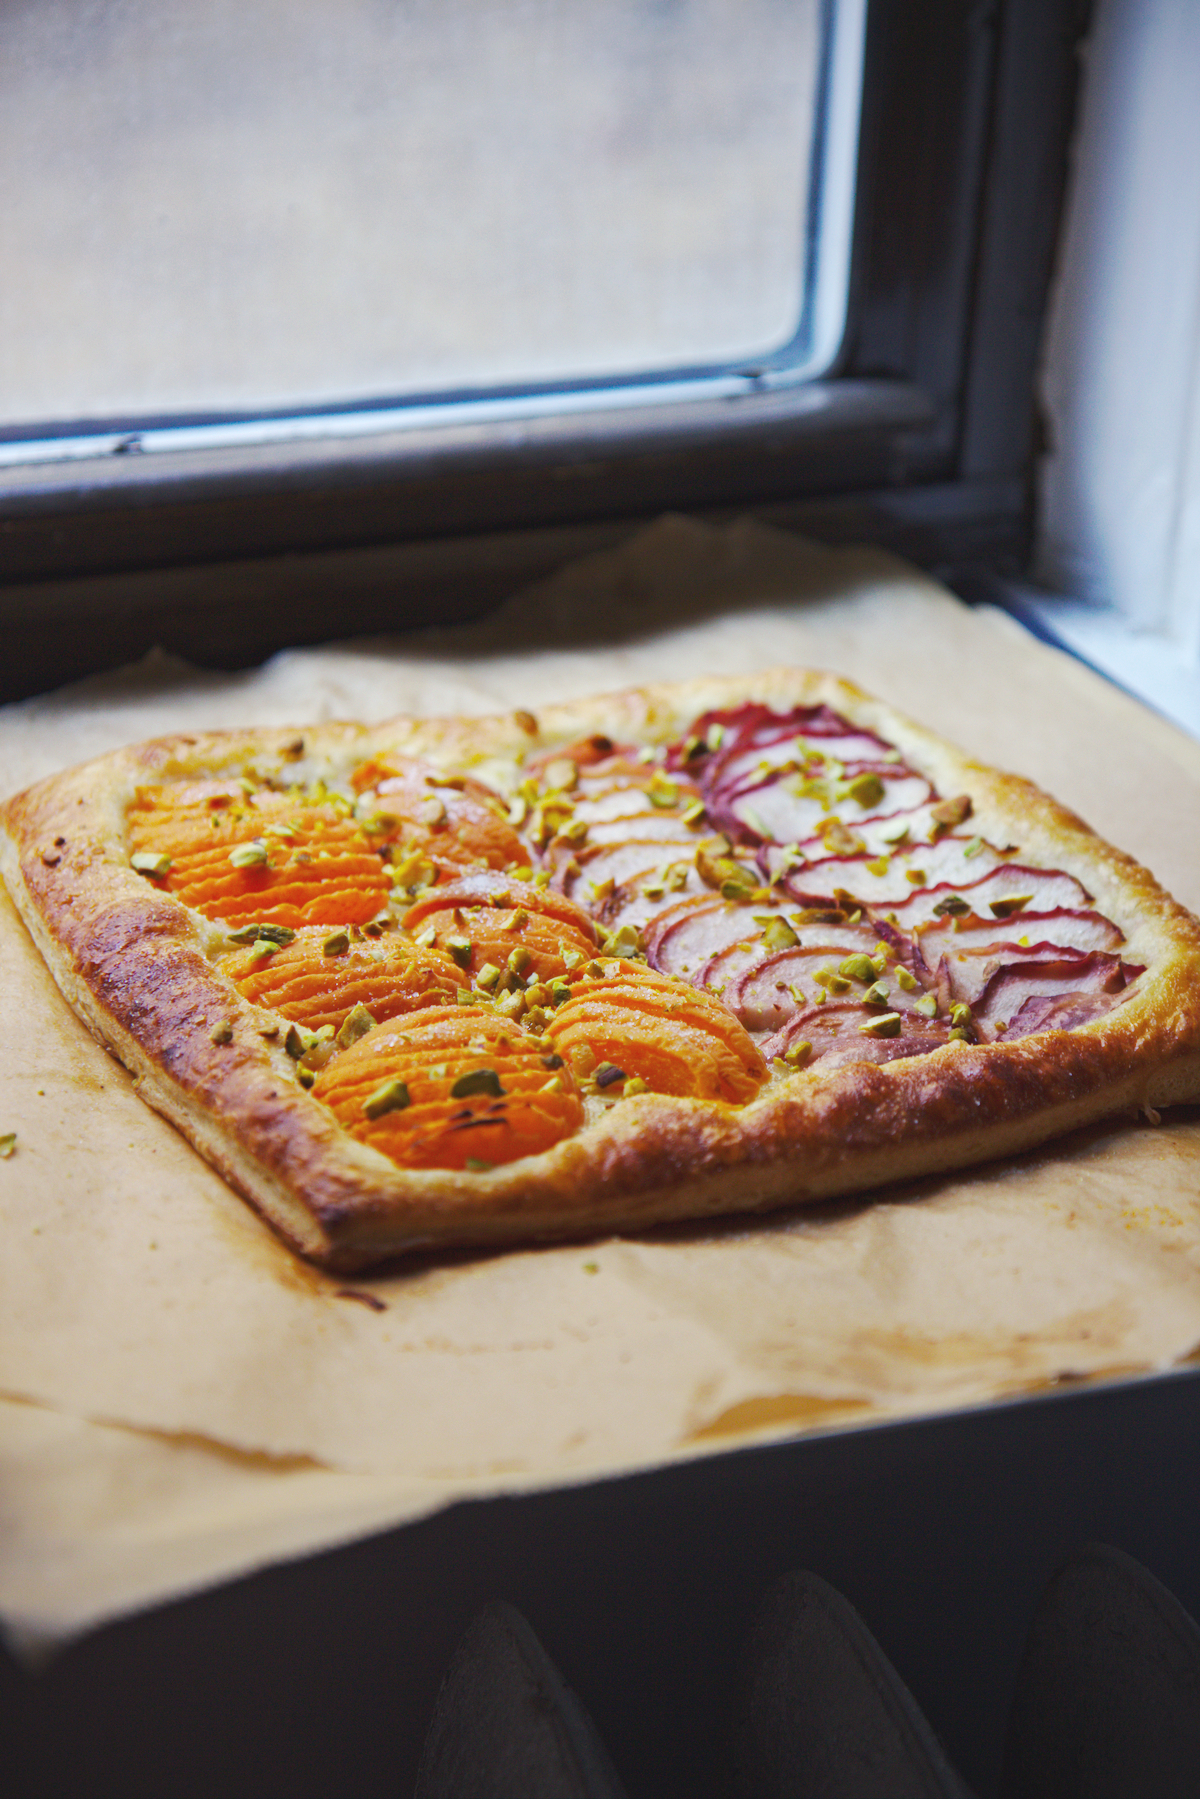
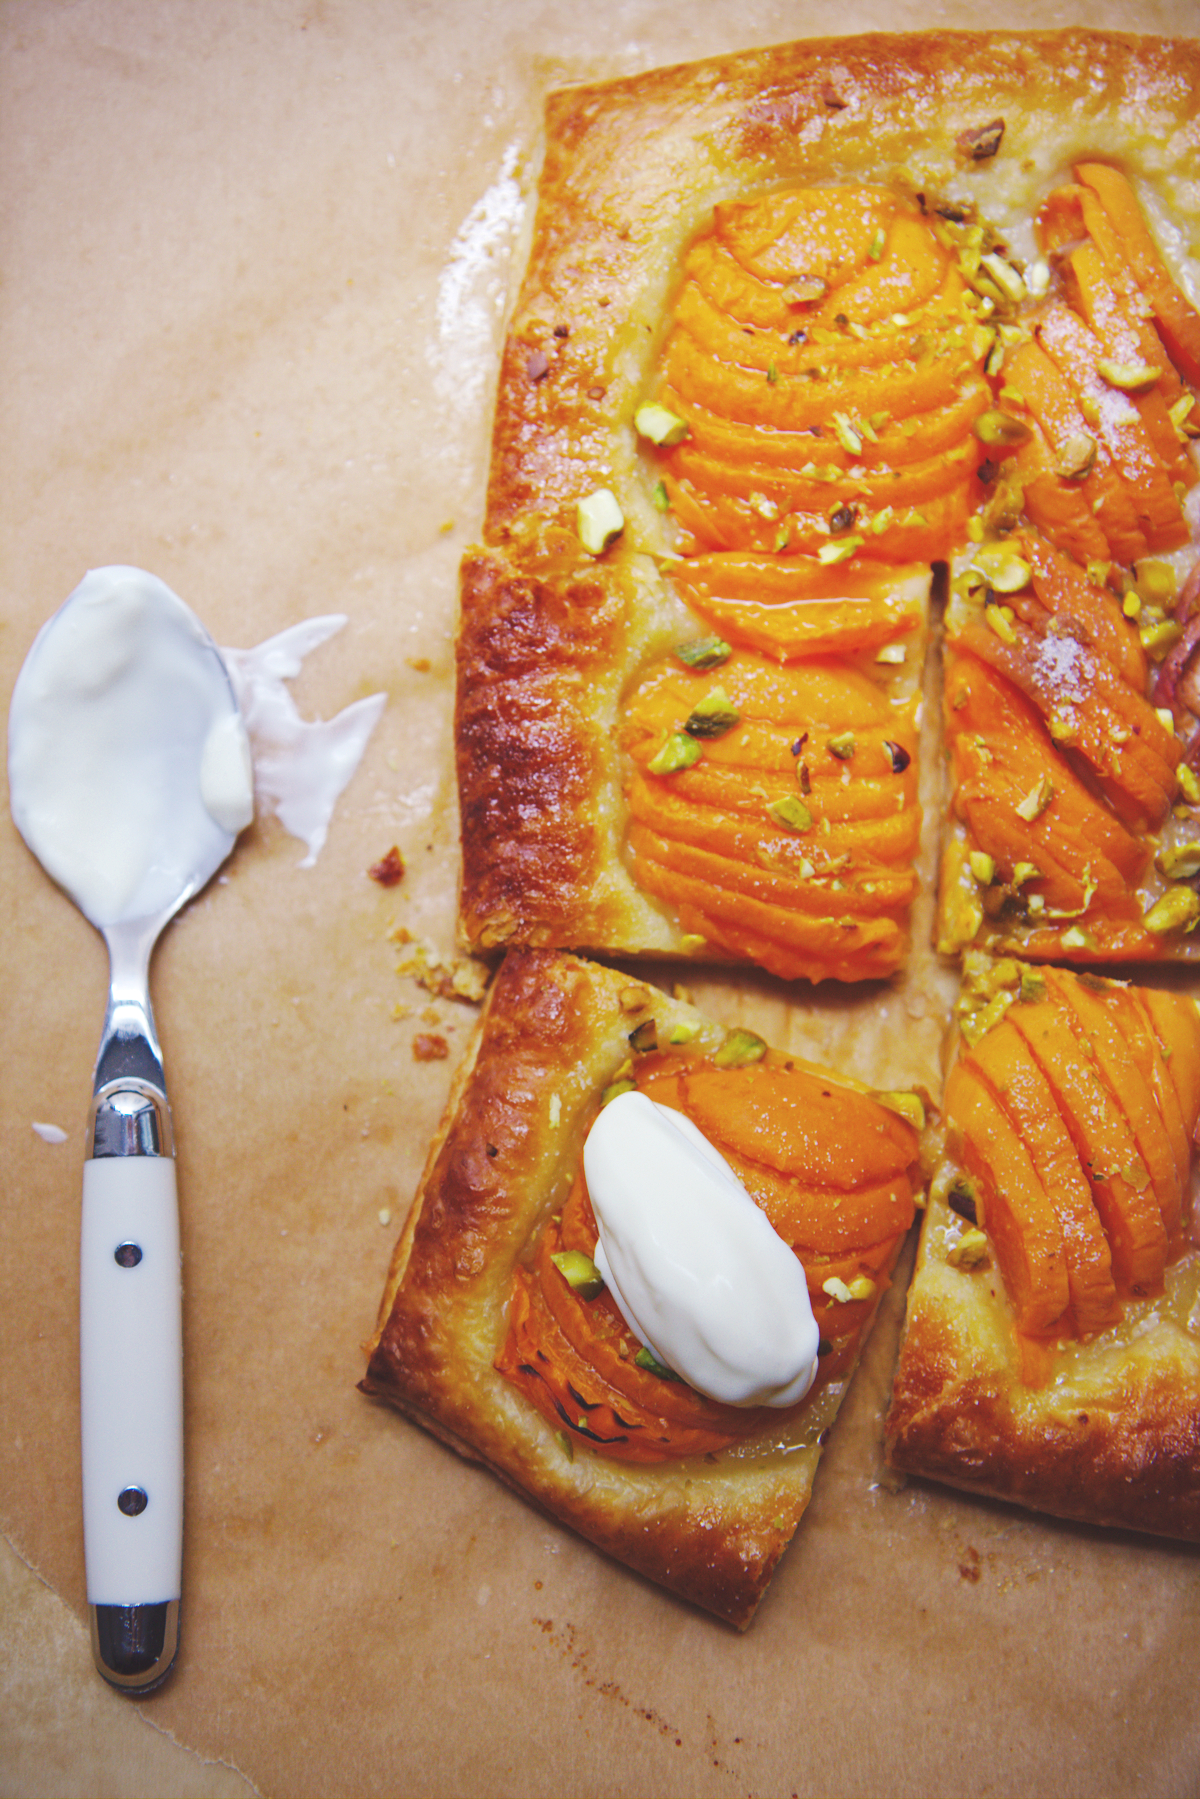
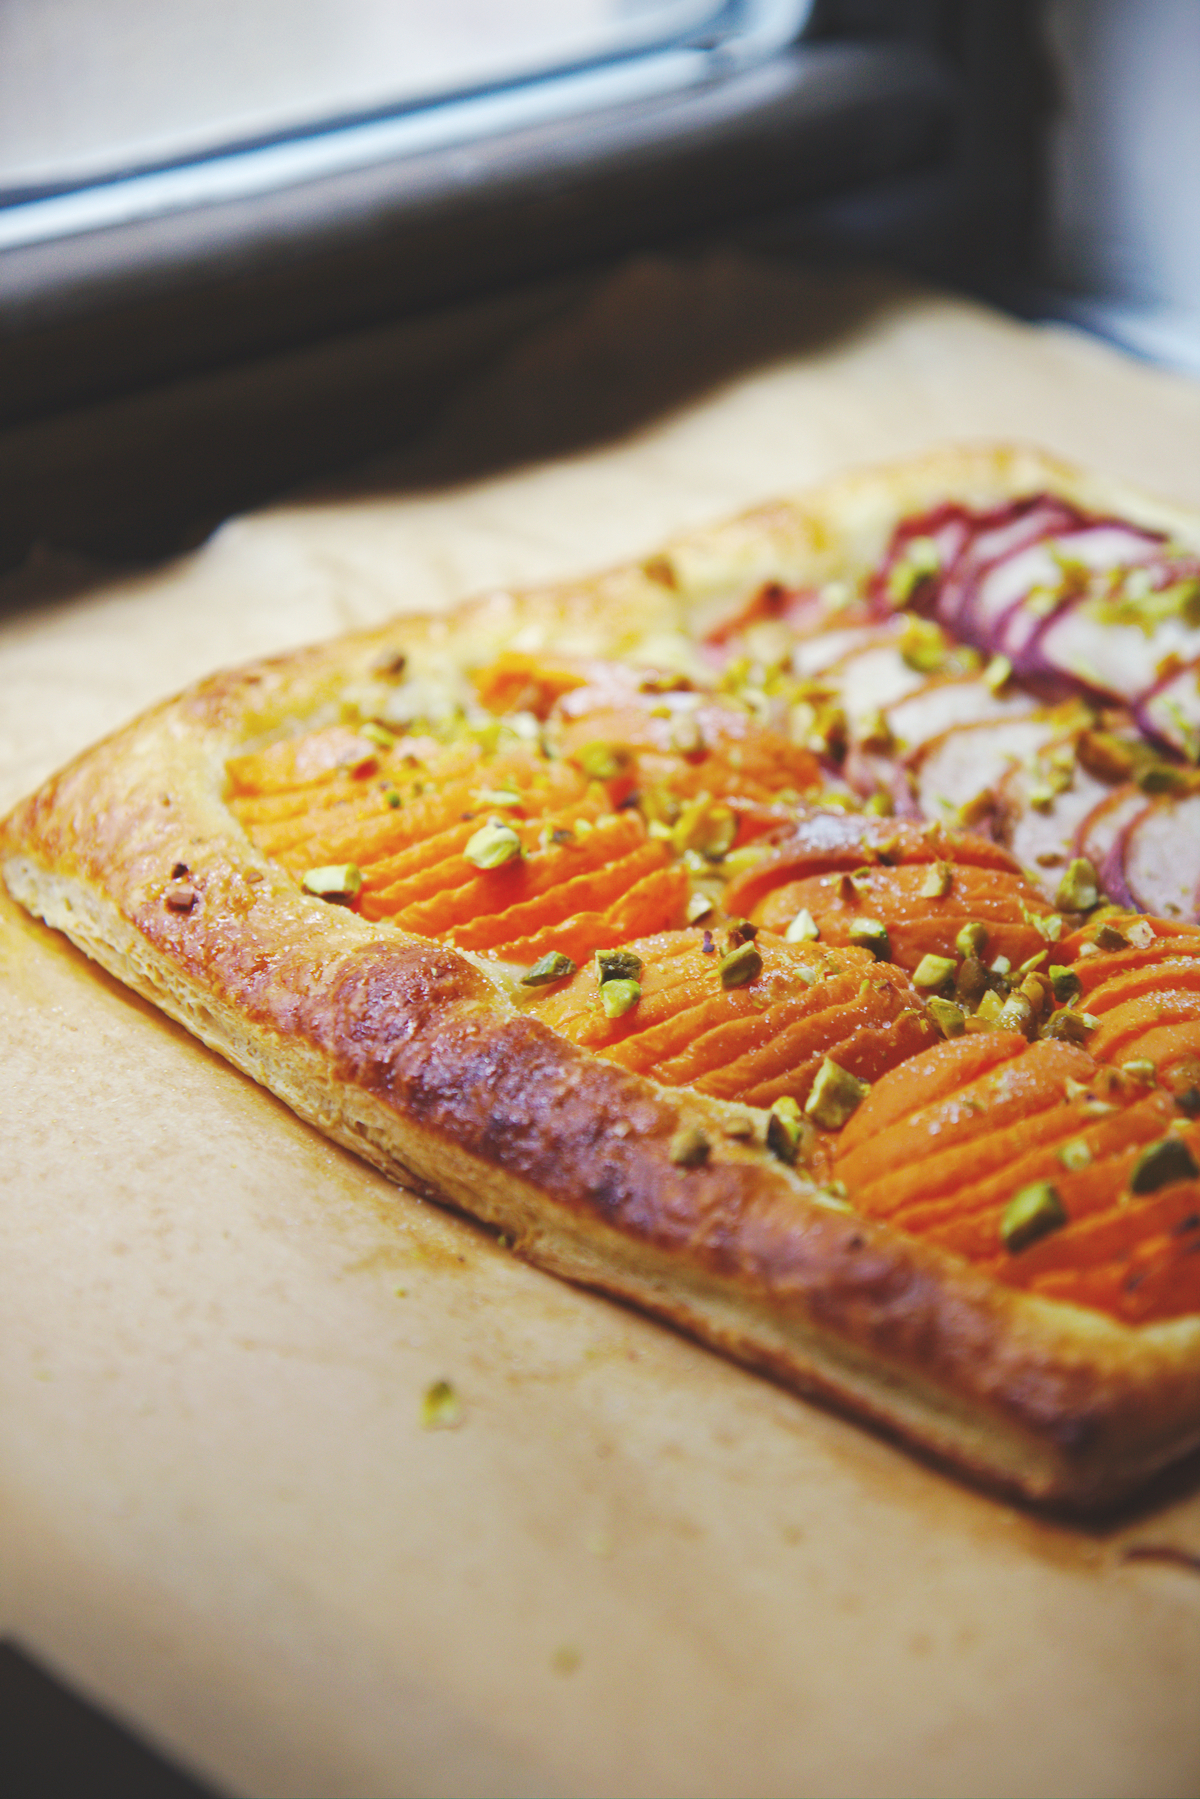
Today, I’m sharing a cheater’s simple stone fruit tart with you without a modicum of shame.
Yep, I used purchased puff pastry for the first time.  And its convenience and dependability were awesome.
No fuss, stupid fast, beautiful, tasty, and simple.

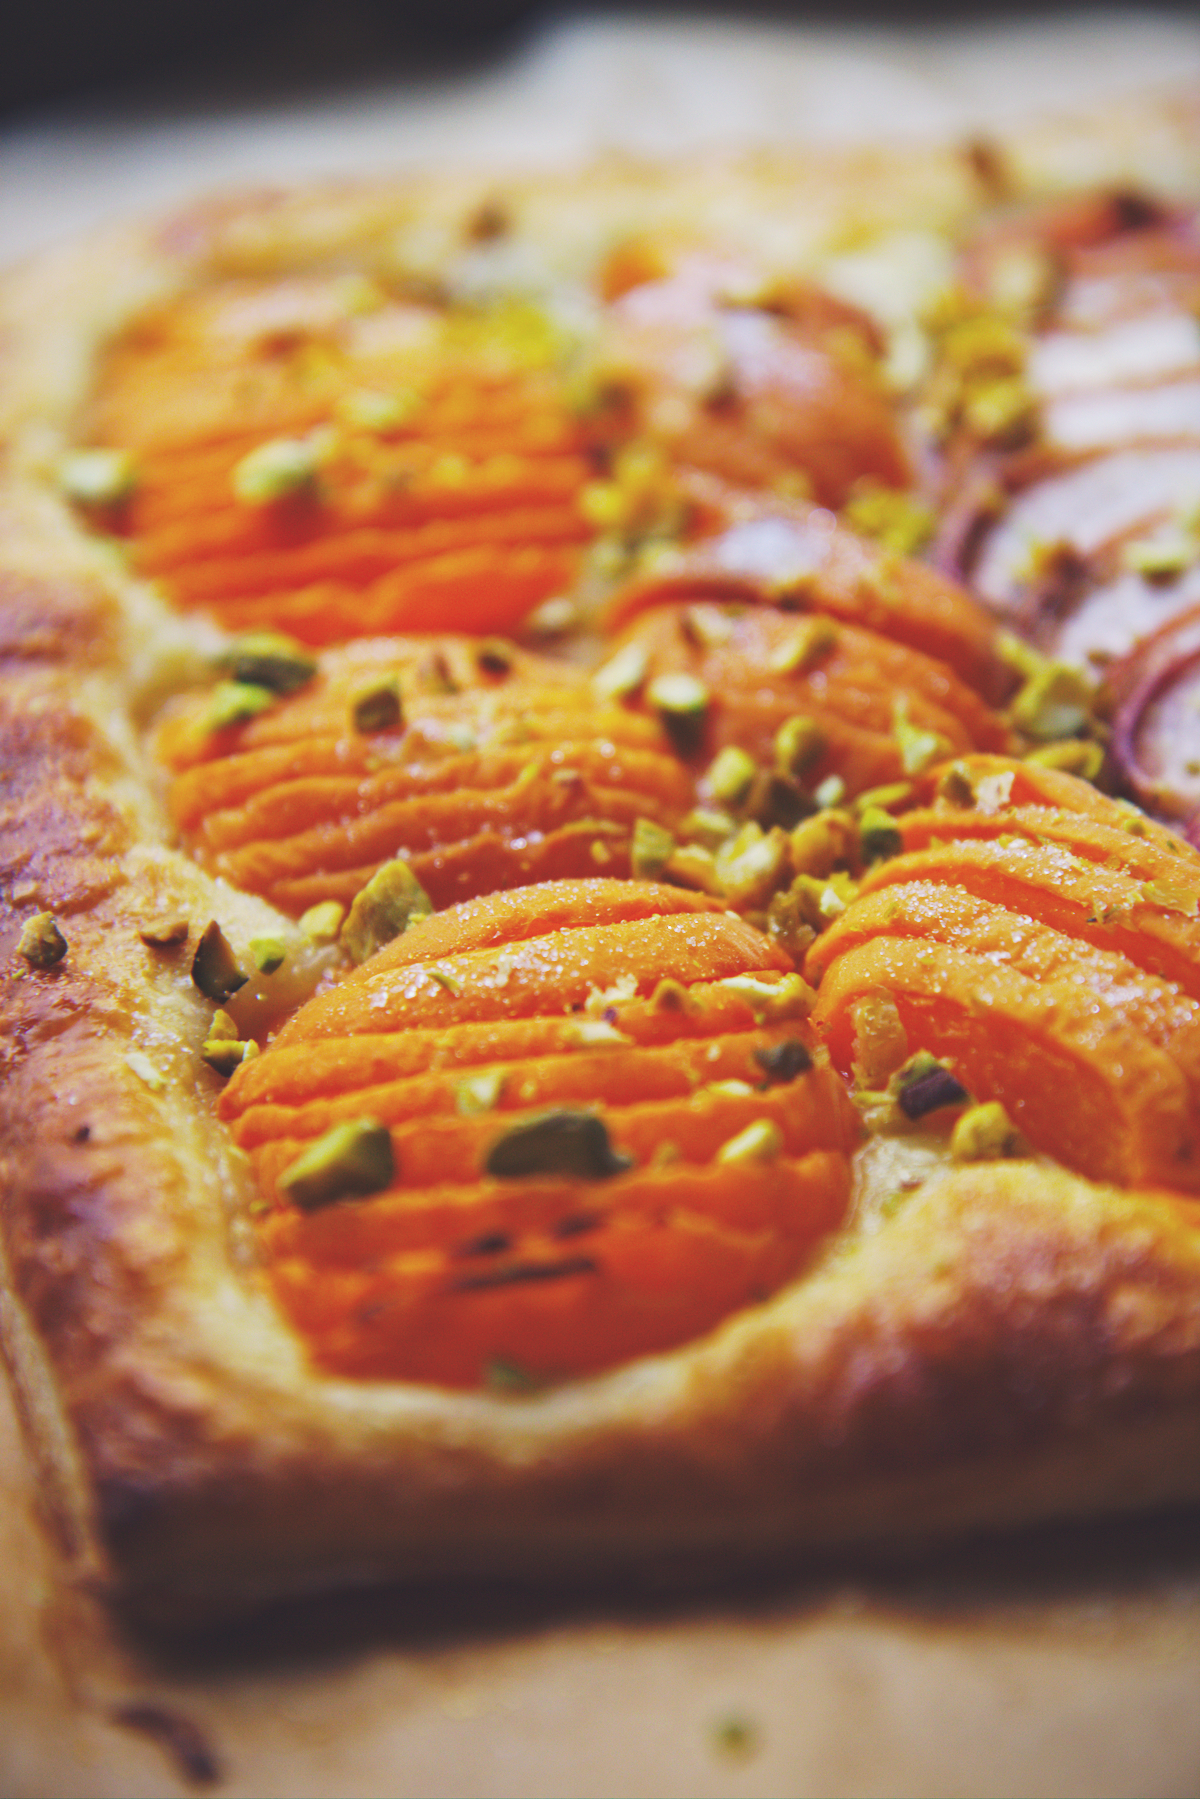
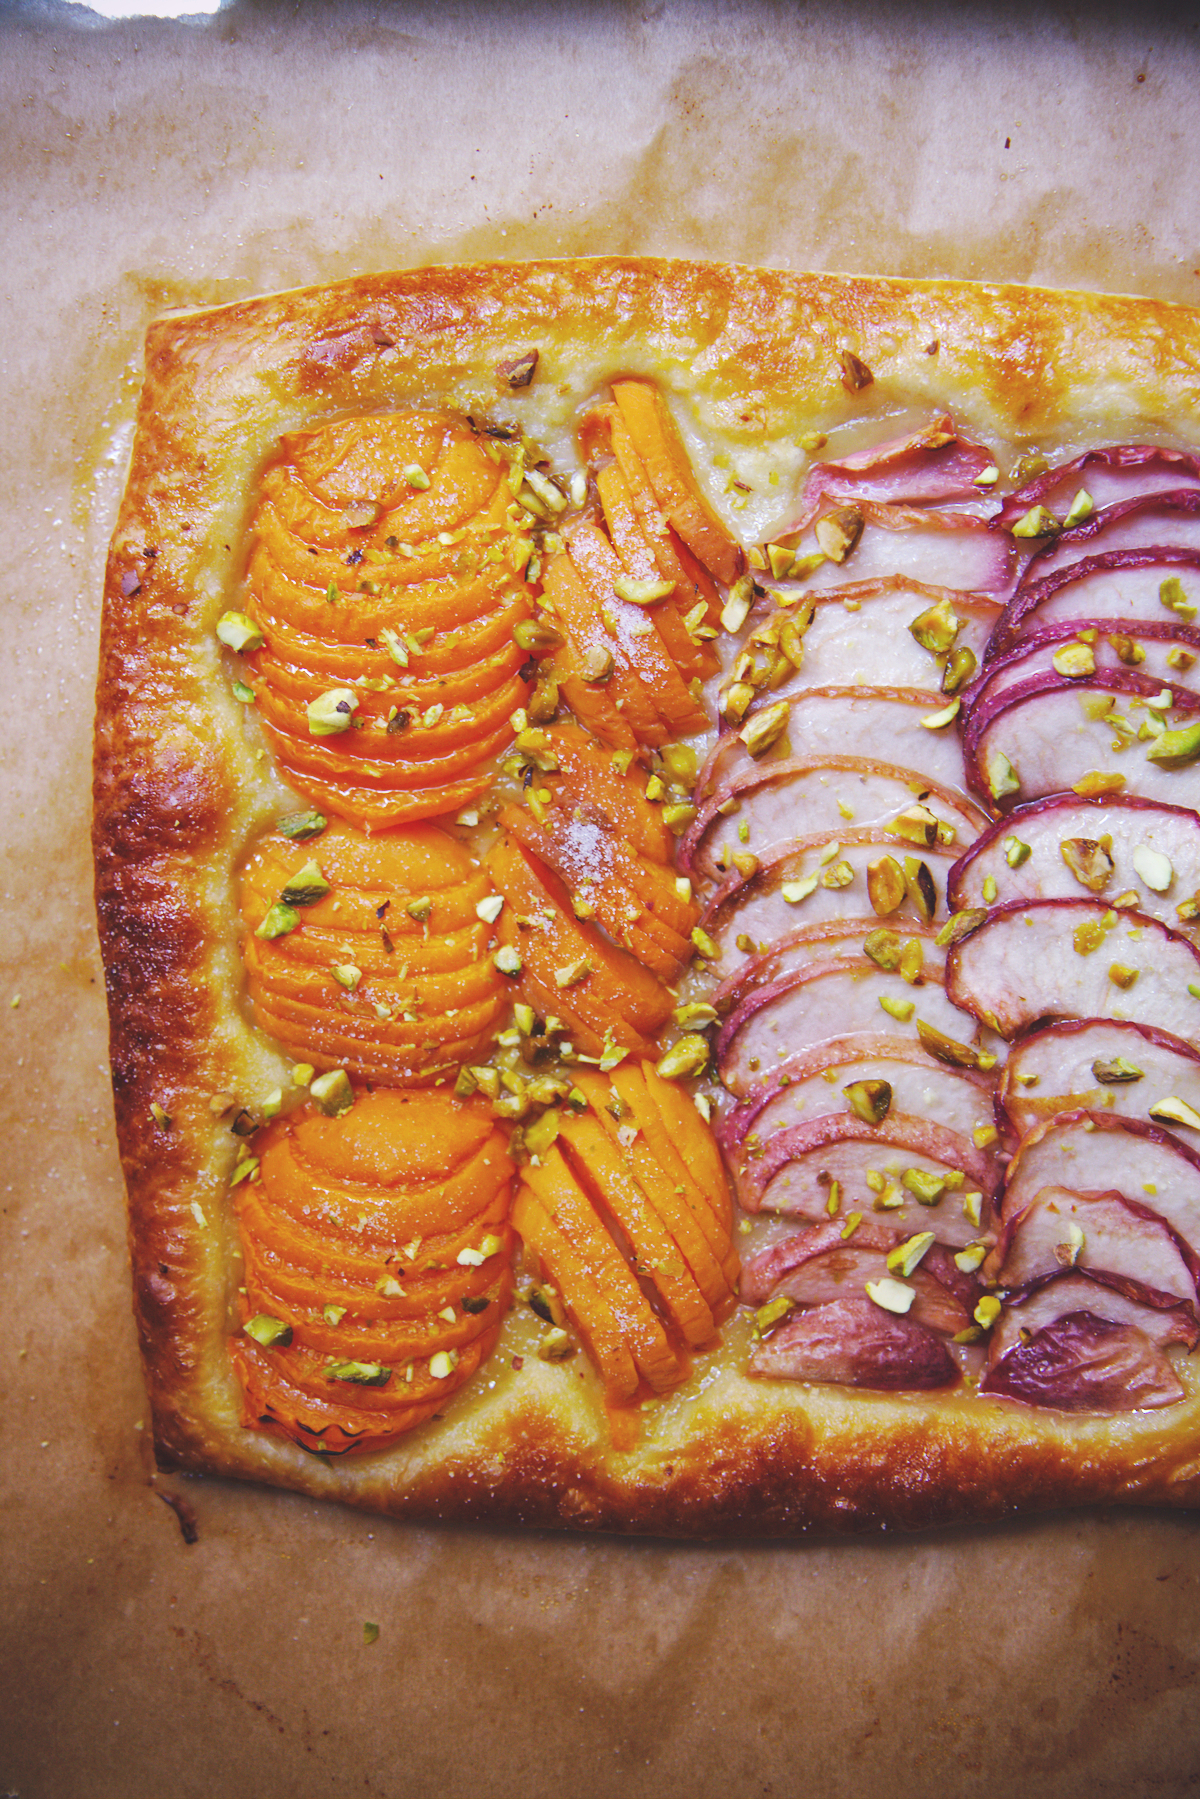
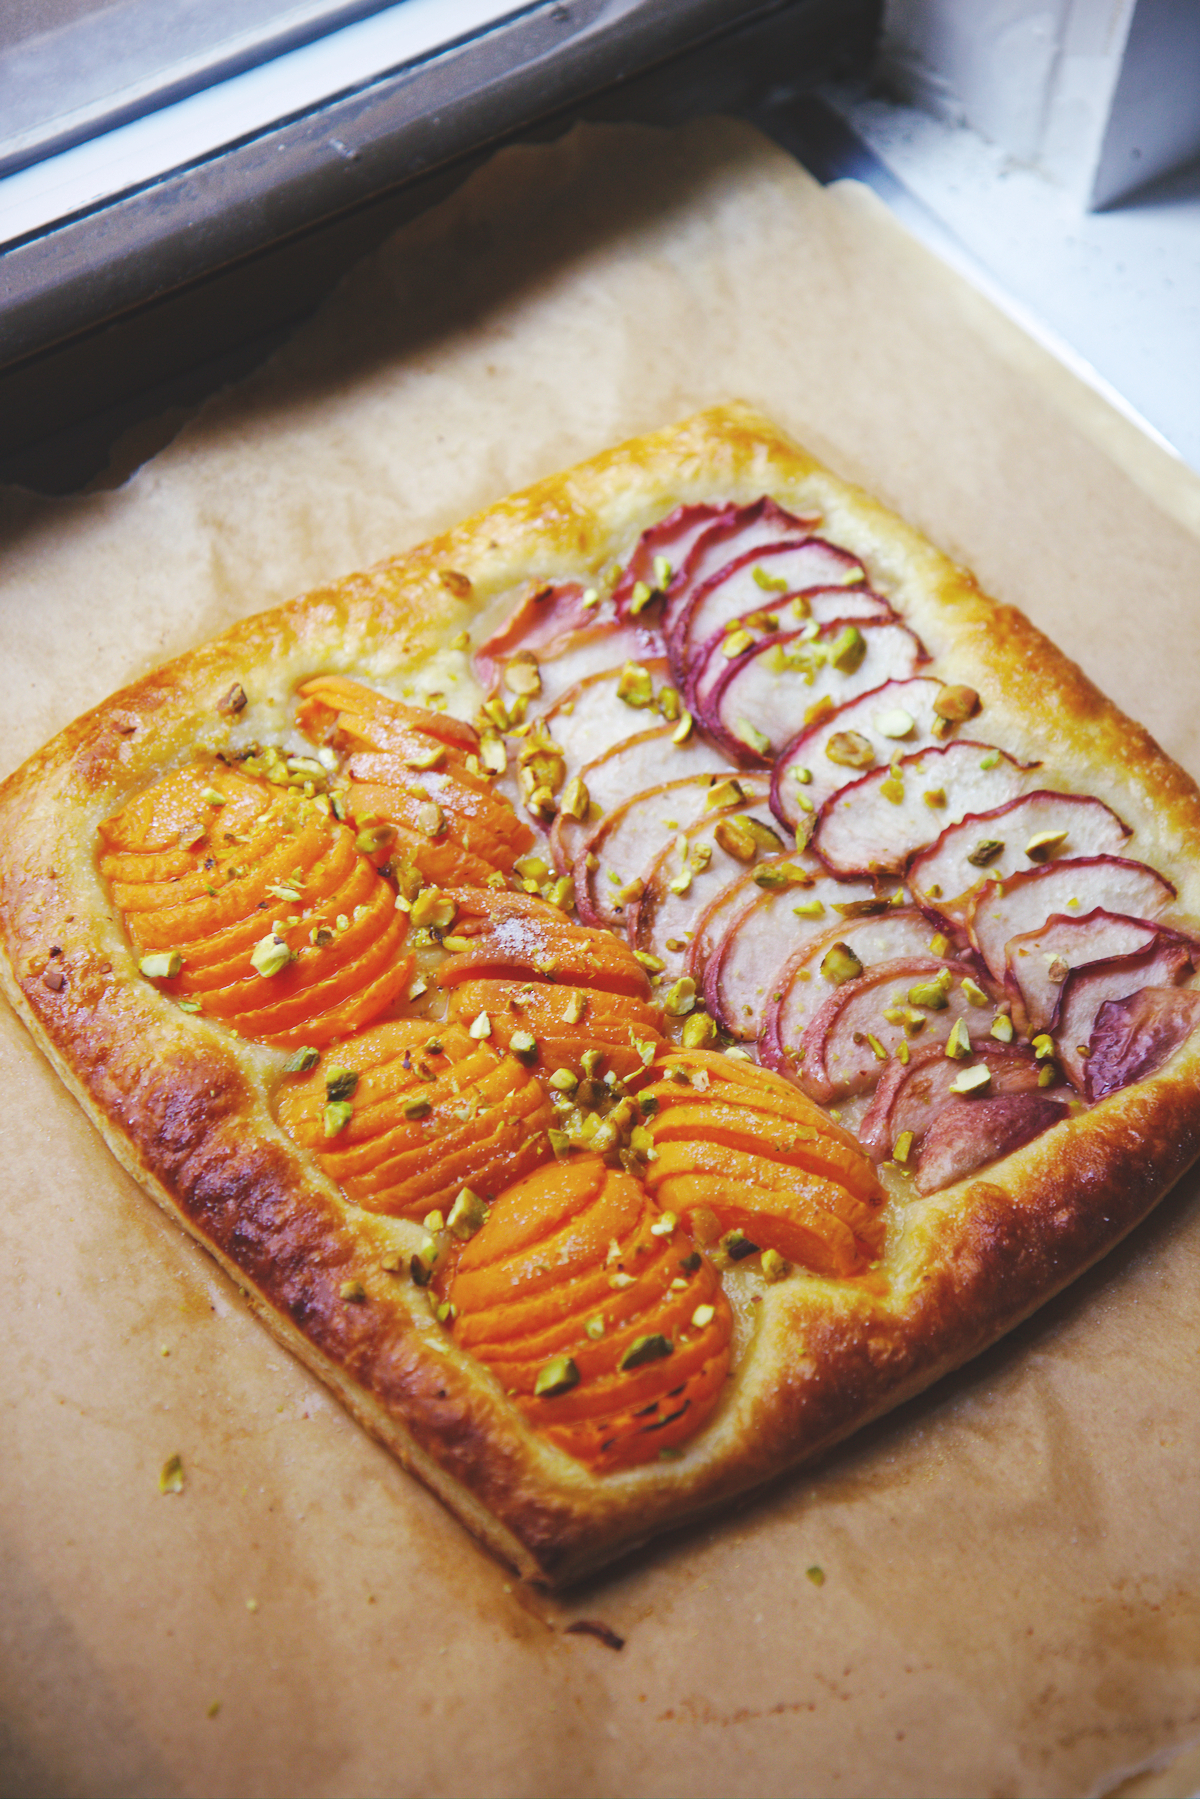
5 ingredients, if you count the egg wash and pistachio garnish.
If you thaw your puff pastry the night before, you can have this beauty on your table in 25 minutes flat.
This really lets the fruit shine—there’s virtually no added sugar or other ingredients to distract.

For this reason, it’s vital to choose ripe fruits—a little bruise or droopy skin here or there is a-OK.
It will intensify the flavors of the tart.

If you find yourself in a situation where you need a quick, sweet and fruity fix, or you want a fool-proof yet impressive dessert to serve to friends, or you have some droopy, slightly sad little drupes that are a day away from necessitating jam, this is the recipe to reach for.

Infinitely adaptable.  Unendingly forgiving.

Seriously Easy Stone Fruit Tart | La Pêche Fraîche

You can use any stone fruit or sliceable fruit that you wish, really: plums, apples, dry pears, peaches, apricots, nectarines, pluots, cherries… all fair game.
Nothing too juicy or acidic, and you’re pretty much set.

The (store-bought!) puff pastry rises up, golden and shiny, in the oven; the weight of the fruit prevents it from getting too airy, which allows for a sturdy crust that can be eaten by hand.
The fruit becomes syrupy in the hot oven, bathing itself in sweet, sticky juice.
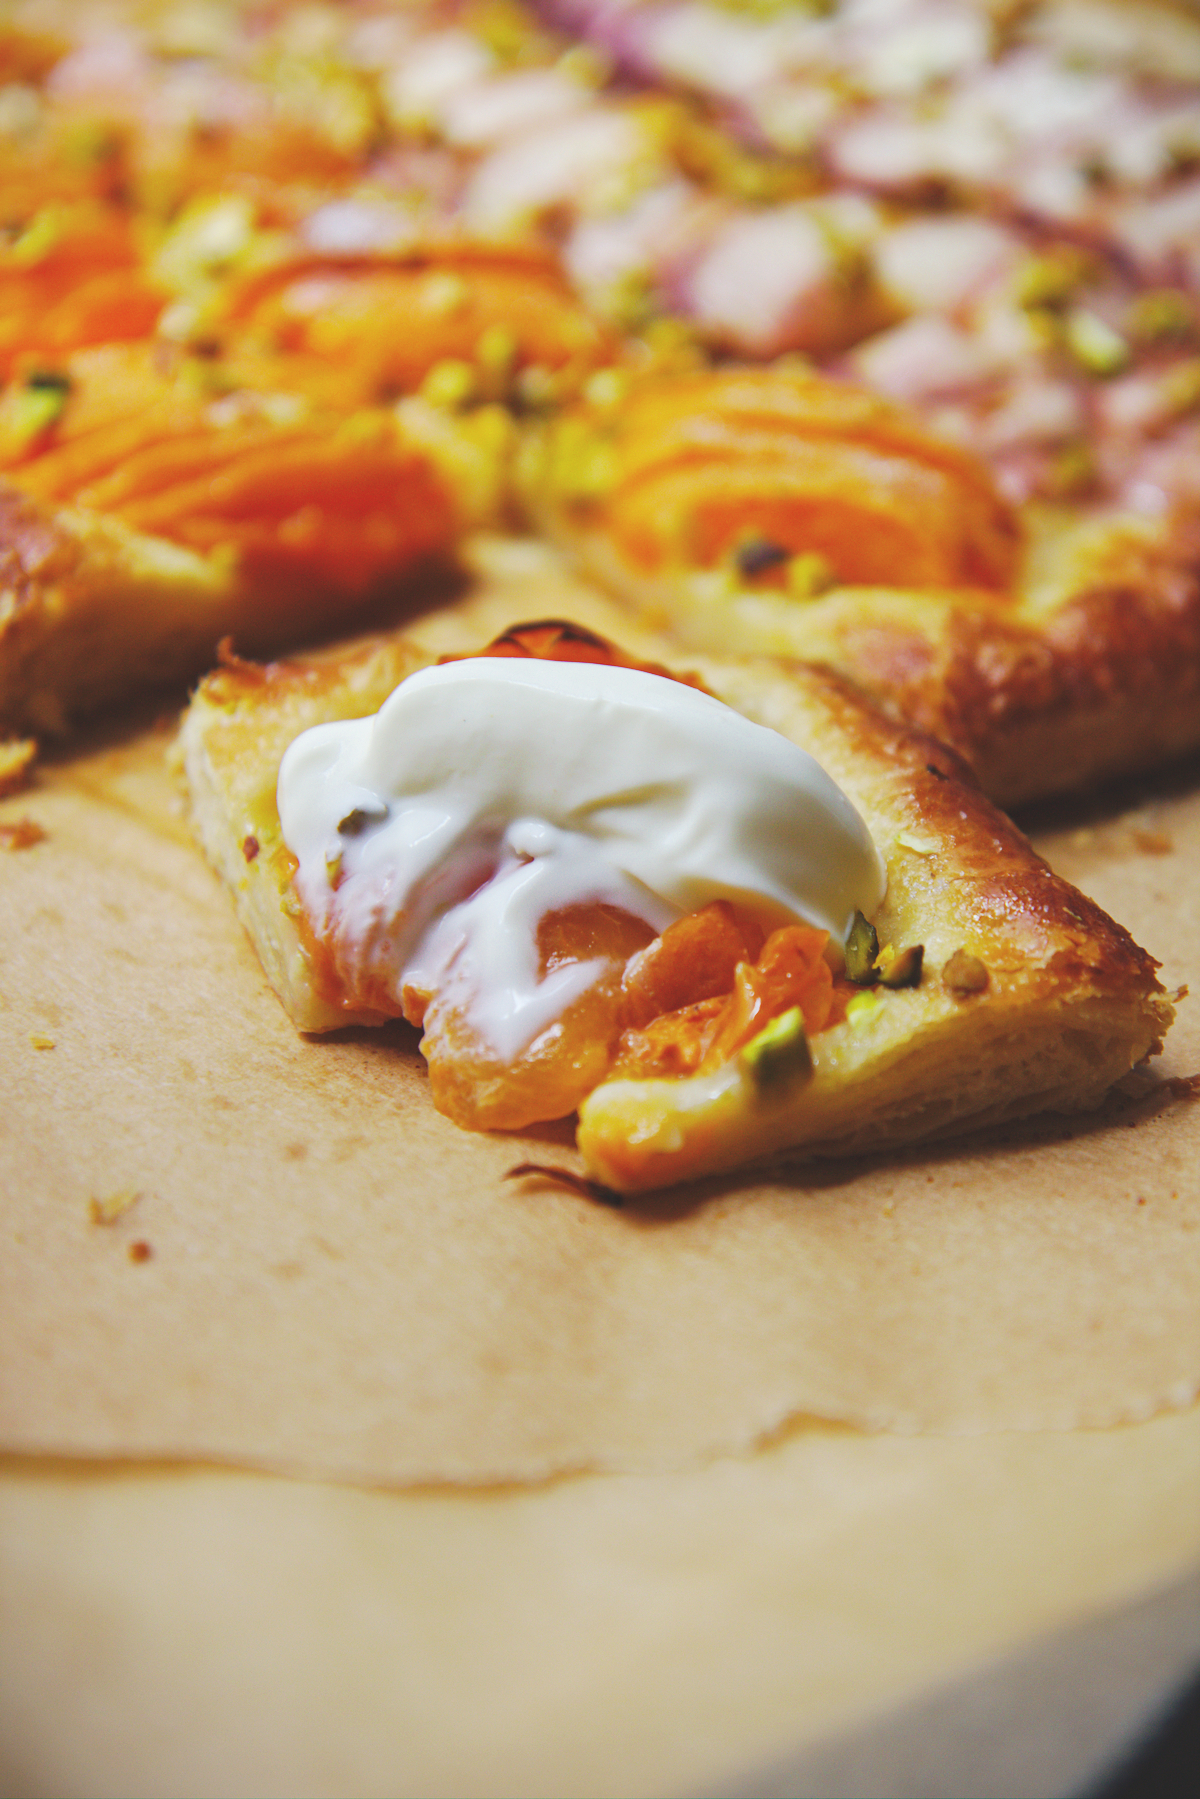
A smattering of pistachios provides crunch, and a cool, creamy dollop of crème fraîche ties this simple summer treat together.

The tart comes out looking quite beautiful for the minimum amount of effort put in, with the bright, warm colors of the fruit foiled by green pistachios and pure, snow-white cream.

This, I think, is the definition of keeping it simple (stupid).
Don’t mess too much with perfectly ripe/slightly overripe summer fruit.
Let it pop against the backdrop of buttery pastry.
Highlight it only with a conservative touch of sugar and a few crunchy pistachios.
Indulge in a spoonful of cream to add richness and I think anyone would agree that this is a far more exciting use for droopy, tired fruits than jam…

Seriously Easy Stone Fruit Tart | La Pêche Fraîche

Seriously Easy Stone Fruit Tart
makes 1 10×10 tart

ingredients:
1 sheet all-butter puff pastry, thawed overnight in the fridge
4-6 pieces of very ripe stone fruit, of your choice, sliced thinly
1 egg beaten with 1 teaspoon water
3 tablespoons of sugar
2 tablespoons chopped pistachios
crème fraîche or vanilla ice cream or sour cream, for serving

directions:
Preheat oven to 400 degrees F.
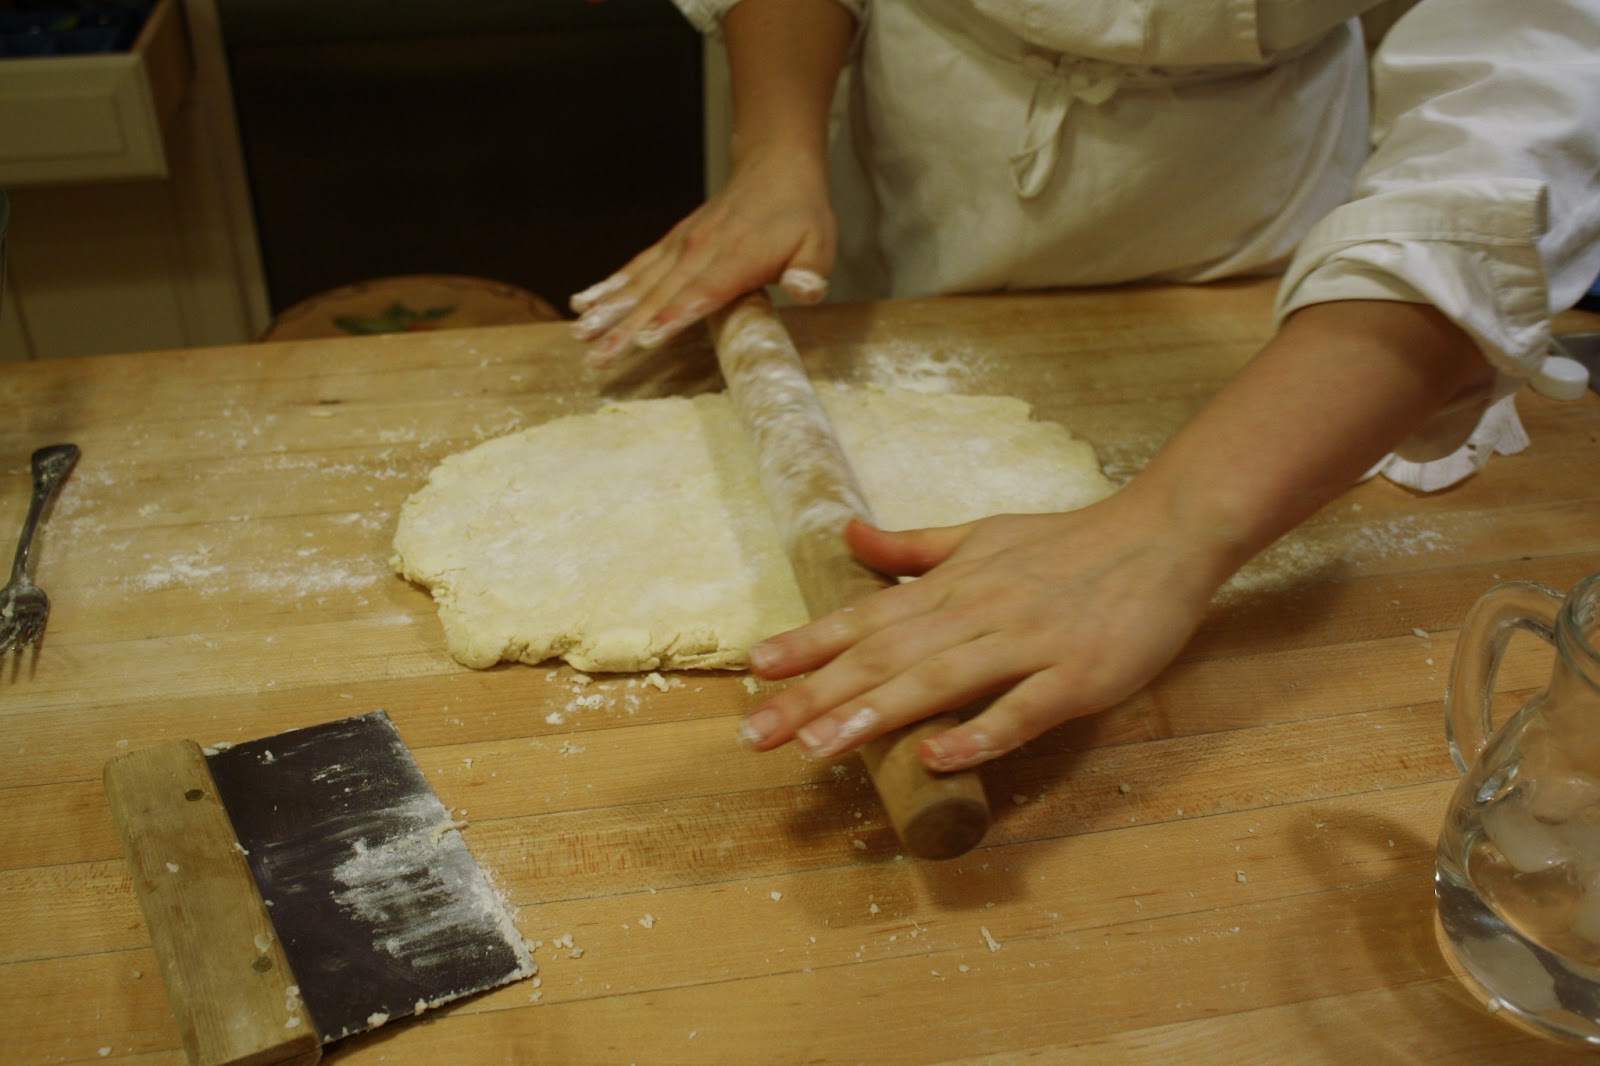
On a very lightly floured surface, gently roll out the puff pastry until it is approximately 11×11 inches.
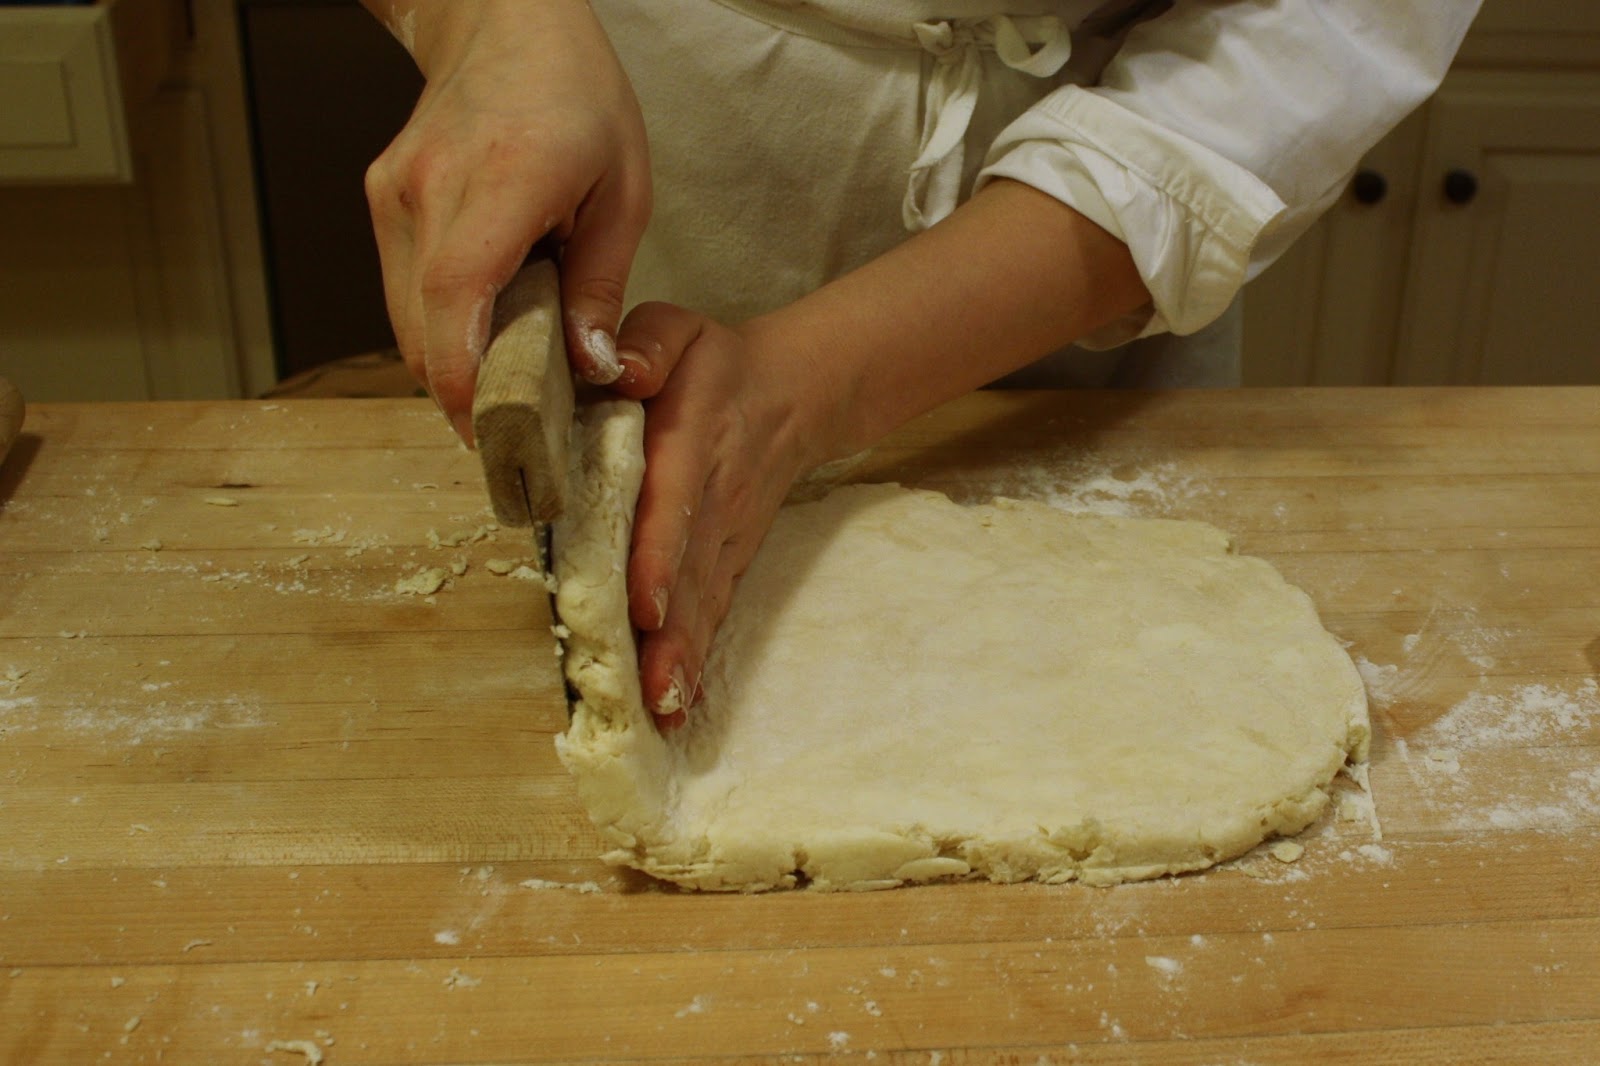
Trim the edges carefully , being sure not to rock the blade, to make an even square of 10×10.
Carefully transfer the puff to a baking sheet lined with parchment.
Brush an inch border with the egg wash, and lightly sprinkle 1 tablespoon over the center part of the pastry.
Carefully arrange your sliced fruit over the pastry.
Choose any design you like, but avoid layering one slice completely on top of another.
Sprinkle the tart with 1-2 more tablespoons of sugar, depending on how sweet your fruit is.
Pop in the oven for 25 minutes, until the crust is puffed and golden and the fruit is slumped and juicy.
Remove from oven and sprinkle with pistachios; serve warm with cold crème fraîche or vanilla ice cream.

Magic Dragon


There is indeed something magical about puff pastry’s exponential rise and versatility, but it’s no mystery.

 
As thin, thin sheets of butter (which is approximately 82% fat, protein, and other solids and therefore around 18% water), which are trapped between flour particles, are heated in a hot oven, the water evaporates quickly, causing the steam to lift the flour and create lovely, flaky layers.  


Puff pastry can be a beast to handle; much depends on the temperature of your butter and dough.
 
It is certainly a surmountable challenge; however, for less-experienced bakers, it can be extremely frustrating and time consuming.
Traditional puff pastry is made with a yeasted dough, which is laminated with a butter block.  
It takes a long time, and it can be hard to get just right.
 
Which is precisely why I decided to do this picture series/tutorial about blitz puff pastry.  
This recipe and technique is invaluable.  Definitely tuck it away in your brain for future uses.
It’s faster, easier, and, at least in my own experience, more idiot-proof reliable.
 

Flaky pastry enhances any dessert (Like… Duh?).

Turnovers?  Killer with this dough.  I made orange-chocolate ricotta turnovers which were a hit.
Vol-au-vent?  This dough is faster than traditional puff, and rises essentially as high.
Brie en croute?  Hello, the faster this gets into my mouth, the better.  Blitz pastry it is.
Anything en papillote?  Heck, why not?


Croissants?  Bear claws?  Elephant ears or palmiers?  Pain au chocolat? But of course… Recipes below.
The scraps never go to waste, either.  Just like with pie dough, if they are sprinkled with some cinnamon sugar and baked off, they become lovely little nuggets of sparkly, spicy gold.
The time you’ll save is worth the 1/8 inch loss of height that traditional puff gives you.

Still with me?  Salivating yet?

Let’s get started!


For the basic dough,

you’ll need to assemble:
16 ounces of cold unsalted butter
10 ounces of flour
10 ounces of ice cold water
1 tablespoon of sugar
1 teaspoon of sea salt

The tools you’ll need are:
a large, clean surface, like a well-scrubbed counter
a large bowl
a rolling pin
a bench scraper (not 100% necessary, but crazy helpful)
 Christmas-themed cling wrap (100% necessary)


Whisk your flour, salt, and sugar together in the large bowl with a fork.  
Break up any clumps.  
Dump all your cold butter onto the flour.  Toss to coat.


With clean hands, roughly flatten all of the cubes of butter.  
They do not have to be perfect sheets; that will happen in the next step.  They should just be roughly flat.


This is what your dough should look like thus far.  It’s not much of a dough, yet.  Just a bunch of flour-coated, flattened butter cubes.  (Yum…?)
Next up is the fraisage.  
Dump the contents of your bowl out onto your clean surface.  
Using the heel of your hand, gather the dough, then push forward and down firmly, so that your butter is smeared along the flour and other bits and bobs on the counter.  (Just kidding.  Because your counter is super clean, right?  Right?! Right!)
Continue to do so until virtually all of the butter has been sheeted even further and thinner than before.  
Your dough should not yet be cohesive, but rather shaggy and ugly.
 

This is what your dough should now look like.  
Make a well in the center and pour in some water.  
Knead lightly with your hands, using a bench scraper to help fold the dough over itself.  
Continue to add water until your dough just barely comes together in a shaggy mess.  
Do not add so much that it becomes slimy, but add enough that it is no longer crumbly.  
This is a variable amount; you may need slightly more or less than 10 ounces of water.  That’s okay.  Ingredients and environments differ, and that’s what affects this measurement.

Finished adding water.  Cohesive, still shaggy, but stays together.

Next, roll out your dough to about a 3/4- 1 inch thickness, in the shape of a rough rectangle (not triangle, which is what I just wrote).  

Fold your dough in thirds, like a business letter.  
Wrap in plastic and stick in the fridge for 15 minutes.


After your dough has chilled out, take it out and roll it into another rectangle.  
You can see the dimensions of mine in the above picture; it should be 1/2 inch thick and the rectangle should be relatively even in size.

Next, do a double book turn.  Visually divide your rectangle in half, then divide each half into two.  You are going to fold it in quarters, but first fold the outer flaps in, to meet the center, then fold the flaps created by that fold onto each other, like a book.
Christina Tosi describes it by putting her arms out straight, folding in at the elbows, then folding the elbows together.  
After one double book turn, stick the dough in the fridge for 15-30 minutes.  

Do two more double book turns, rolling the dough out to 1/2 inch thick between each one.
After your third double book turn, your dough is ready to be used!  
You did it! Now you can make all sorts of delicacies with it!

In general, to use your puff pastry, you will need to roll it out to a tiny bit more than 1/8 inch thickness.  
When you cut it, never twist your cutters or knife- just like making biscuits.  
If you do so, the layers of flour may fuse together on one side, causing uneven rising.
Don’t re-roll scraps.  Just try to minimize them.

Blitz Puff Pastry
proportions from the godly Stella Parks, technique is my own, bastardized from many sources, including Christina Tosi
ingredients:
16 ounces cold cubed butter
10 ounces ice water
10 ounces flour
1 tablespoon sugar
1 teaspoon sea salt
directions:
  1. Whisk your flour, salt, and sugar together in the large bowl with a fork.  Break up any clumps.  Dump all your cold butter onto the flour.  Toss to coat.
  2. With clean hands, roughly flatten all of the cubes of butter.  They do not have to be perfect sheets; that will happen in the next step.  They should just be roughly flat.
  3. Dump the contents of your bowl out onto your clean surface.  Using the heel of your hand, gather the dough, then push forward and down firmly, so that your butter is smeared along the flour and other bits and bobs on the counter.
  4. Continue to do so until virtually all of the butter has been sheeted even further and thinner than before.  Your dough should not yet be cohesive.
  5. Roll out your dough to about a 3/4- 1 inch thickness, in the shape of a rough rectangle.
  6. Fold your dough in thirds, like a business letter.  
  7. Wrap in plastic and stick in the fridge for 15 minutes.
  8. After your dough has chilled out, take it out and roll it into another rectangle; it should be 1/2 inch thick and the rectangle should be relatively even in size.
  9. Next, do a double book turn.  Visually divide your rectangle in half, then divide each half into two.  You are going to fold it in quarters, but first fold the outer flaps in, to meet the center, then fold the flaps created by that fold onto each other, like a book.  Christina Tosi describes it by putting her arms out straight, folding in at the elbows, then folding the elbows together.  
  10. After one double book turn, stick the dough in the fridge for 15-30 minutes.  
  11. Do two more double book turns, rolling the dough out to 1/2 inch thick between each one.  After your third double book turn, your dough is ready to be used.
  12.  In general, to use your puff pastry, you will need to roll it out to a tiny bit more than 1/8 inch thickness, before cutting it into desired shapes.  
Notes and ideas for use:
This puff can be used just like a regular puff pastry dough.  It is versatile and adapts to any shape.  Bake it at 375 degrees F, on good insulated pans.  If your pans are flimsy, use two stacked together.  The baking times I have provided are for very miniature pastries; if you make larger ones, the baking time will go up accordingly.  Puff pastry is very easy to change baking times with, because the only test of doneness is the color of the crust.  The pastries should be tanned and deep gold when you pull them out.  If you change the size, simply check the color of your pastries often after going past the times noted here and you will not have dried out or burned products, I promise.
Palmiers: 
Cut long strips of dough, about 3/16 of an inch wide and 5 or more inches long, and brush them with a little melted butter.  Sprinkle some cinnamon sugar on top, and roll from each end to create a swirl shape.  Bake until golden and sugar is caramelized, about 8 minutes depending on the size of your cookies.  Check early and often; sugar burns quickly.  If you cut the strips 3/4 of an inch wide, and roll from just one end, you can stick them in a mini muffin tin and make mini cinnamon rolls.
Croissants:
Cut isosceles triangles, about 3.5 inches wide and 6 inches high, and cut a small, 1/4 inch slit at the base.  Roll up the triangle starting at the wide end, shaping into a crescent once the dough is all rolled up.  Brush with egg wash (1 egg plus 1 teaspoon water), bake for about 14 minutes, until tanned; timing varies a lot with puff pastry depending on the size of your pastries, but it is easy to check doneness by color, as that is the main factor.
Bear Claws:
Mix 1/3 cup almond paste with 1 egg white, a sprinkle of cinnamon, and 1/4 cup powdered sugar until smooth.  Cut strips of pastry 2 inches wide and as long as possible, and fill with a thin coating of filling.  Roll, starting from the long sides, to make long filled logs.  Pinch the edges to seal, and flatten the logs.  Cut into 4 inch long pieces, and make notches 1/3 of the way into the dough to make “claws.”  Shape into crescents, with the claws pointing out, and brush with egg wash.  Sprinkle cinnamon sugar on top and bake for 15 minutes, or until almond filling is crisp and tops of claws are tanned and golden.
Pain au Chocolat
Cut rectangles of dough 3 inches by 4.5 inches.  Place a few bittersweet chocolate chips on the shorter edge, and fold over once.  Where the fold has met the main part of the dough, tuck a few more bittersweet chocolate chips.  Fold over again, then place seam side down on a sheet tray.  Brush with egg wash and sprinkle with cinnamon sugar, if desired.  Bake for 15 minutes.

O.C.D.

Or, alternately, Why I Shouldn’t Be Left Alone In the Kitchen.

 Or perhaps, Why I Shouldn’t Be Allowed on the Internet.

 Hello, my name is Rachel, and I am a perfectionist and an obsessive-compulsive, bossy, unstable control freak.
Doesn’t that just make you want to live with me forever and ever?
Don’t answer that.

Alas, I admit it, I am.  I’m so glad I have you all here to support me.  
The thing is, when I get an idea up in my head, I can’t let go of it.  I saw a picture on the dreaded interweb the other year day of little rosettes made of mangoes.  On a pie.
I died.

In addition, my mind was wrapped around the idea of marrying nectarines and gingersnaps.
Oh yeah, and I was so very intrigued by peach pits that I wanted to do something with noyaux, à la Bravetart.
Besides, I had already been hoping to freeze some peaches, what with the abundance right now, to save for winter. 

Oooh! Also, croissants.  For tea.  With company.

So yes, today I am presenting you with not only a laminated dough, but also a labor intensive tart. 

If, by the off chance, you aren’t as… shall we say, crazy… as me, feel free to dump the nectarine slices on haphazardly.  It tastes good.  That’s what matters.
I suppose I understand if you don’t want to undertake making croissants, but please, put them on your bucket list.  They aren’t half as hard as they’re made out to be, and they will impress your friends and terrify your enemies.  

And as for the peach pits?  I managed to crack two open, using a giant mallet and some pliers, but gave up when I discovered that I had rent a gash in my favorite bamboo cutting board.  (Damn pits!)  While I possibly could have done something with those two measly noyaux, when I awoke the next morning, all the peach pits had been trashed.  Ah, well.


Nectarine, Lemon, and Gingerbread Tart
For the crust: (adapted from The Moosewood Restaurant Book of Desserts)
Ingredients:
1 1/2 cups flour
1/2 cup brown sugar
BIG pinch each of ginger, cinnamon, allspice, cloves, sea salt, and cardamom
1 teaspoon baking powder
1 stick very cold butter, cubed
1 tablespoon molasses
ice water as needed
Directions:
Put the flour, sugar, spices, and baking powder in the bowl of a food processor.  Pulse to combine.  Pulse in the butter and molasses until there are small bits of butter, ranging from sandy to pea-sized.  If the dough is too dry, add in ice water, a tablespoon at a time, until it can stick together when pressed.  Press the dough into a buttered tart pan, prick with a fork, cover with a sheet of aluminum foil that has been buttered (press the foil right down into the pan), and freeze, for at least 30 minutes, or up to 1 day.  When ready to bake, preheat the oven to 350 degrees F, put some pie weights (you won’t need as many because the shell has been chilled) on top of the foil, and bake until deep golden brown and fragrant, 20-25 minutes.  Allow to cool.
For the filling:
Ingredients:
3/4 cup lemon curd 
1/2 cup to 2/3 cup mascarpone cheese
1/2 cup heavy cream
4 tablespoons powdered sugar (or to taste: it doesn’t need much)
Directions:
Whip the heavy cream and mascarpone and powdered sugar together (I used an immersion blender because it is super fast and effective).  Fold in the lemon curd.  I actually made this in two parts, folding the lemon curd into some of the whipped mixture, then layering that into the tart with the plain whipped cream/cheese on top of that.
To assemble:
Ingredients:
5 or 6 nectarines, sliced as thinly as possible
Directions:
Pour the whipped filling into the tart shell, and smooth the top.  To make nectarine rosettes, gently curl the thinnest pieces of nectarine you can find, and stick them into the filling.  Then begin to place other pieces around, with less curl.  Once you are sick of rosettes, you can just place gently curled pieces around and in between, to take away the white space and act as filler.  

Whole Wheat Sourdough Croissants:
adapted from Christina Tosi’s Momofuku Milk Bar
Ingredients:
for the dough:
550 g white whole wheat flour
12 g kosher salt
3.5 g active dry yeast
370 g water, at room temperature
for the butter block:
2 sticks butter
1 teaspoon kosher salt
Directions: 
Mix all the dough ingredients together with a dough hook in a mixer, until smooth and supple.  Place in an oiled container that is covered but still has air flow (like a bowl with a damp dish towel cover, or a plastic bucket with a top that has a few holes poked in it).  If you want the sourdough component, stick the dough in your fridge for at least 2 days, but up to a week, then pull it out and let it come to room temp, then rise in a warm place until double its original size.  If you don’t, allow the dough to rise to at least double its orignial size, then begin to make your croissants.  When you’re ready to make the croissants, beat your butter in a stand mixer with the paddle attachment until fluffy.  Pat it into a 8 x 12 rectangle between two sheets of parchment paper.  Put it in the fridge to firm up.  Meanwhile, punch down the dough on a smooth, floured countertop, and roll/stretch it gently into  a rectangle 16 x 24 inches, and even in thickness.  Put your slightly firm butter block on one half of the dough, then fold the other half of the dough over and pinch the edges shut.  Let rest for 10 minutes.  Now, you must do 3 double book turns to create the layers.  Here’s how:  Roll the the dough out again to a rectangle of 16 x 24 inches and even in thickness.  Be gentle, so that you don’t have any butter mushing out.  Visualize your dough divided into 4 quarters.  Fold the outer two quarters to the center, then bring one edge over to meet the other (Tosi says: When I’m showing someone how to make a double book turn, I stretch my monkey arms out wide like I’m going in for a big hug, then I fold my arms at the elbow, so my fingers are touching my armpits, and fold my elbows in to touch one another.)  Now transfer your dough to the fridge to rest, wrapped loosely in plastic wrap, for 30 minutes.  Repeat the double book turn twice more.  After the final rest in the fridge, roll your dough out to a 16 x 24 inch rectangle, then cut the dough into 10 triangles (like a backgammon board), putting a small notch on the base of each Isosceles triangle.  Roll em up, allow to rise for about 45 minutes, or until puffed up, then brush them with an egg wash (1 egg+1 teaspoon water), and bake for 20-25 minutes at 375 degrees F.