Sim Sala Bim

Fluffy Overnight Cinnamon Rolls | La Pêche Fraîche

Then the Earth shook, that was all that it took for the dream to break
All the loose ends would surround me again in the shape of your face

What makes me love you despite the reservations?
What do I see in your eyes
Besides my reflection hanging high?

Are you off somewhere reciting incantations?
Sim sala bim on your tongue…

—Fleet Foxes

Fluffy Overnight Cinnamon Rolls | La Pêche Fraîche

Ever since I was little, there have been certain thought streams that help me settle down and fall asleep.

Particularly in the winter, I imagine myself in the deep arctic, in a little pure white snow cave dug into the side of a hill while a storm howls around the landscape.
I think of each warm piece of clothing I’d don (long johns, leggings, two pairs of my warmest, softest wool socks, gloves and mittens and a cuddly sweater, etc…) and imagine myself, warm and cozy despite the cold.
At that point, sleep drapes itself over my drowsy body, yet another blanket of comfort.

Fluffy Overnight Cinnamon Rolls | La Pêche Fraîche

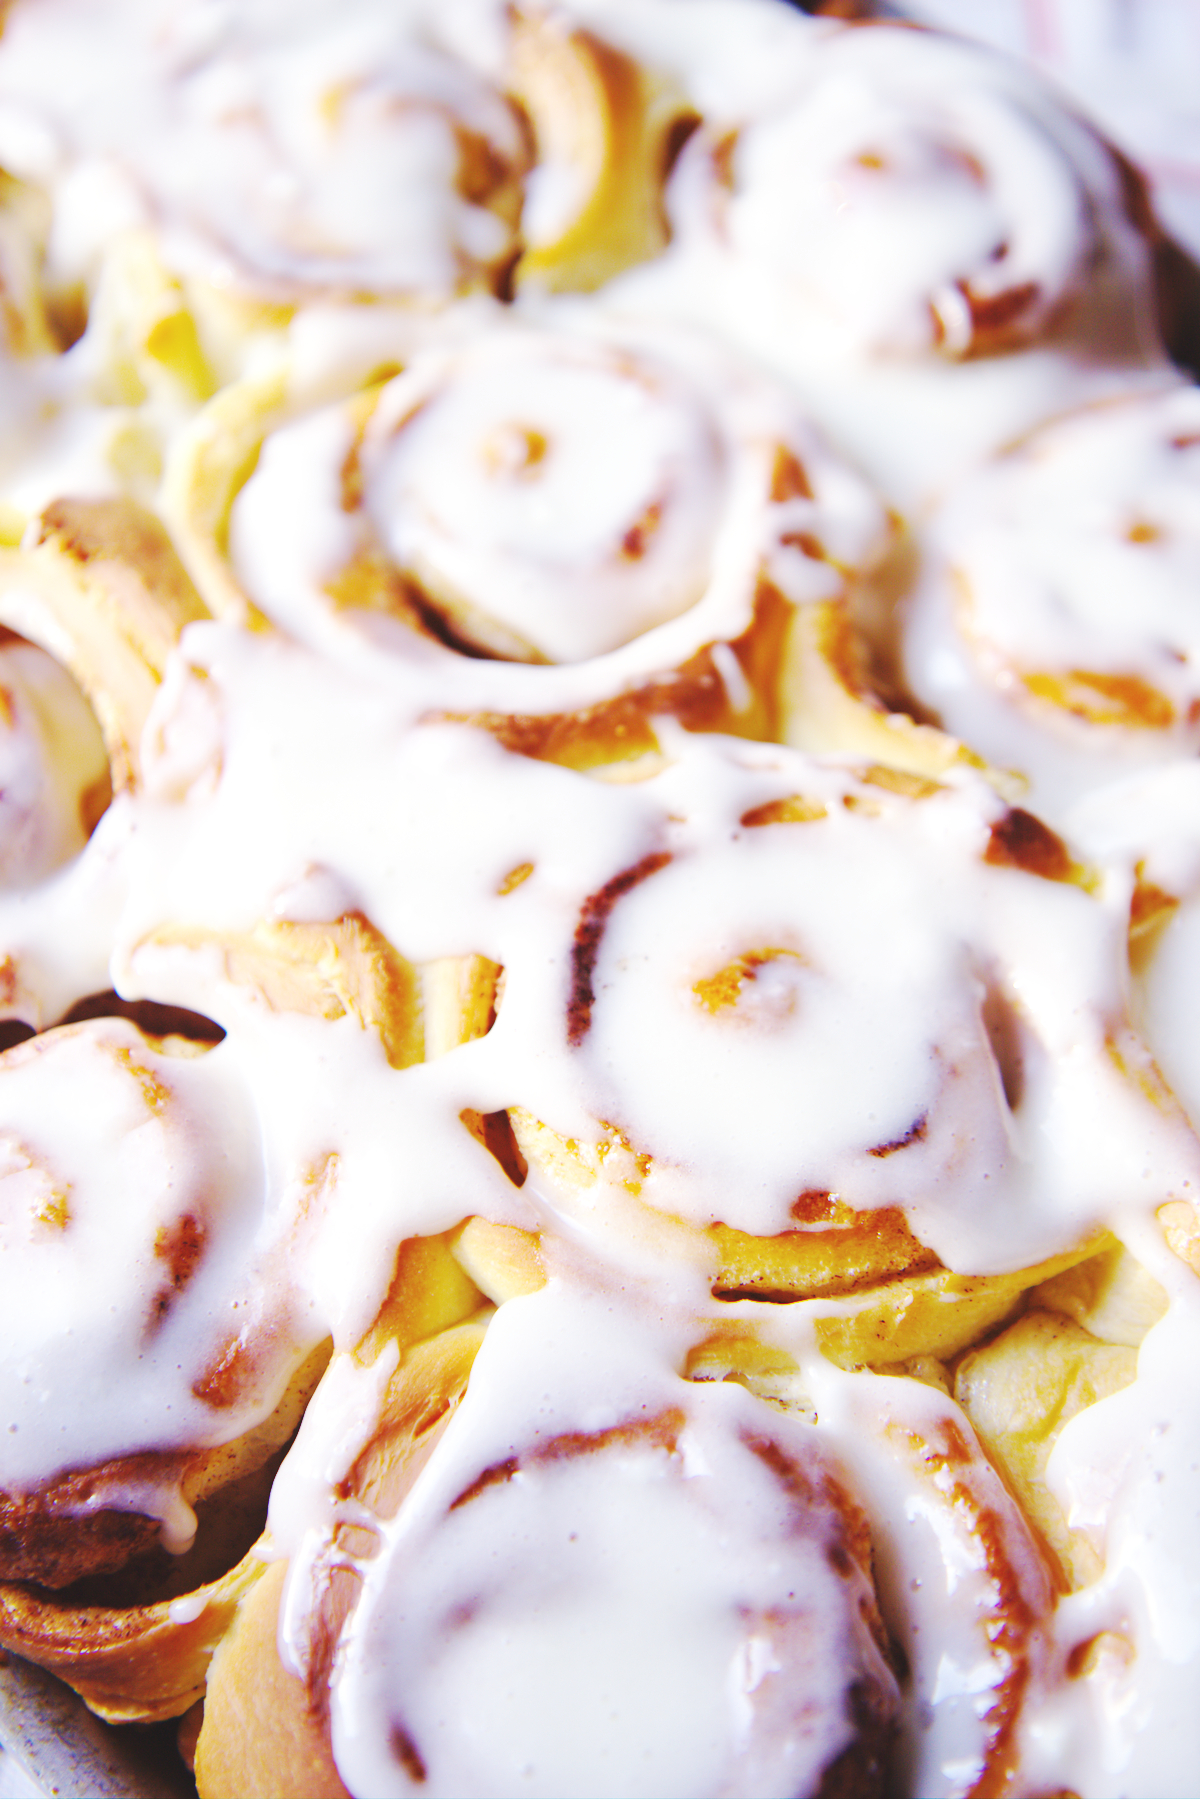
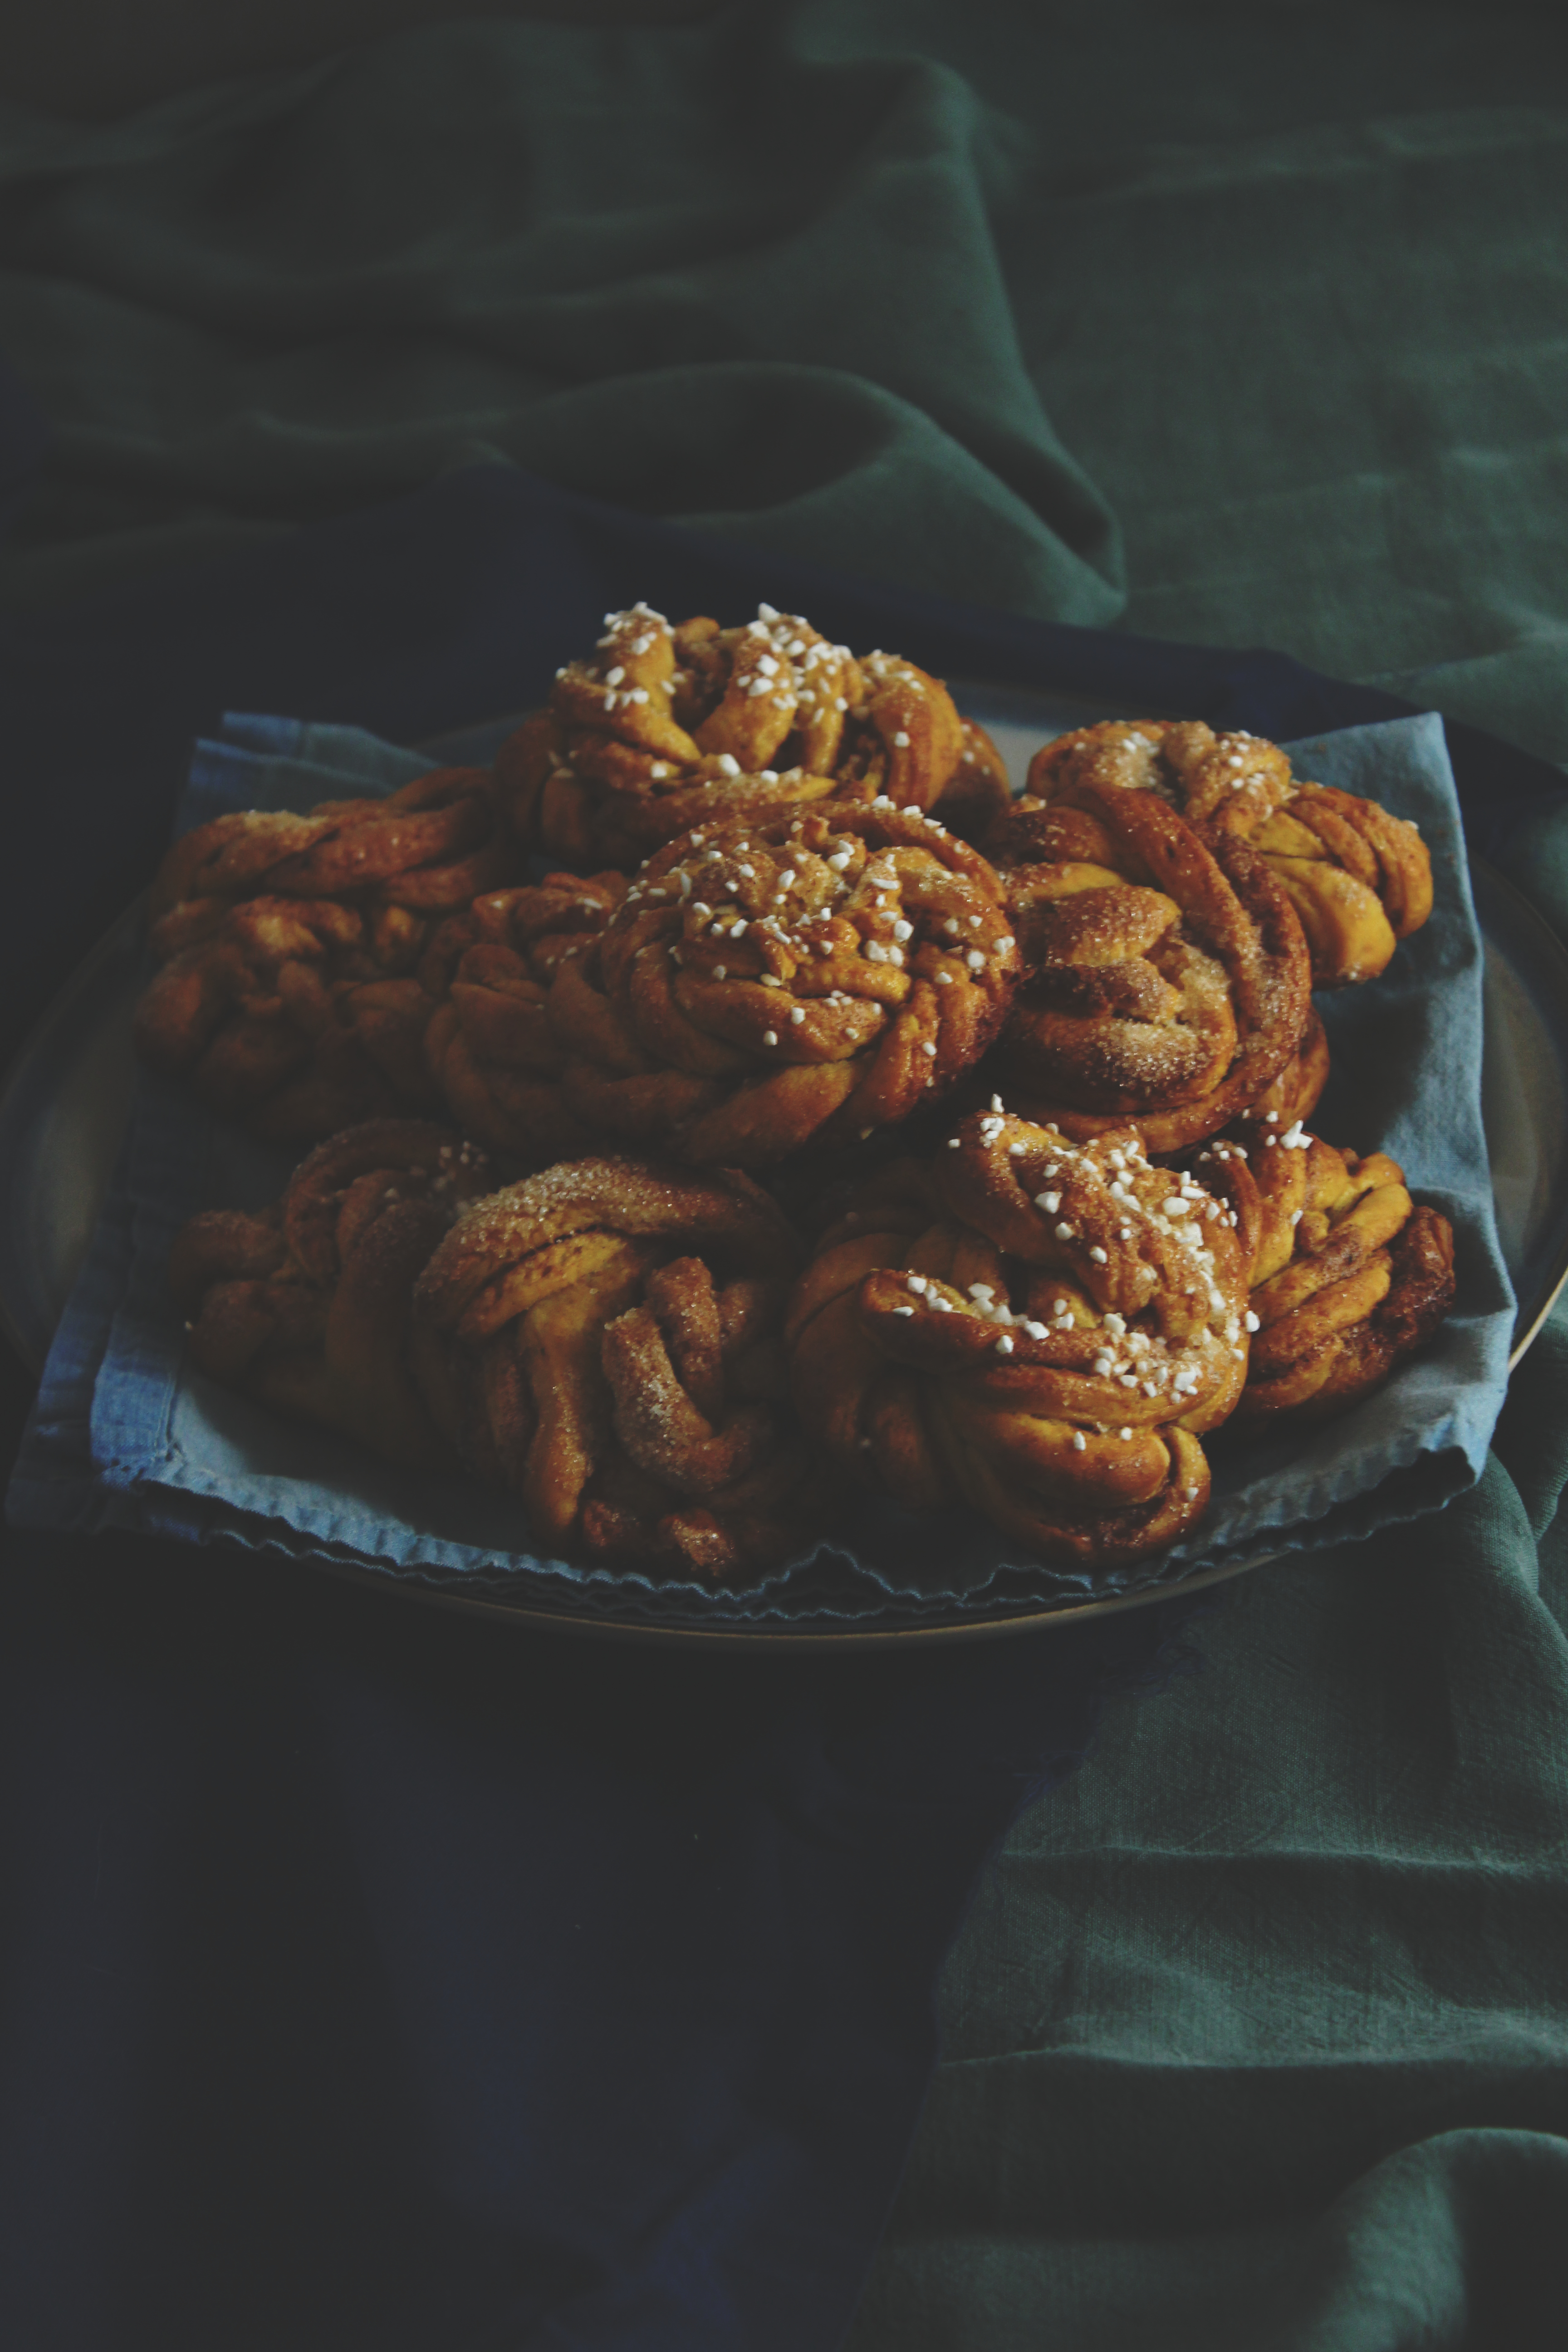
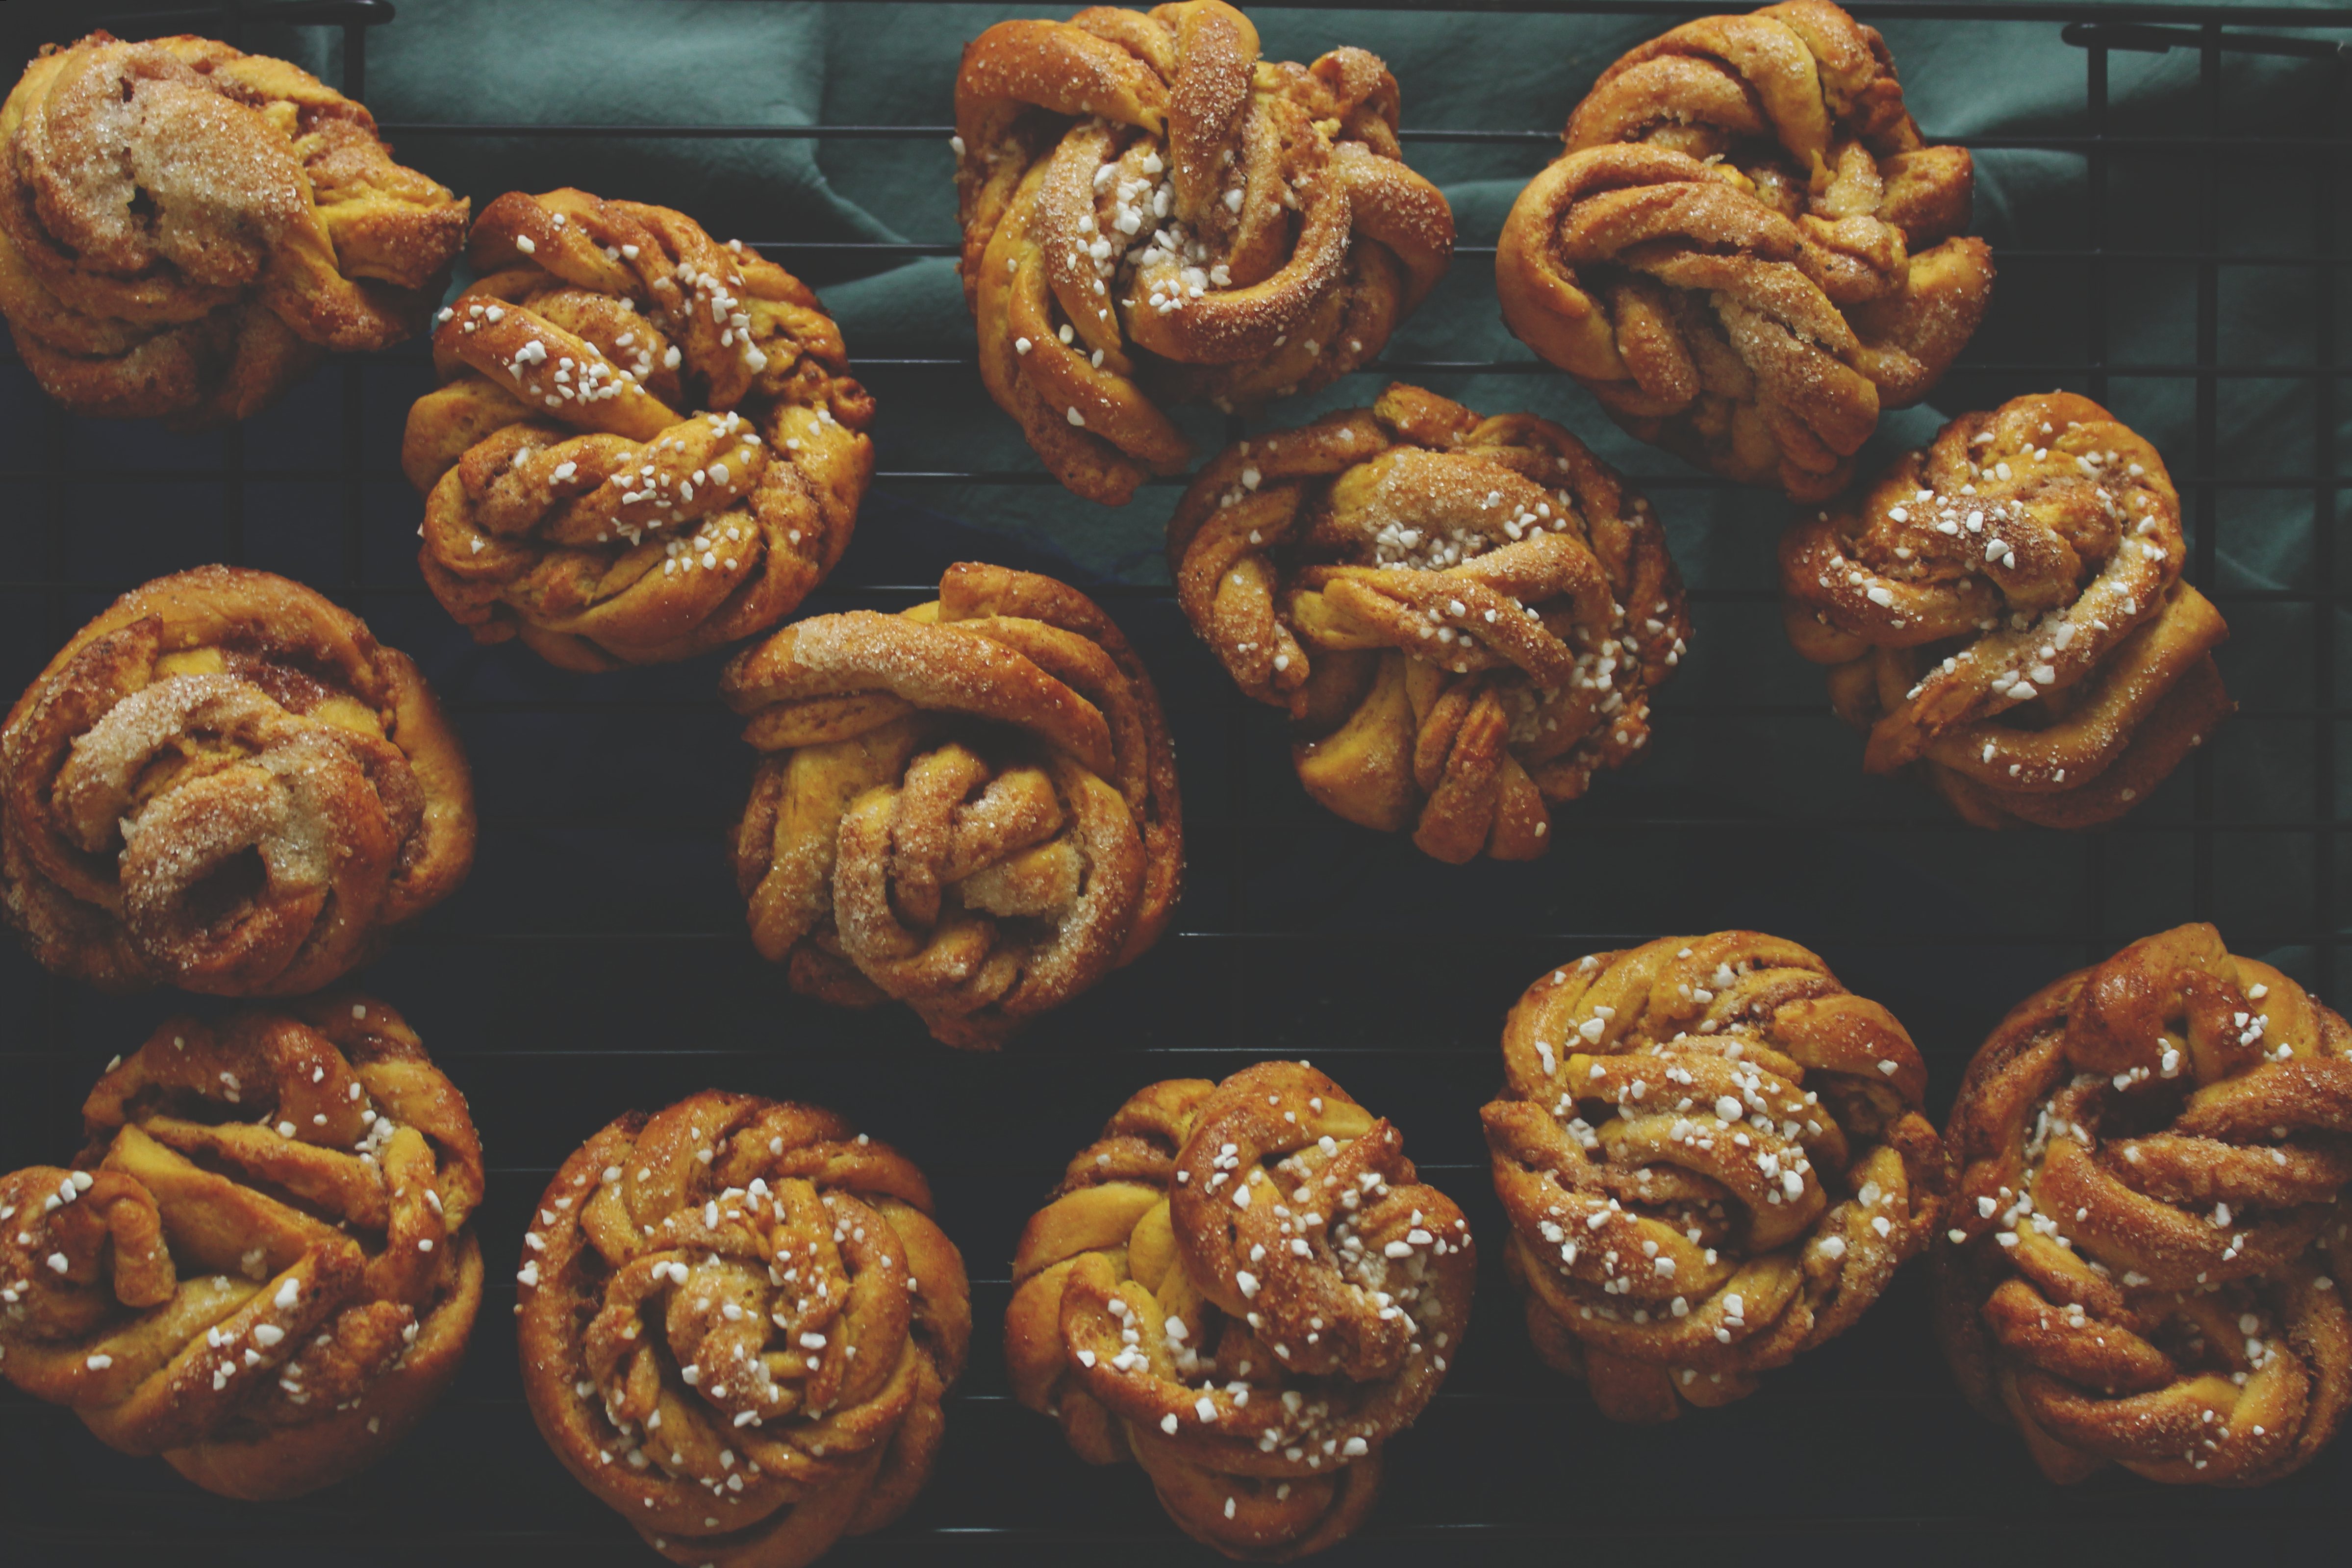
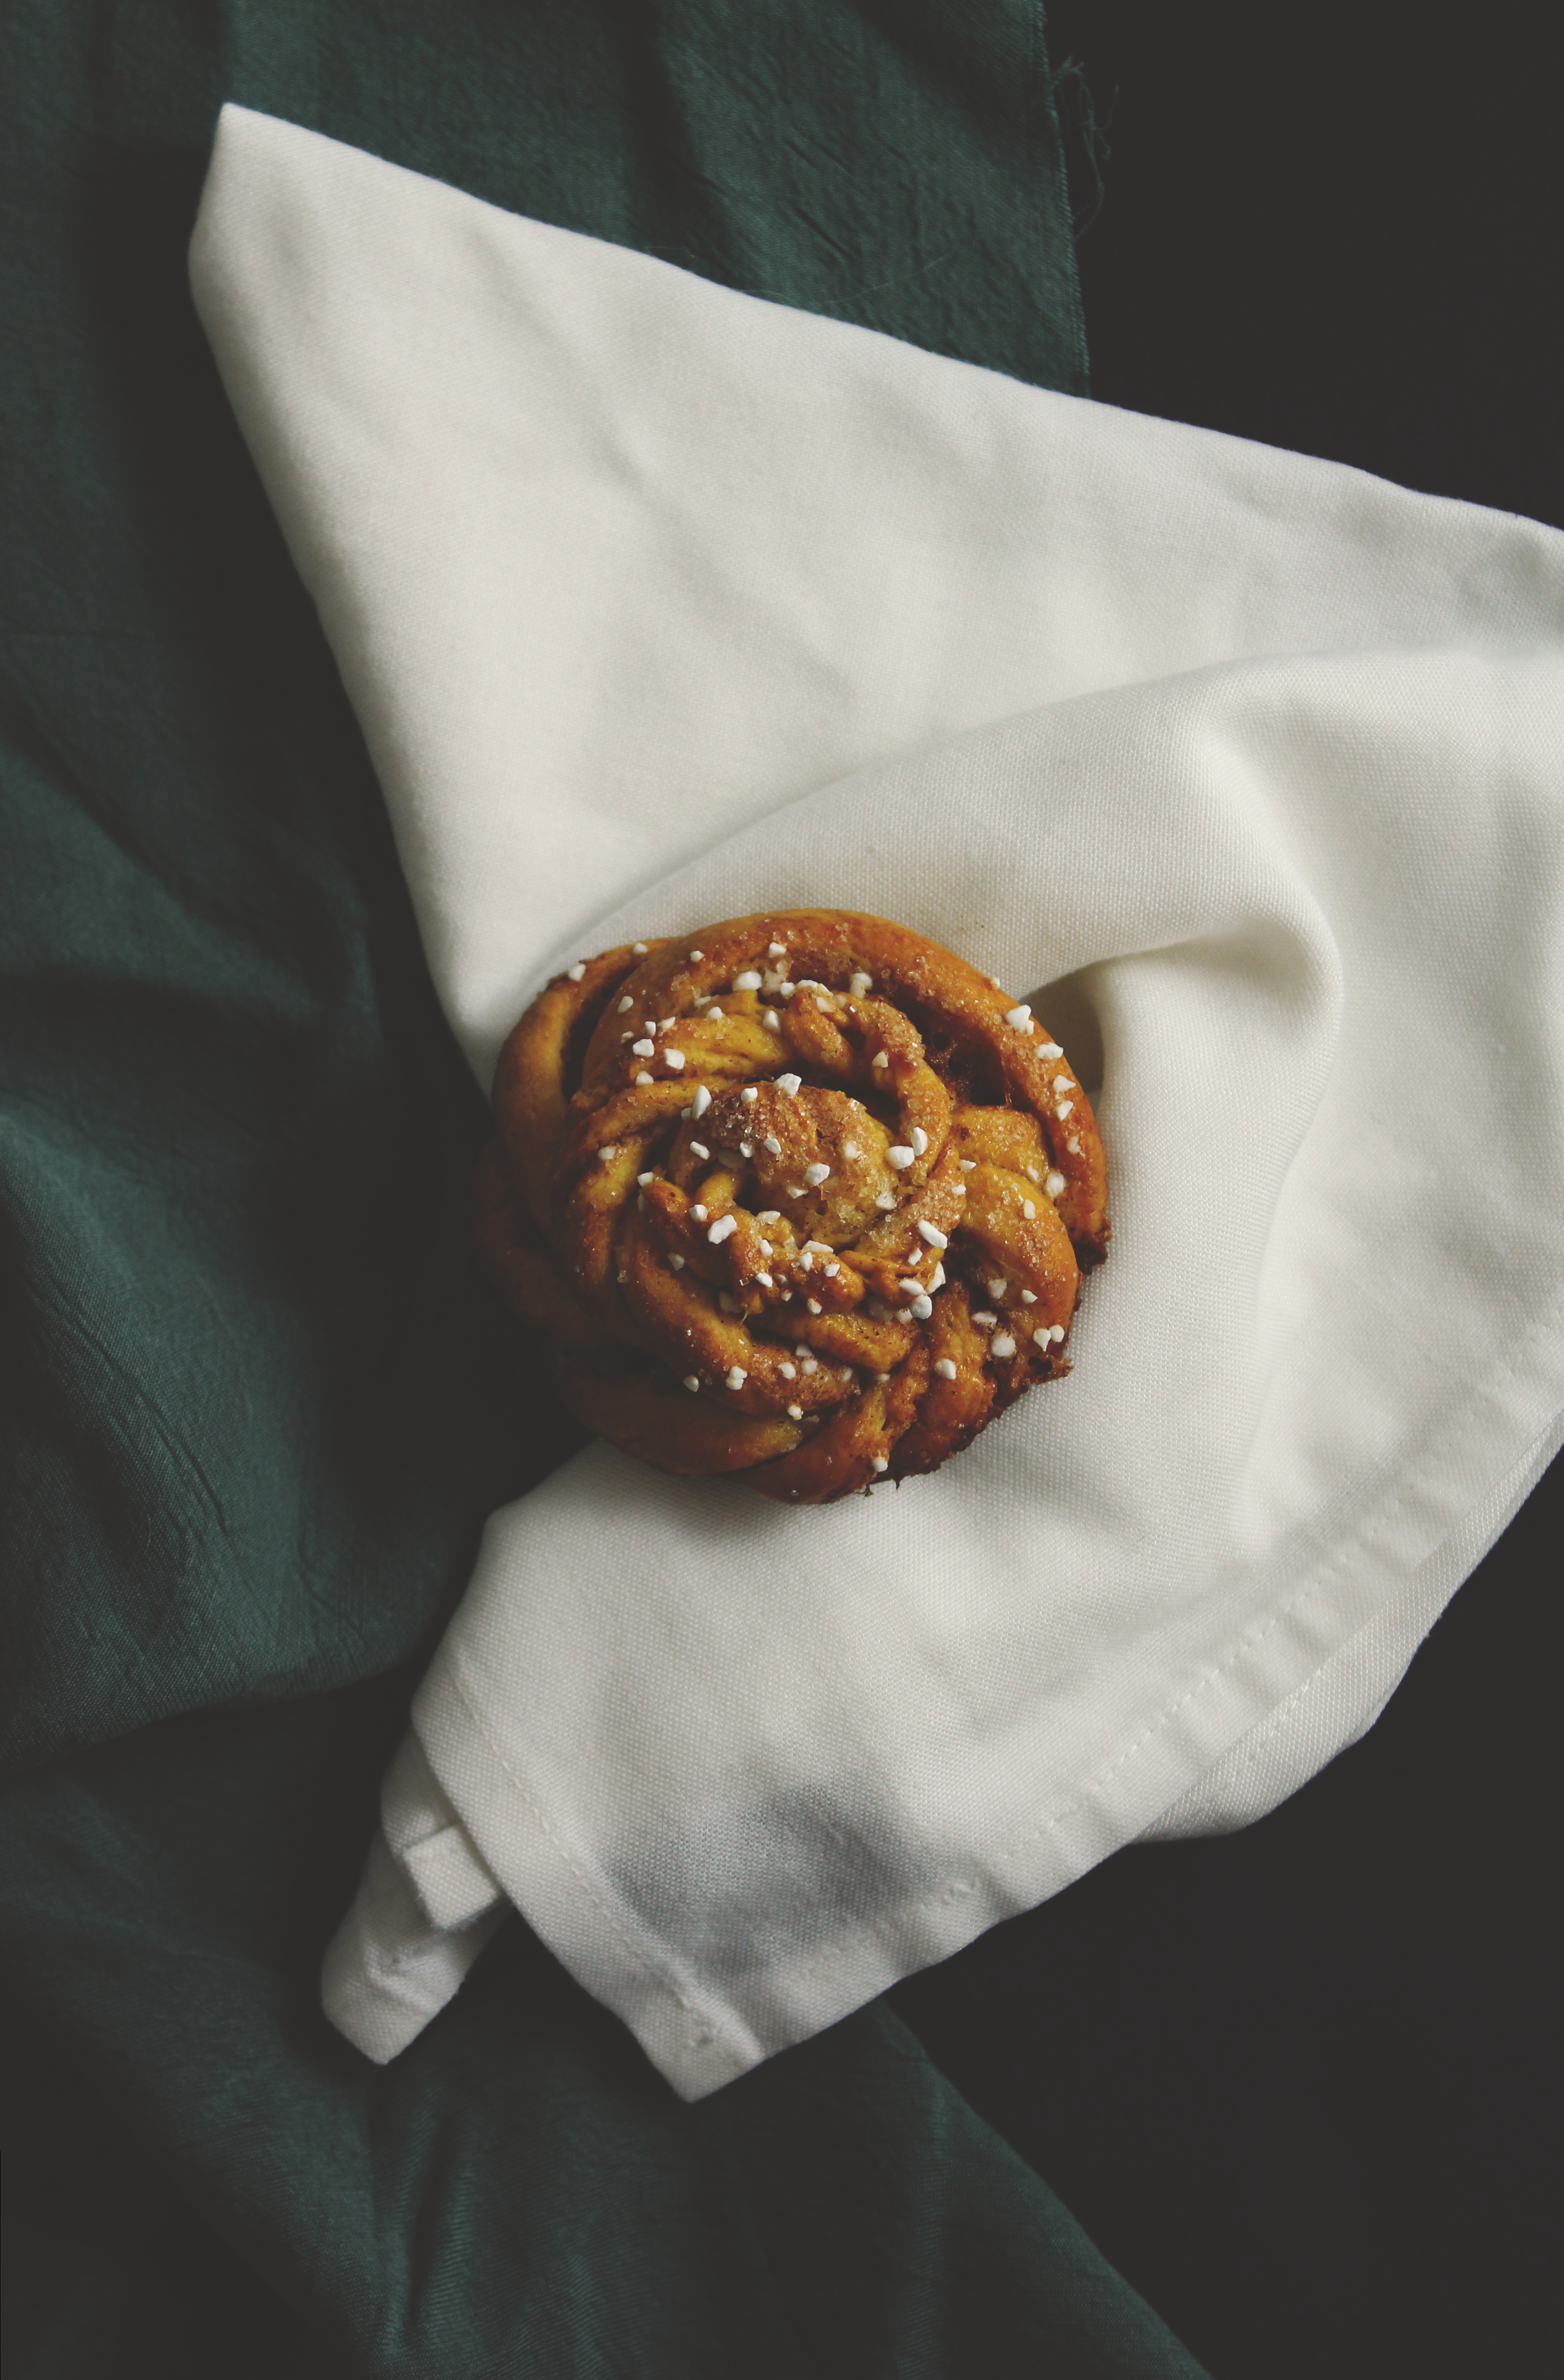
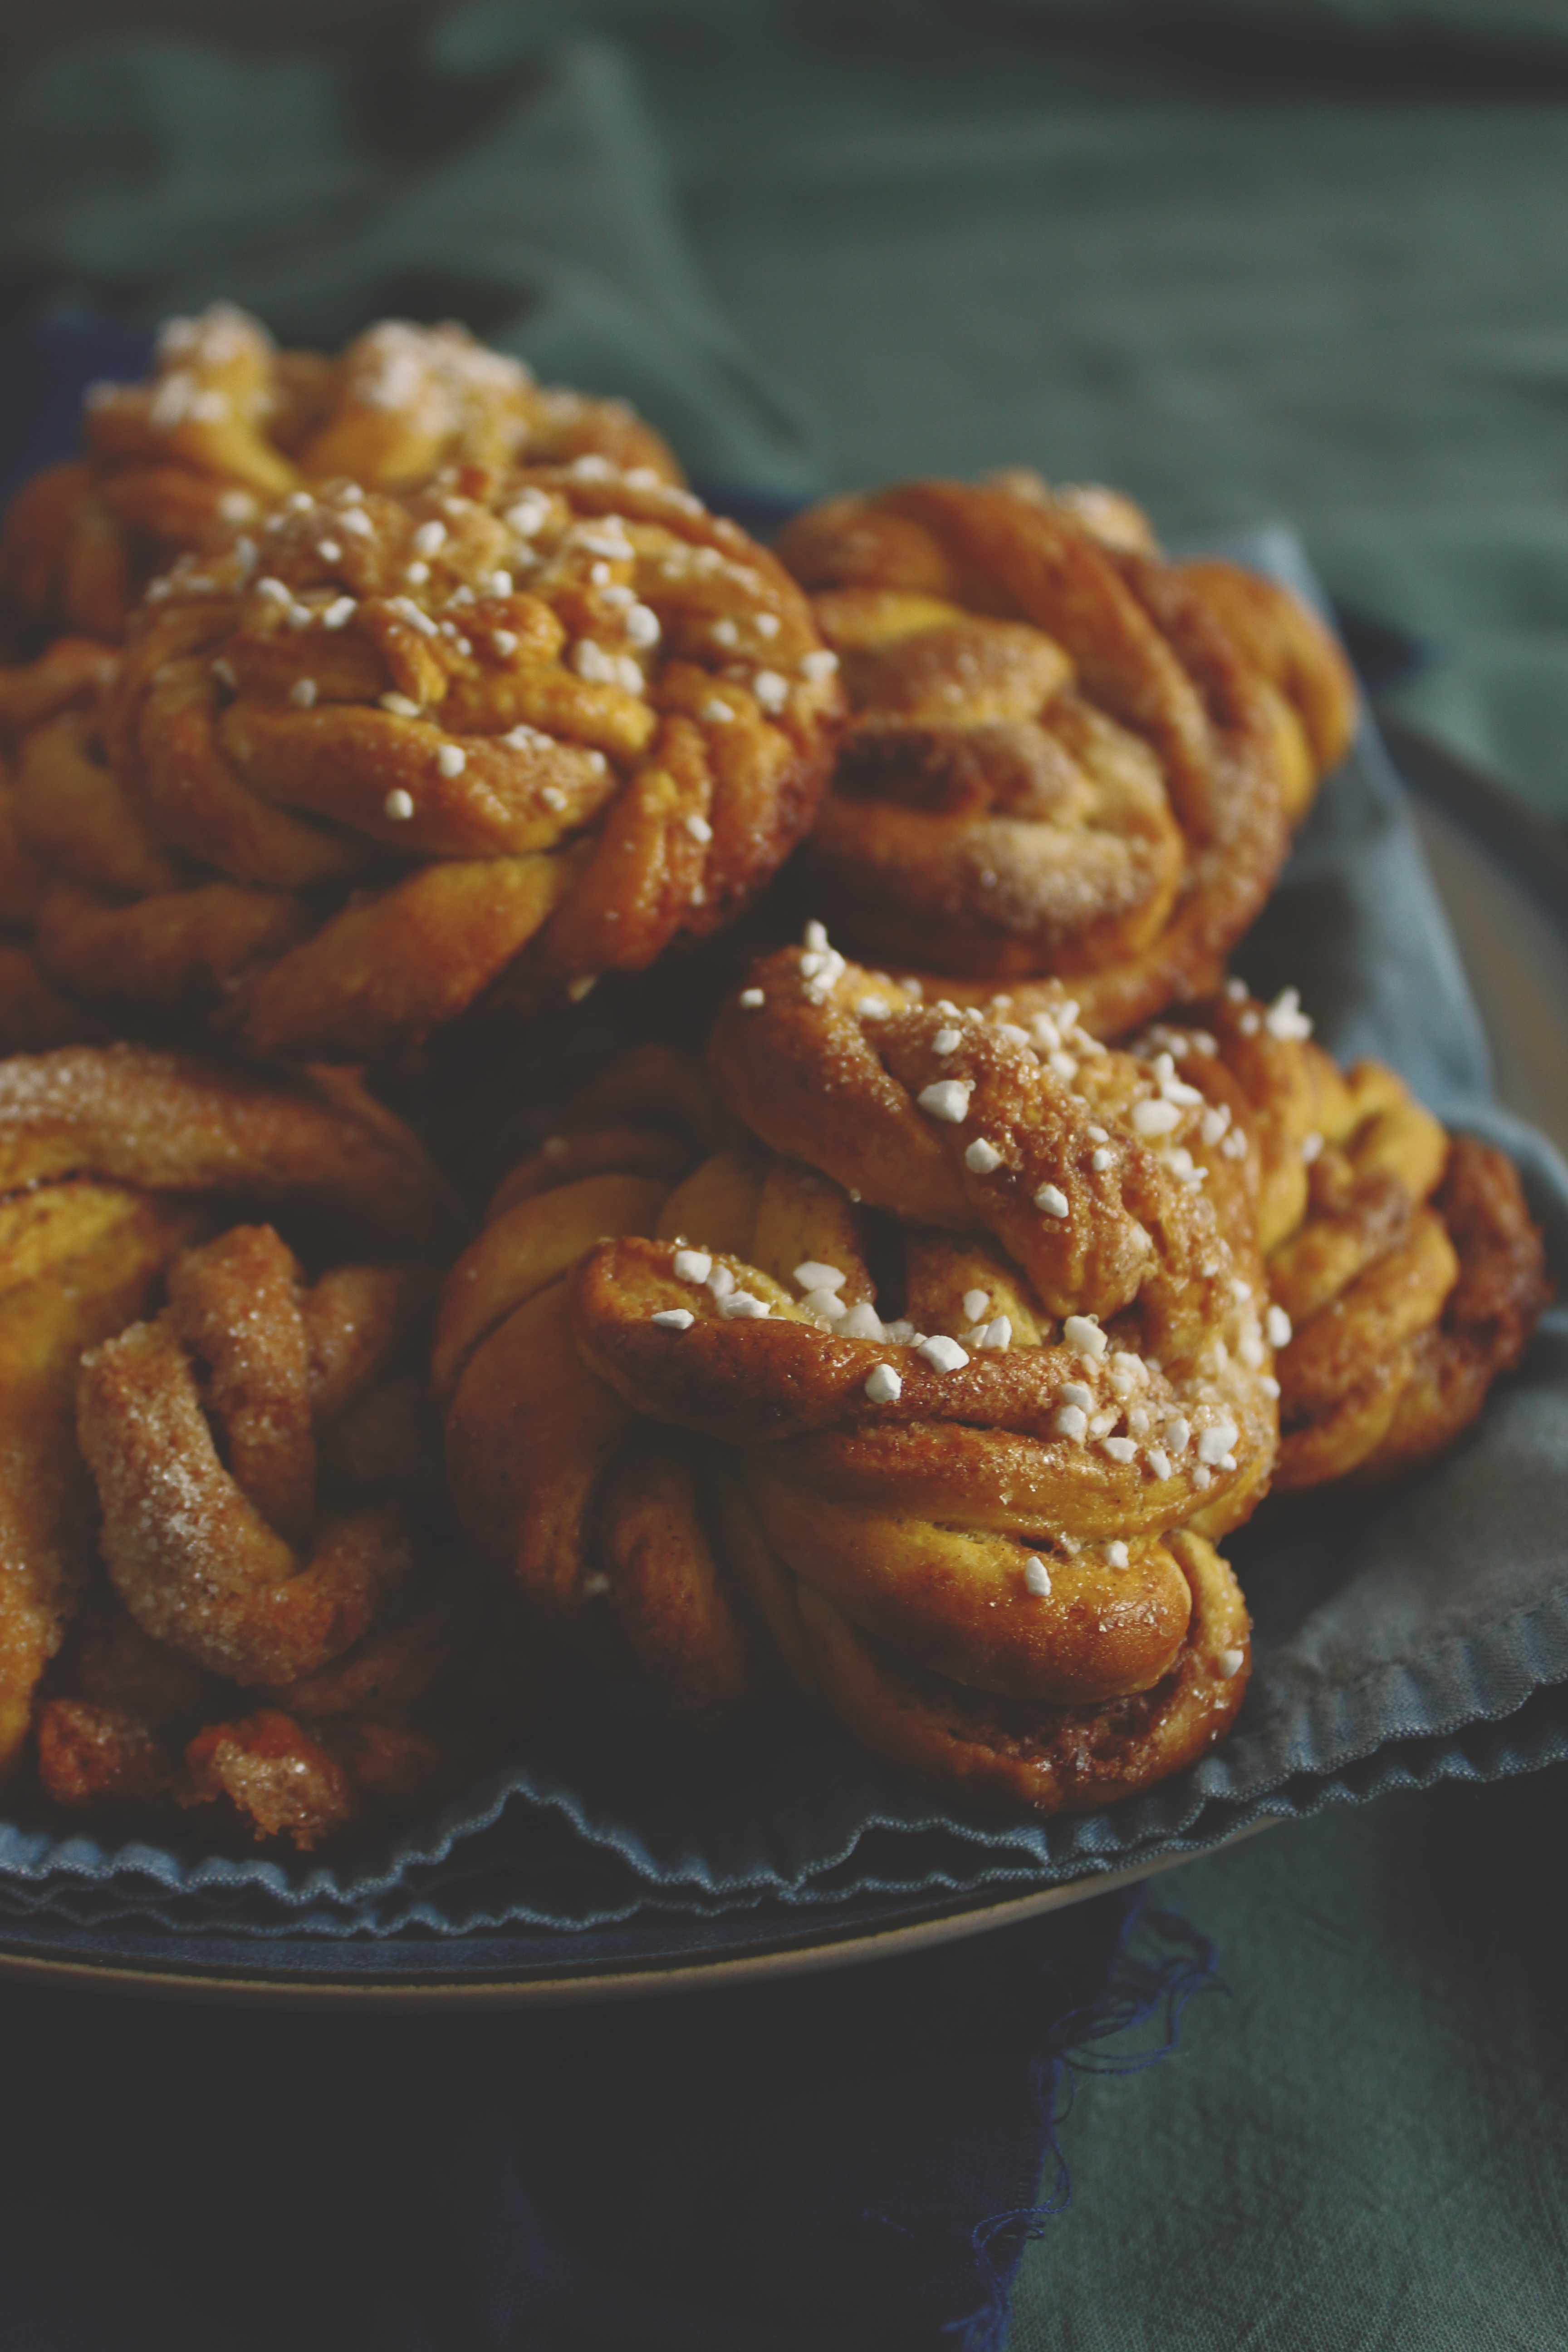
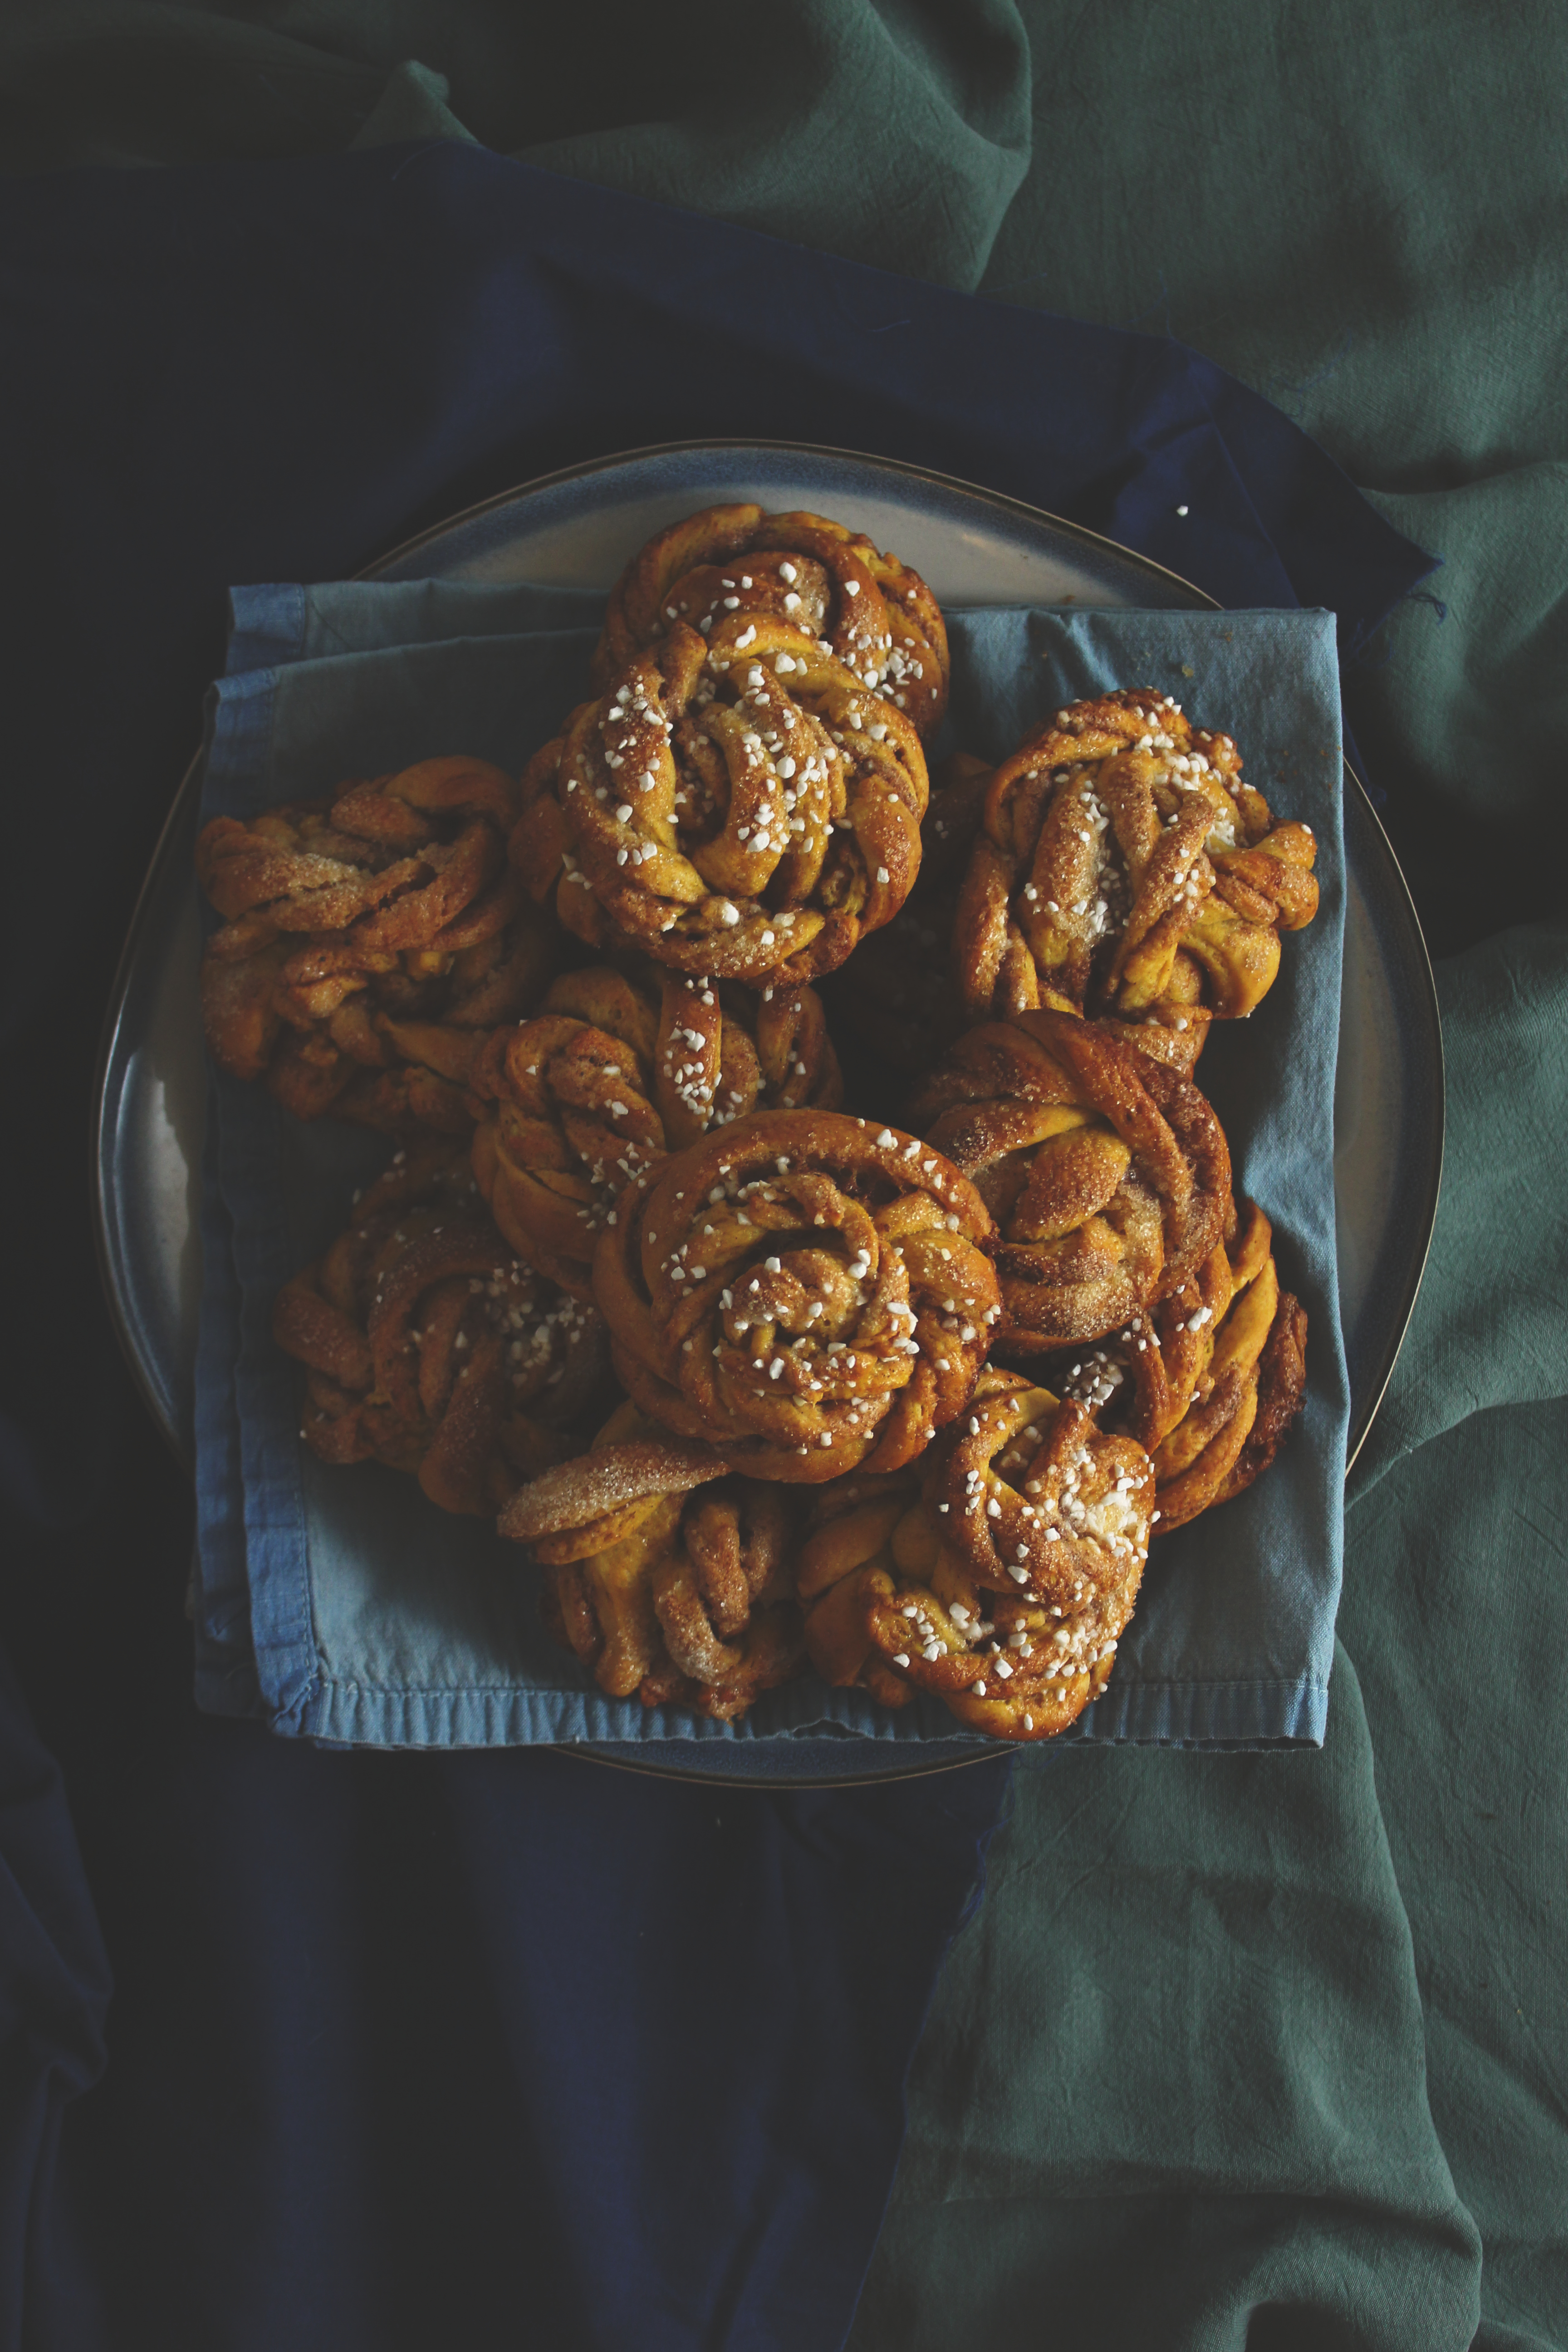
I’d be hard-pressed to imagine anything more cozy than a pan of fresh-baked, fragrant cinnamon buns.
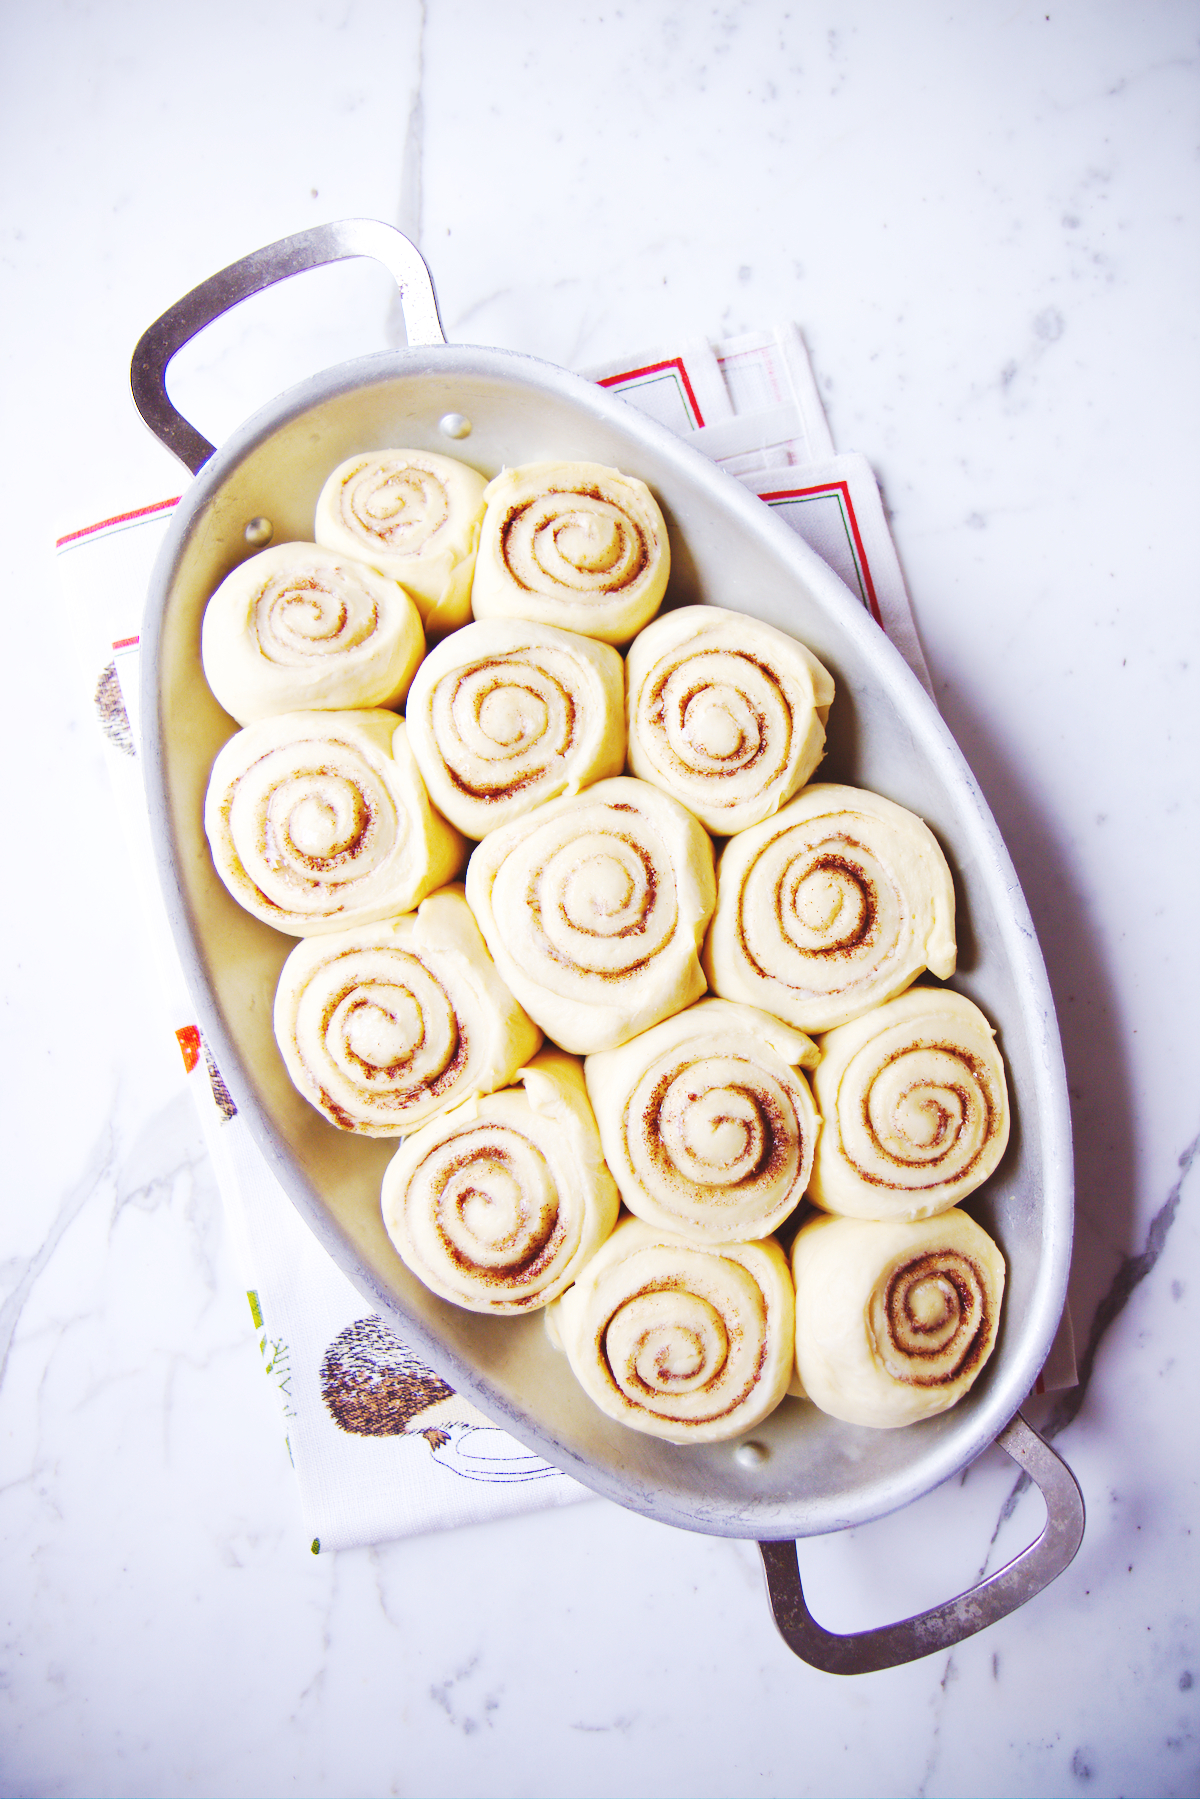
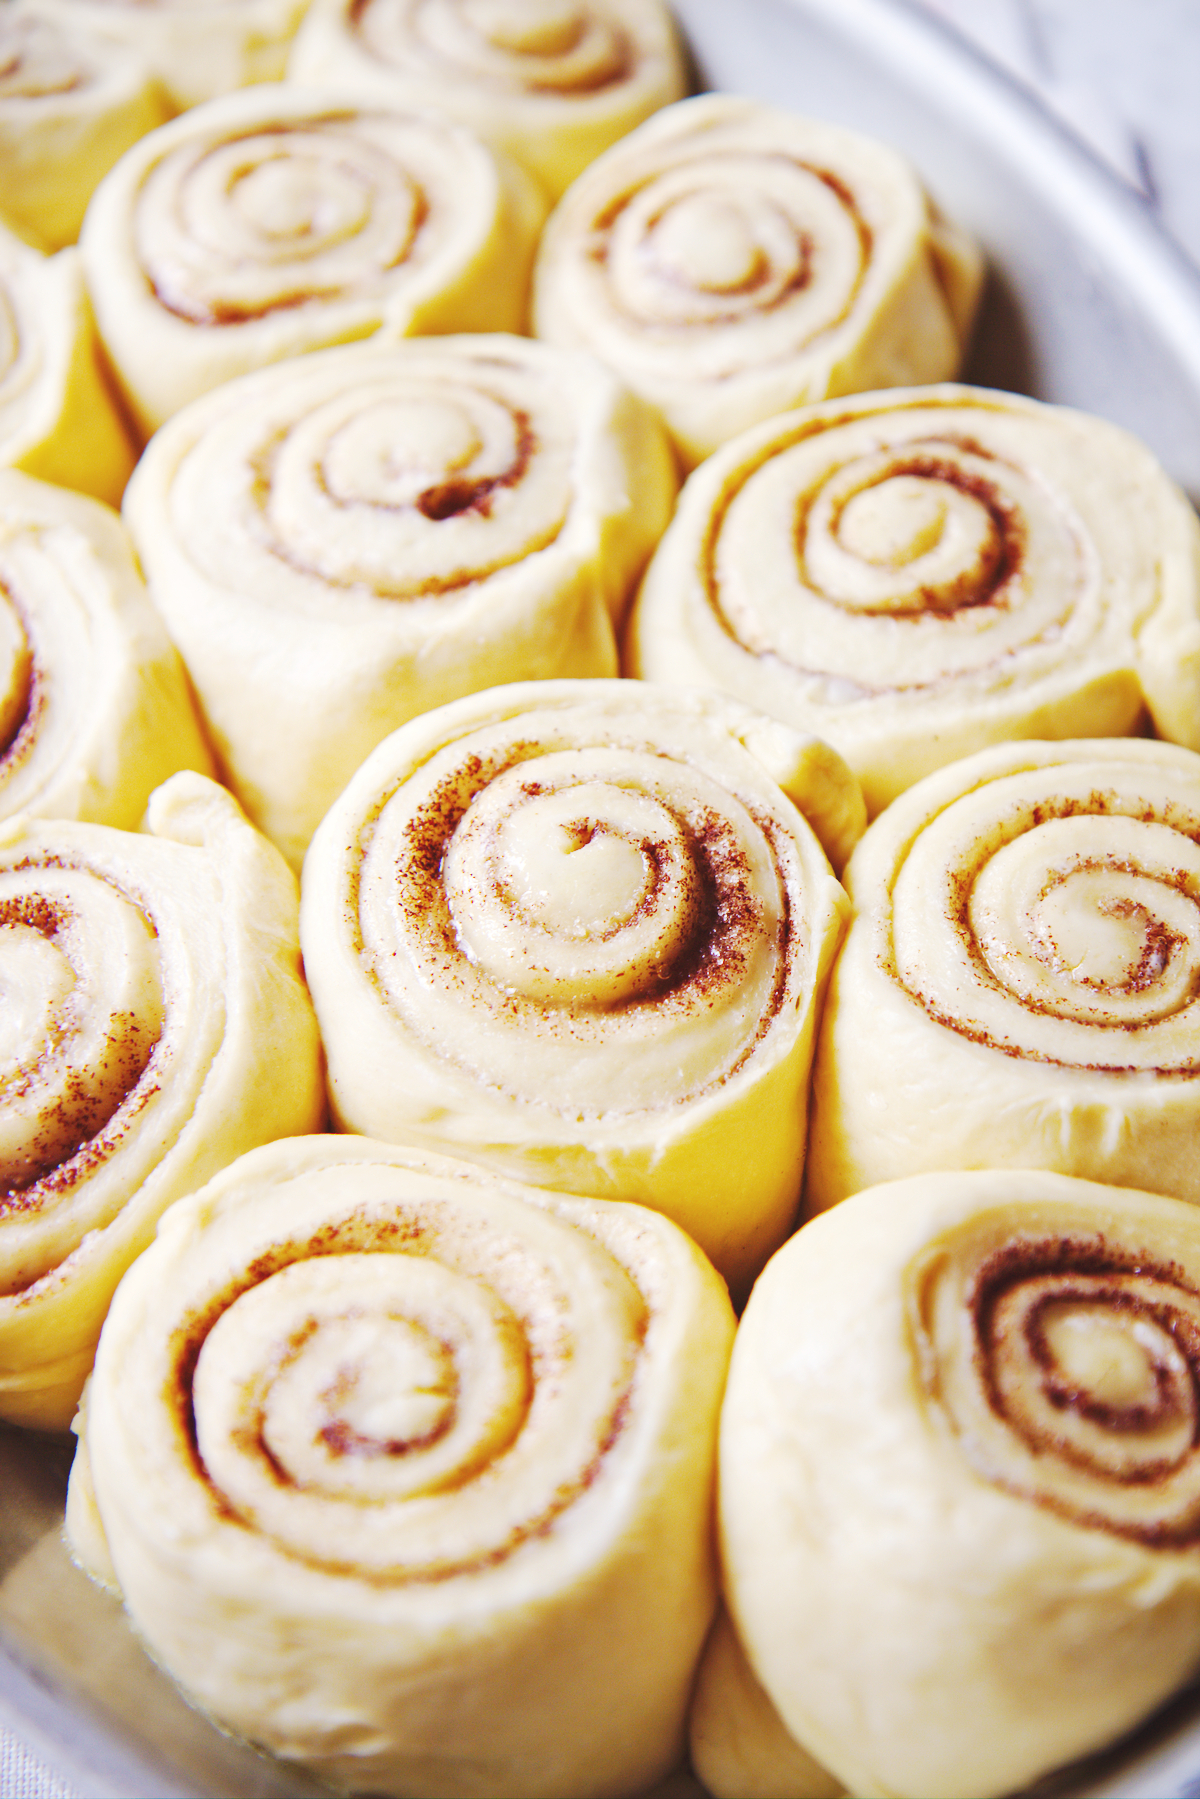
Just look—! at them.  They’re snuggled up against their brethren, their nakedness revealing bewitching spirals that hypnotize almost as much as their scent does.

I made these for Christmas morning, because that’s really the time to break out your most indulgent breakfast recipes.  Served still-warm with a cup of hot coffee or tea makes for a morning treat that’s impossible to top.

Fluffy Overnight Cinnamon Rolls | La Pêche Fraîche

If you want to pull off the magic of warm cinnamon buns on a busy holiday morning, it’s definitely imperative to have a reliable and easy recipe.

My requirements for such a recipe:
it must require minimal effort in the AM, because you’re going to be preoccupied with other things and no one wants to fuss around in the kitchen for half of the morning

it must be quick in the morning, because if your family is anything like mine, they will be breathing down your neck and threatening to turn to cold cereal by 11am

it must be consistently worth the calories and evening effort; it needs must prep and taste like a dream every time.

Fluffy Overnight Cinnamon Rolls | La Pêche Fraîche

These cinnamon buns fulfill all of my stipulations.
They’re easy, fast, and taste like a cloud of sugary, buttery, spicy goodness.
The night before, you make and knead the dough—15 minutes in a stand mixer/3 dishes (1 measuring cup + 2 bowls) dirtied.  Done and done.
The dough, which has similarities to a brioche in its milk- and butter-rich proportions, rises quickly and is smooth, shiny, and supple, making it easy to roll out once risen.
A heap of softened butter and brown sugar and cinnamon gets spread generously over the dough, further enriching the rolls with all-around deliciousness.
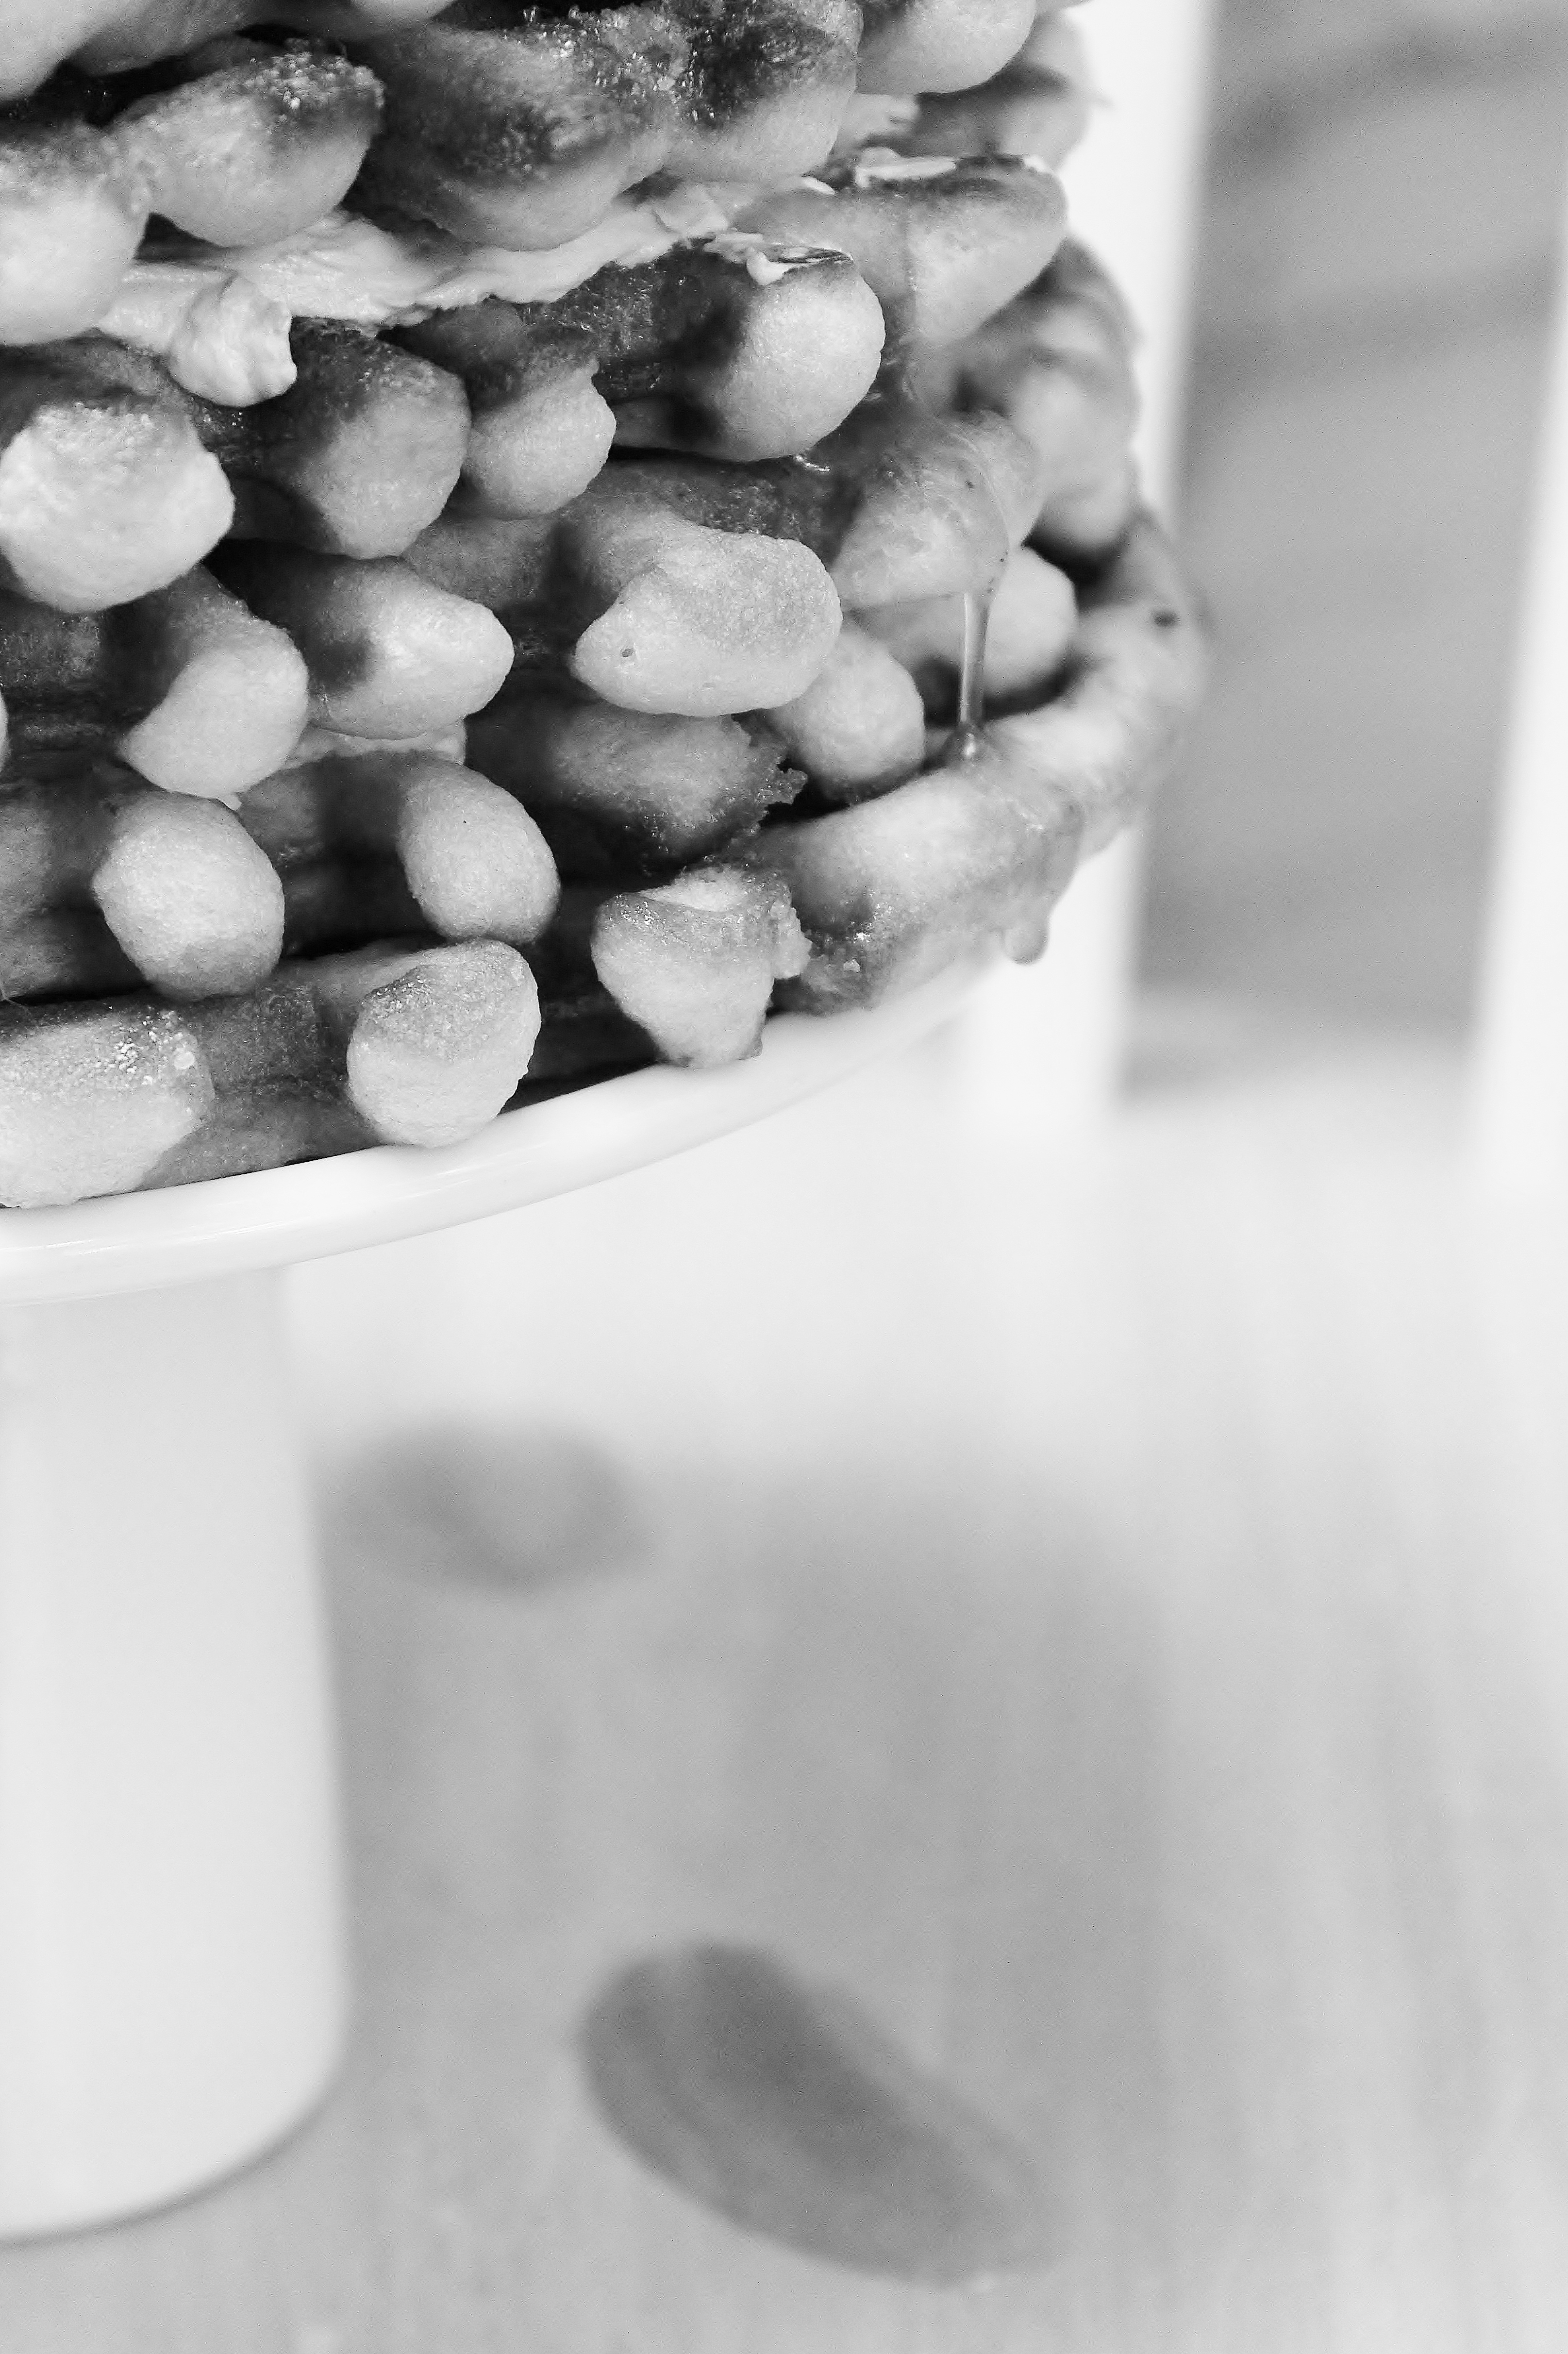
Rolled up tight and cut with kitchen string (or floss), they are tucked into a buttered pan and set in the fridge to develop flavor and relax overnight.
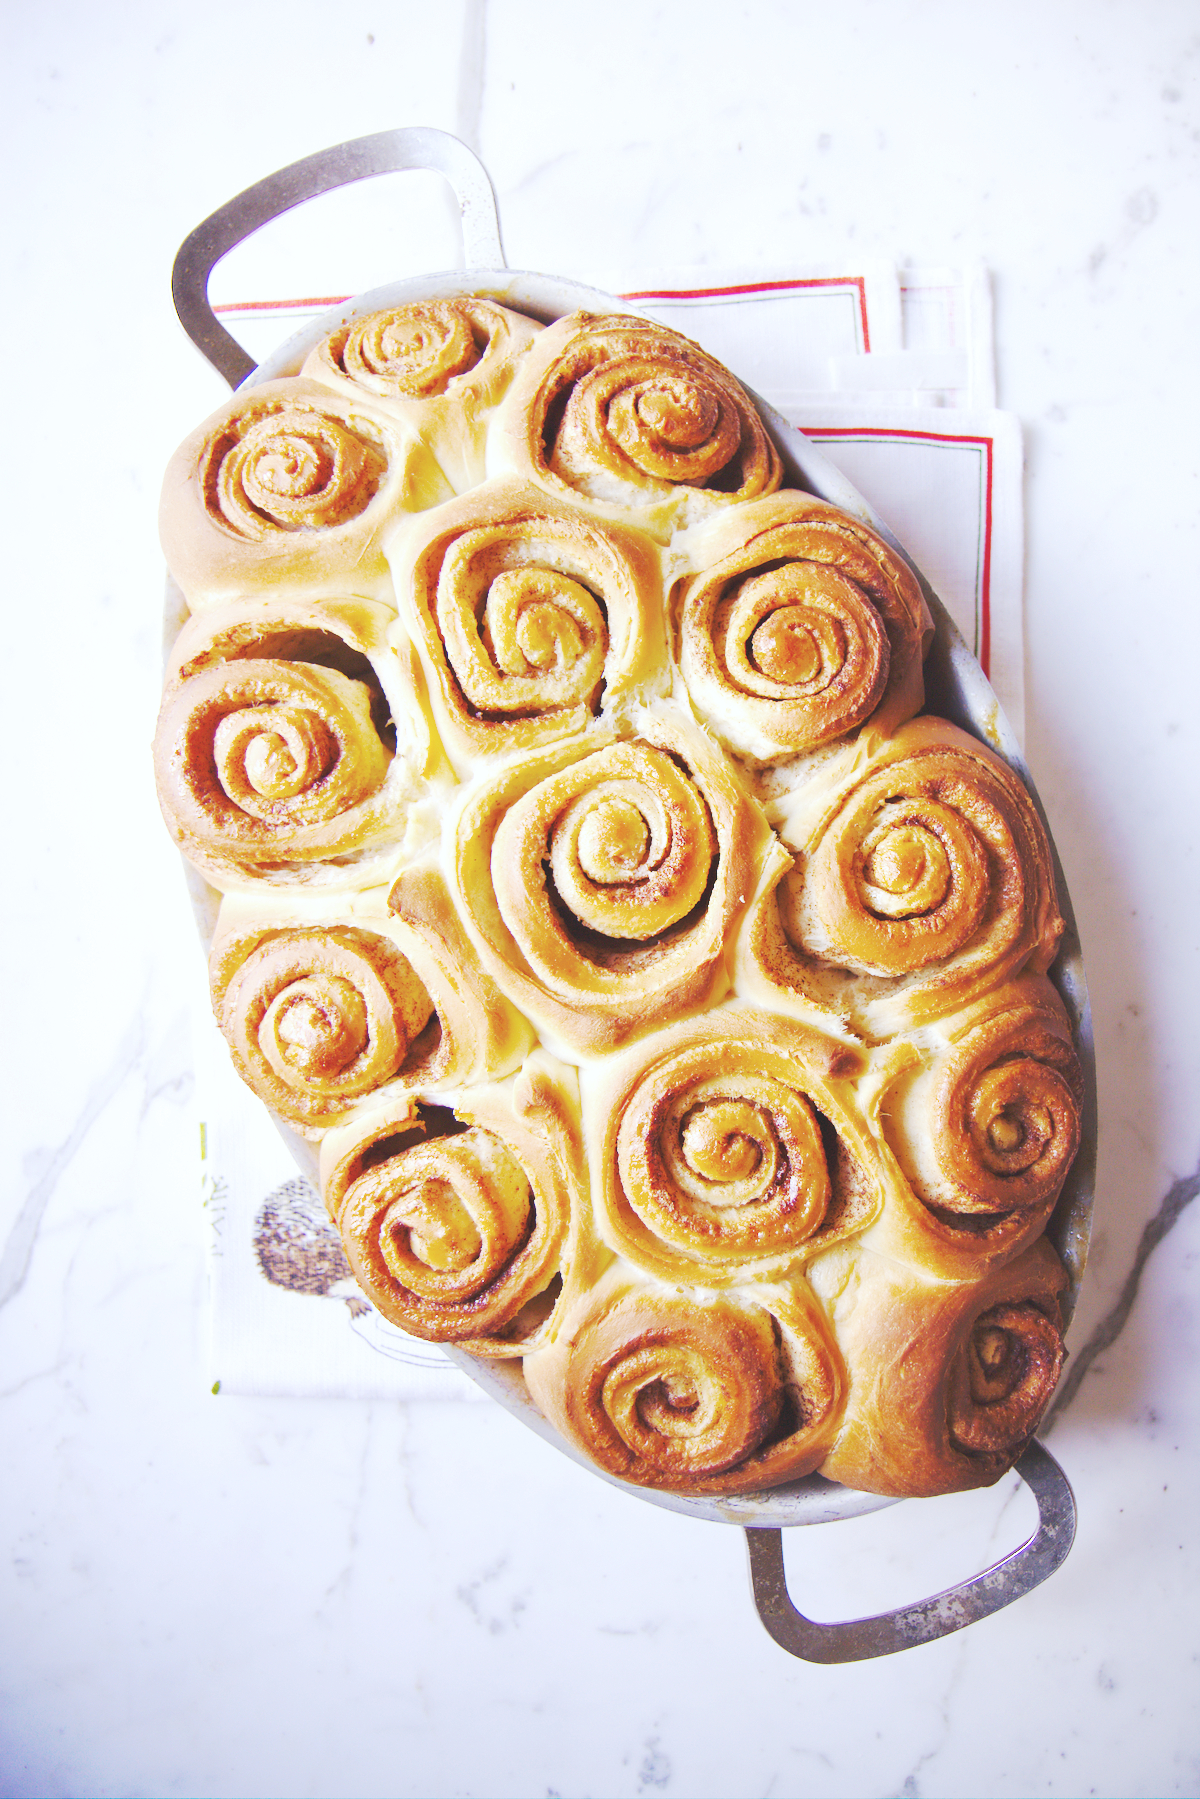
In the morning, it’s just a matter of taking them out of the refrigerator and preheating your oven; once again, they rise quickly and bake in less than 30 minutes.
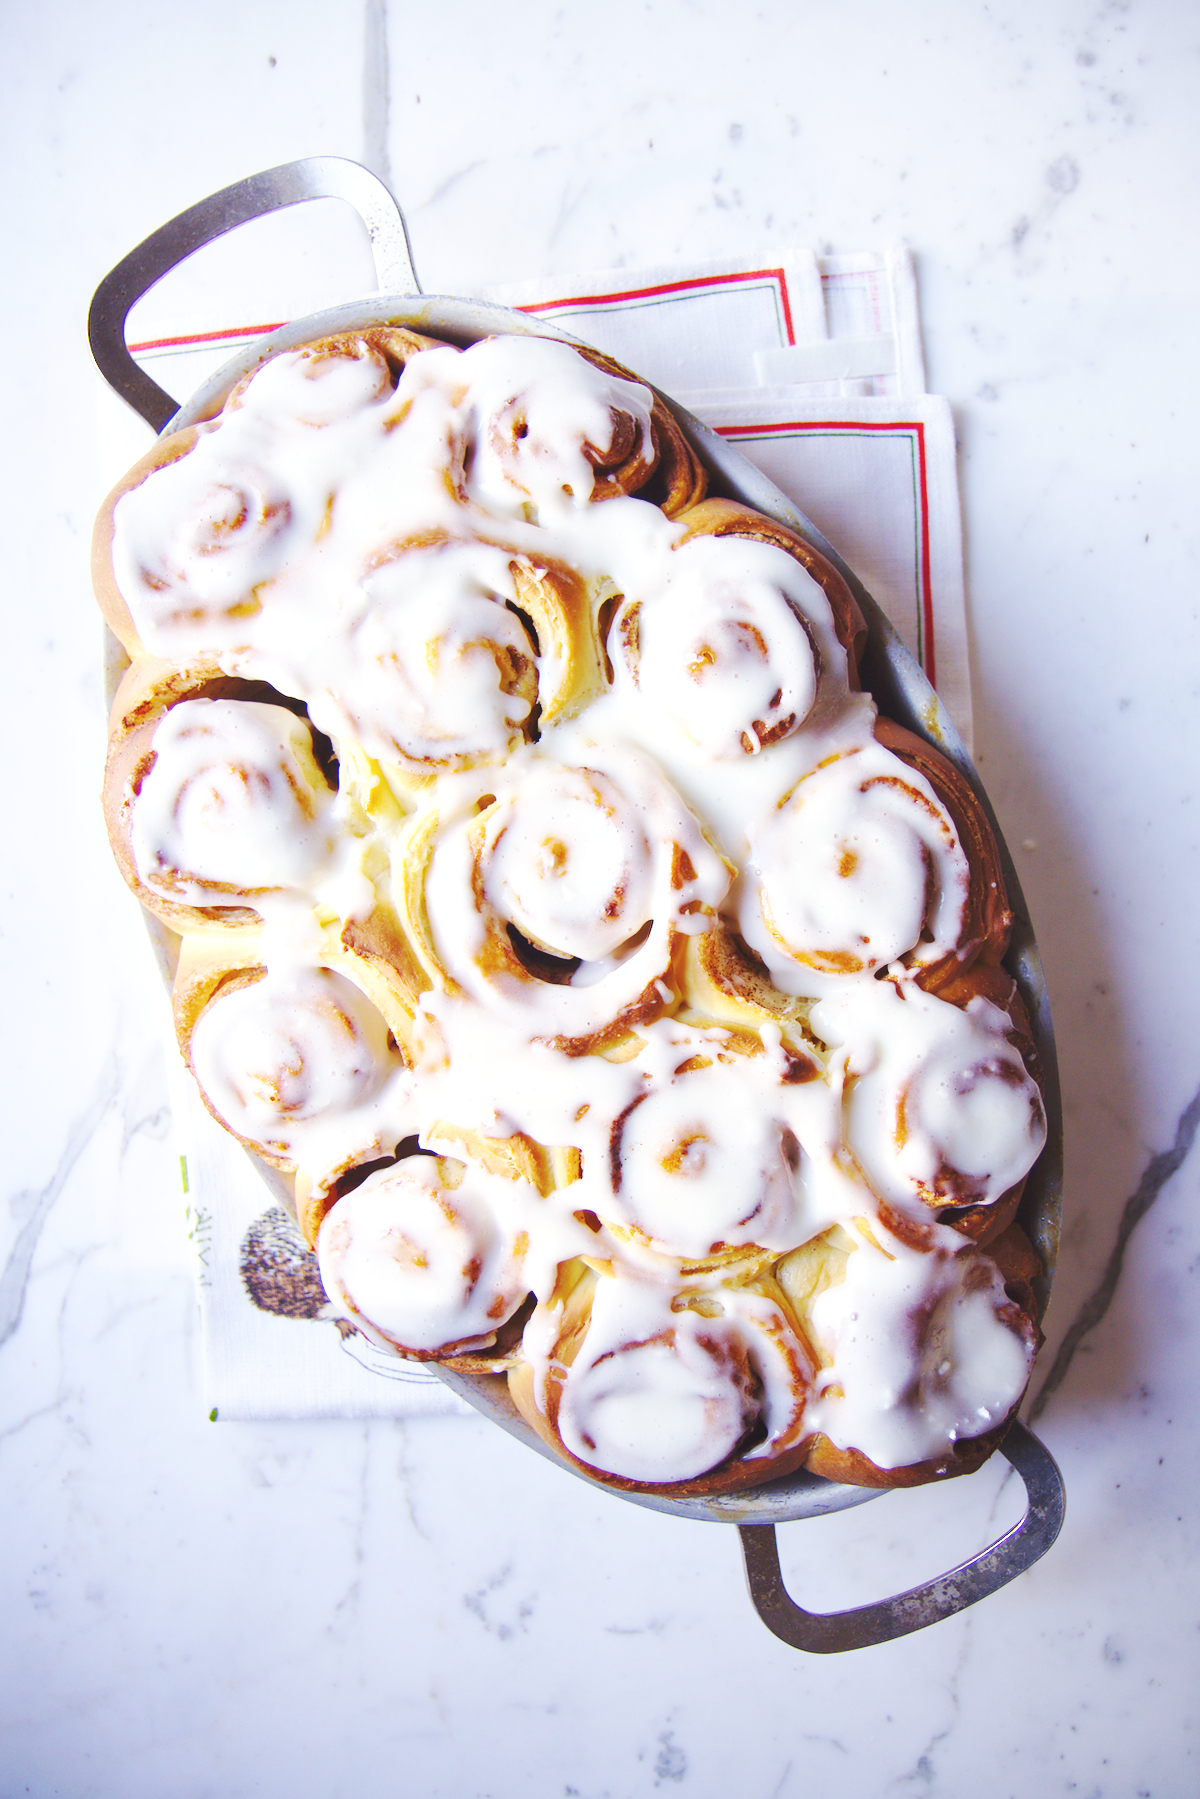
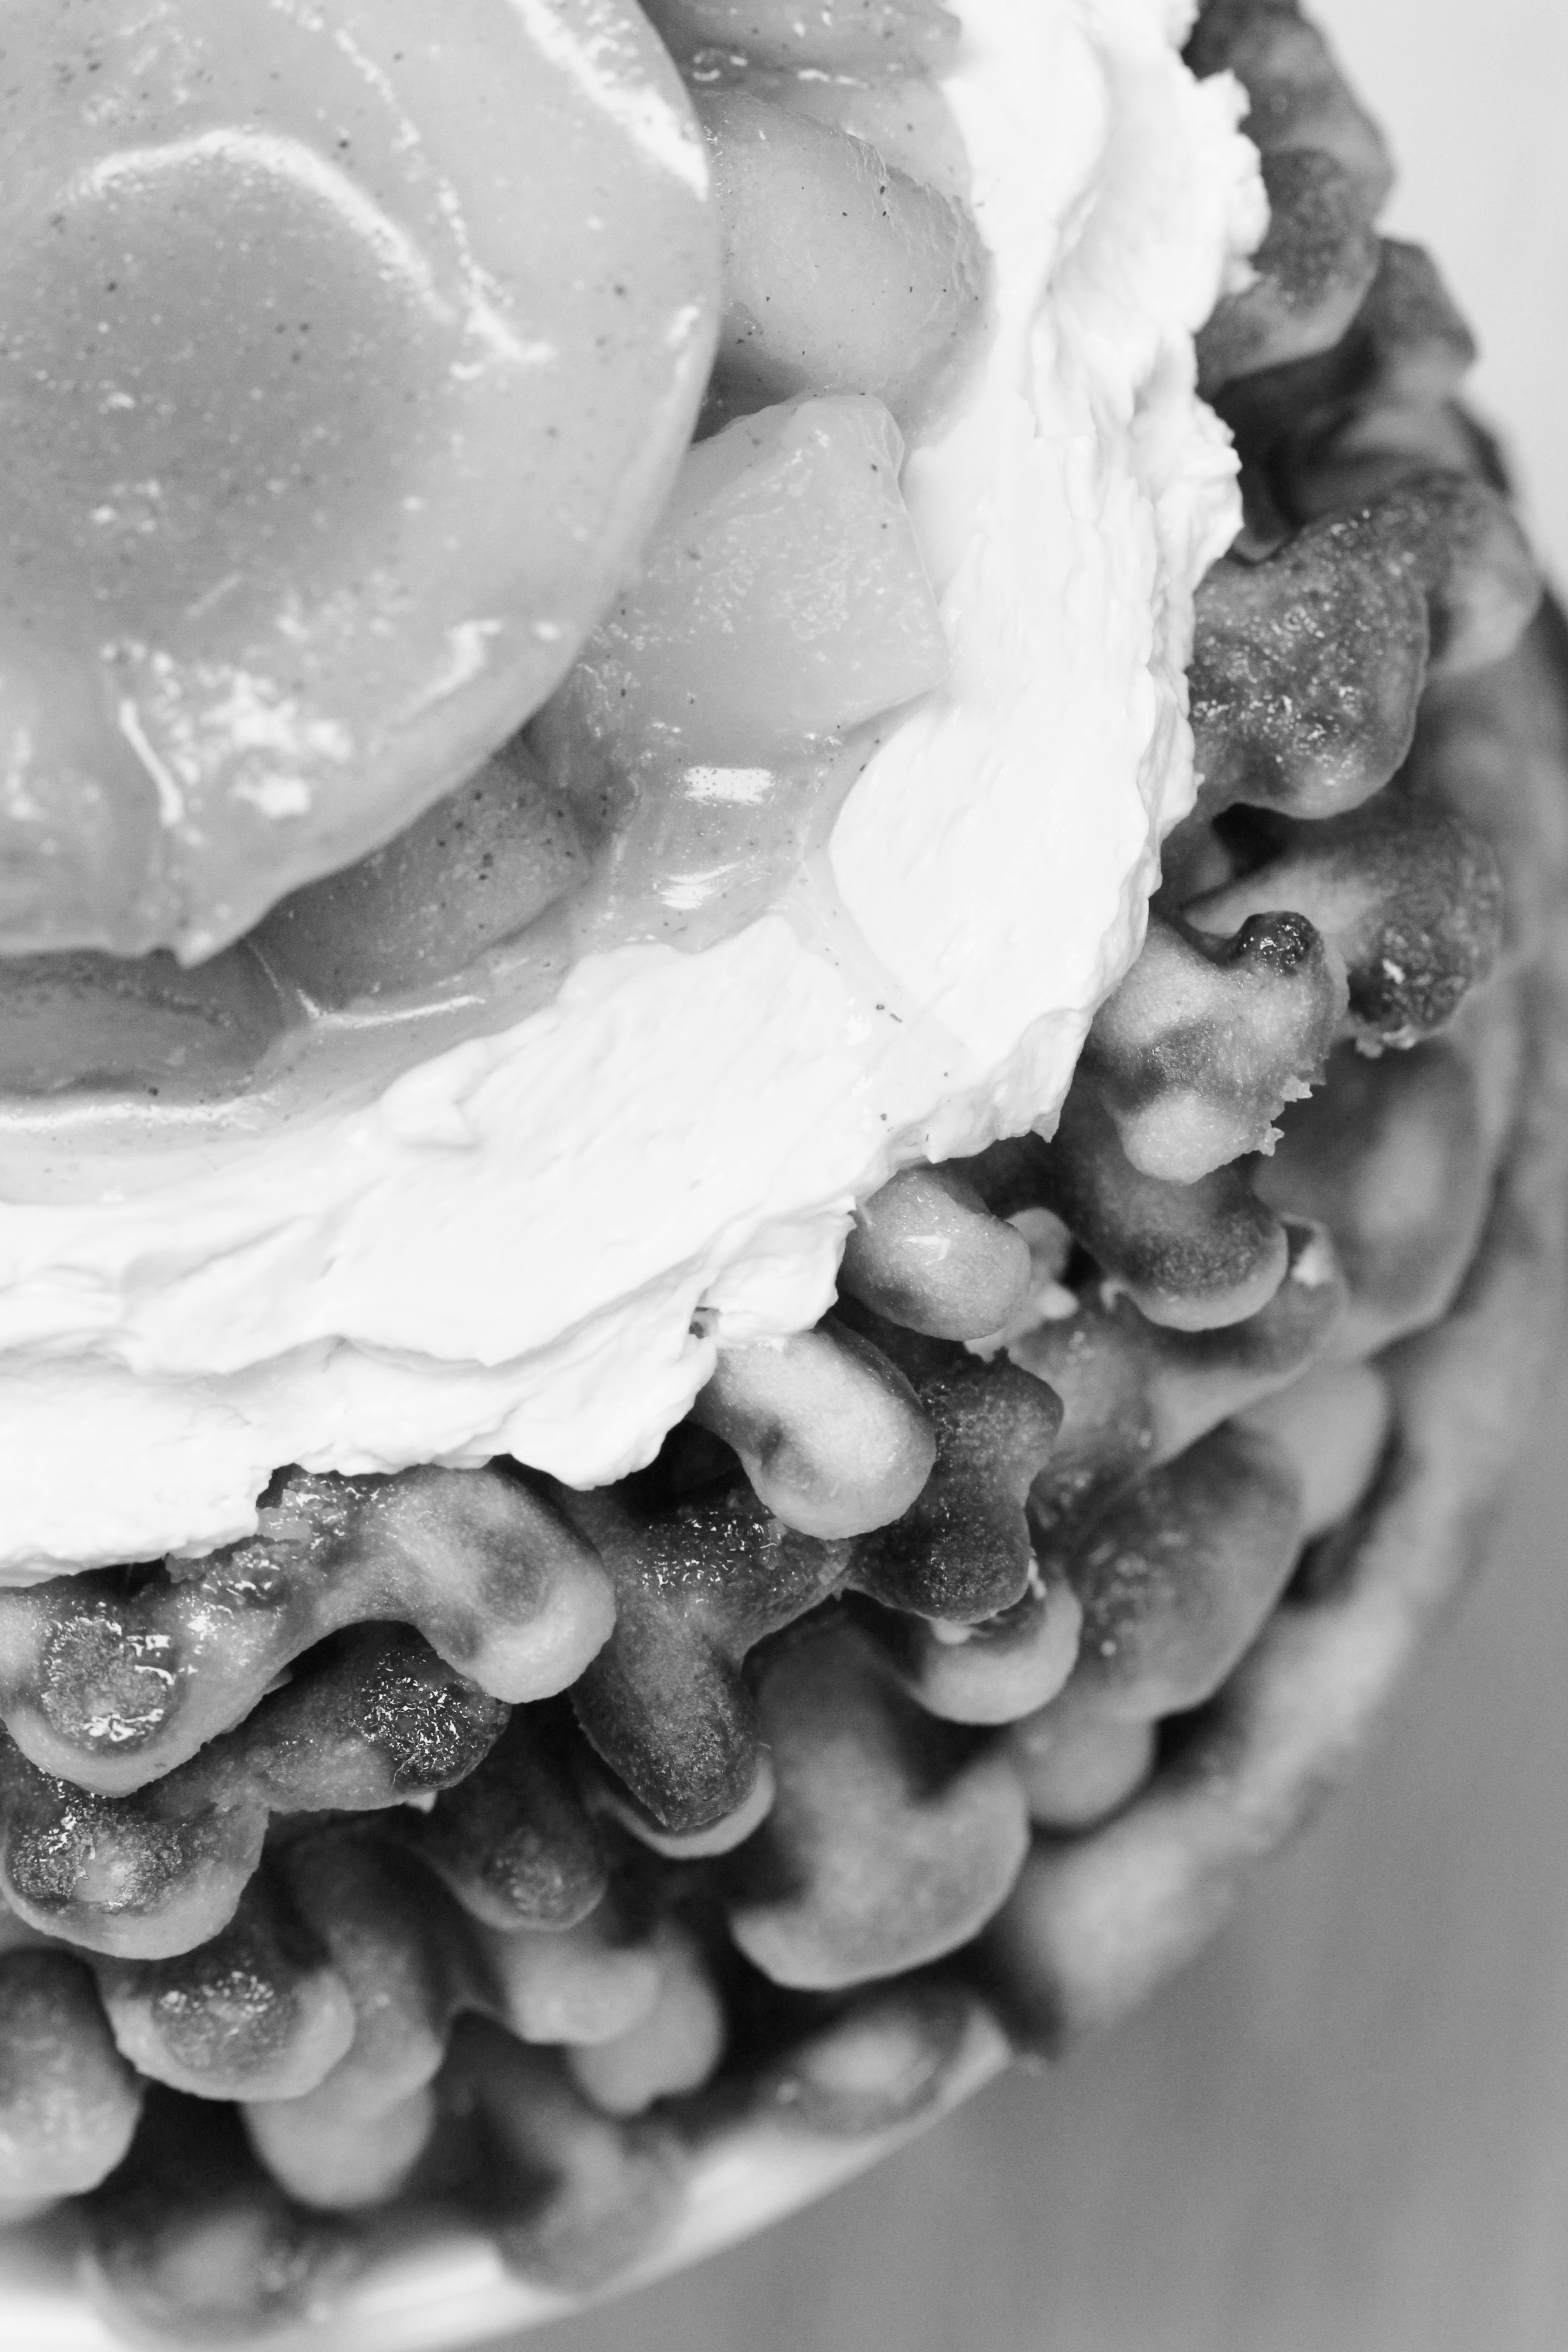
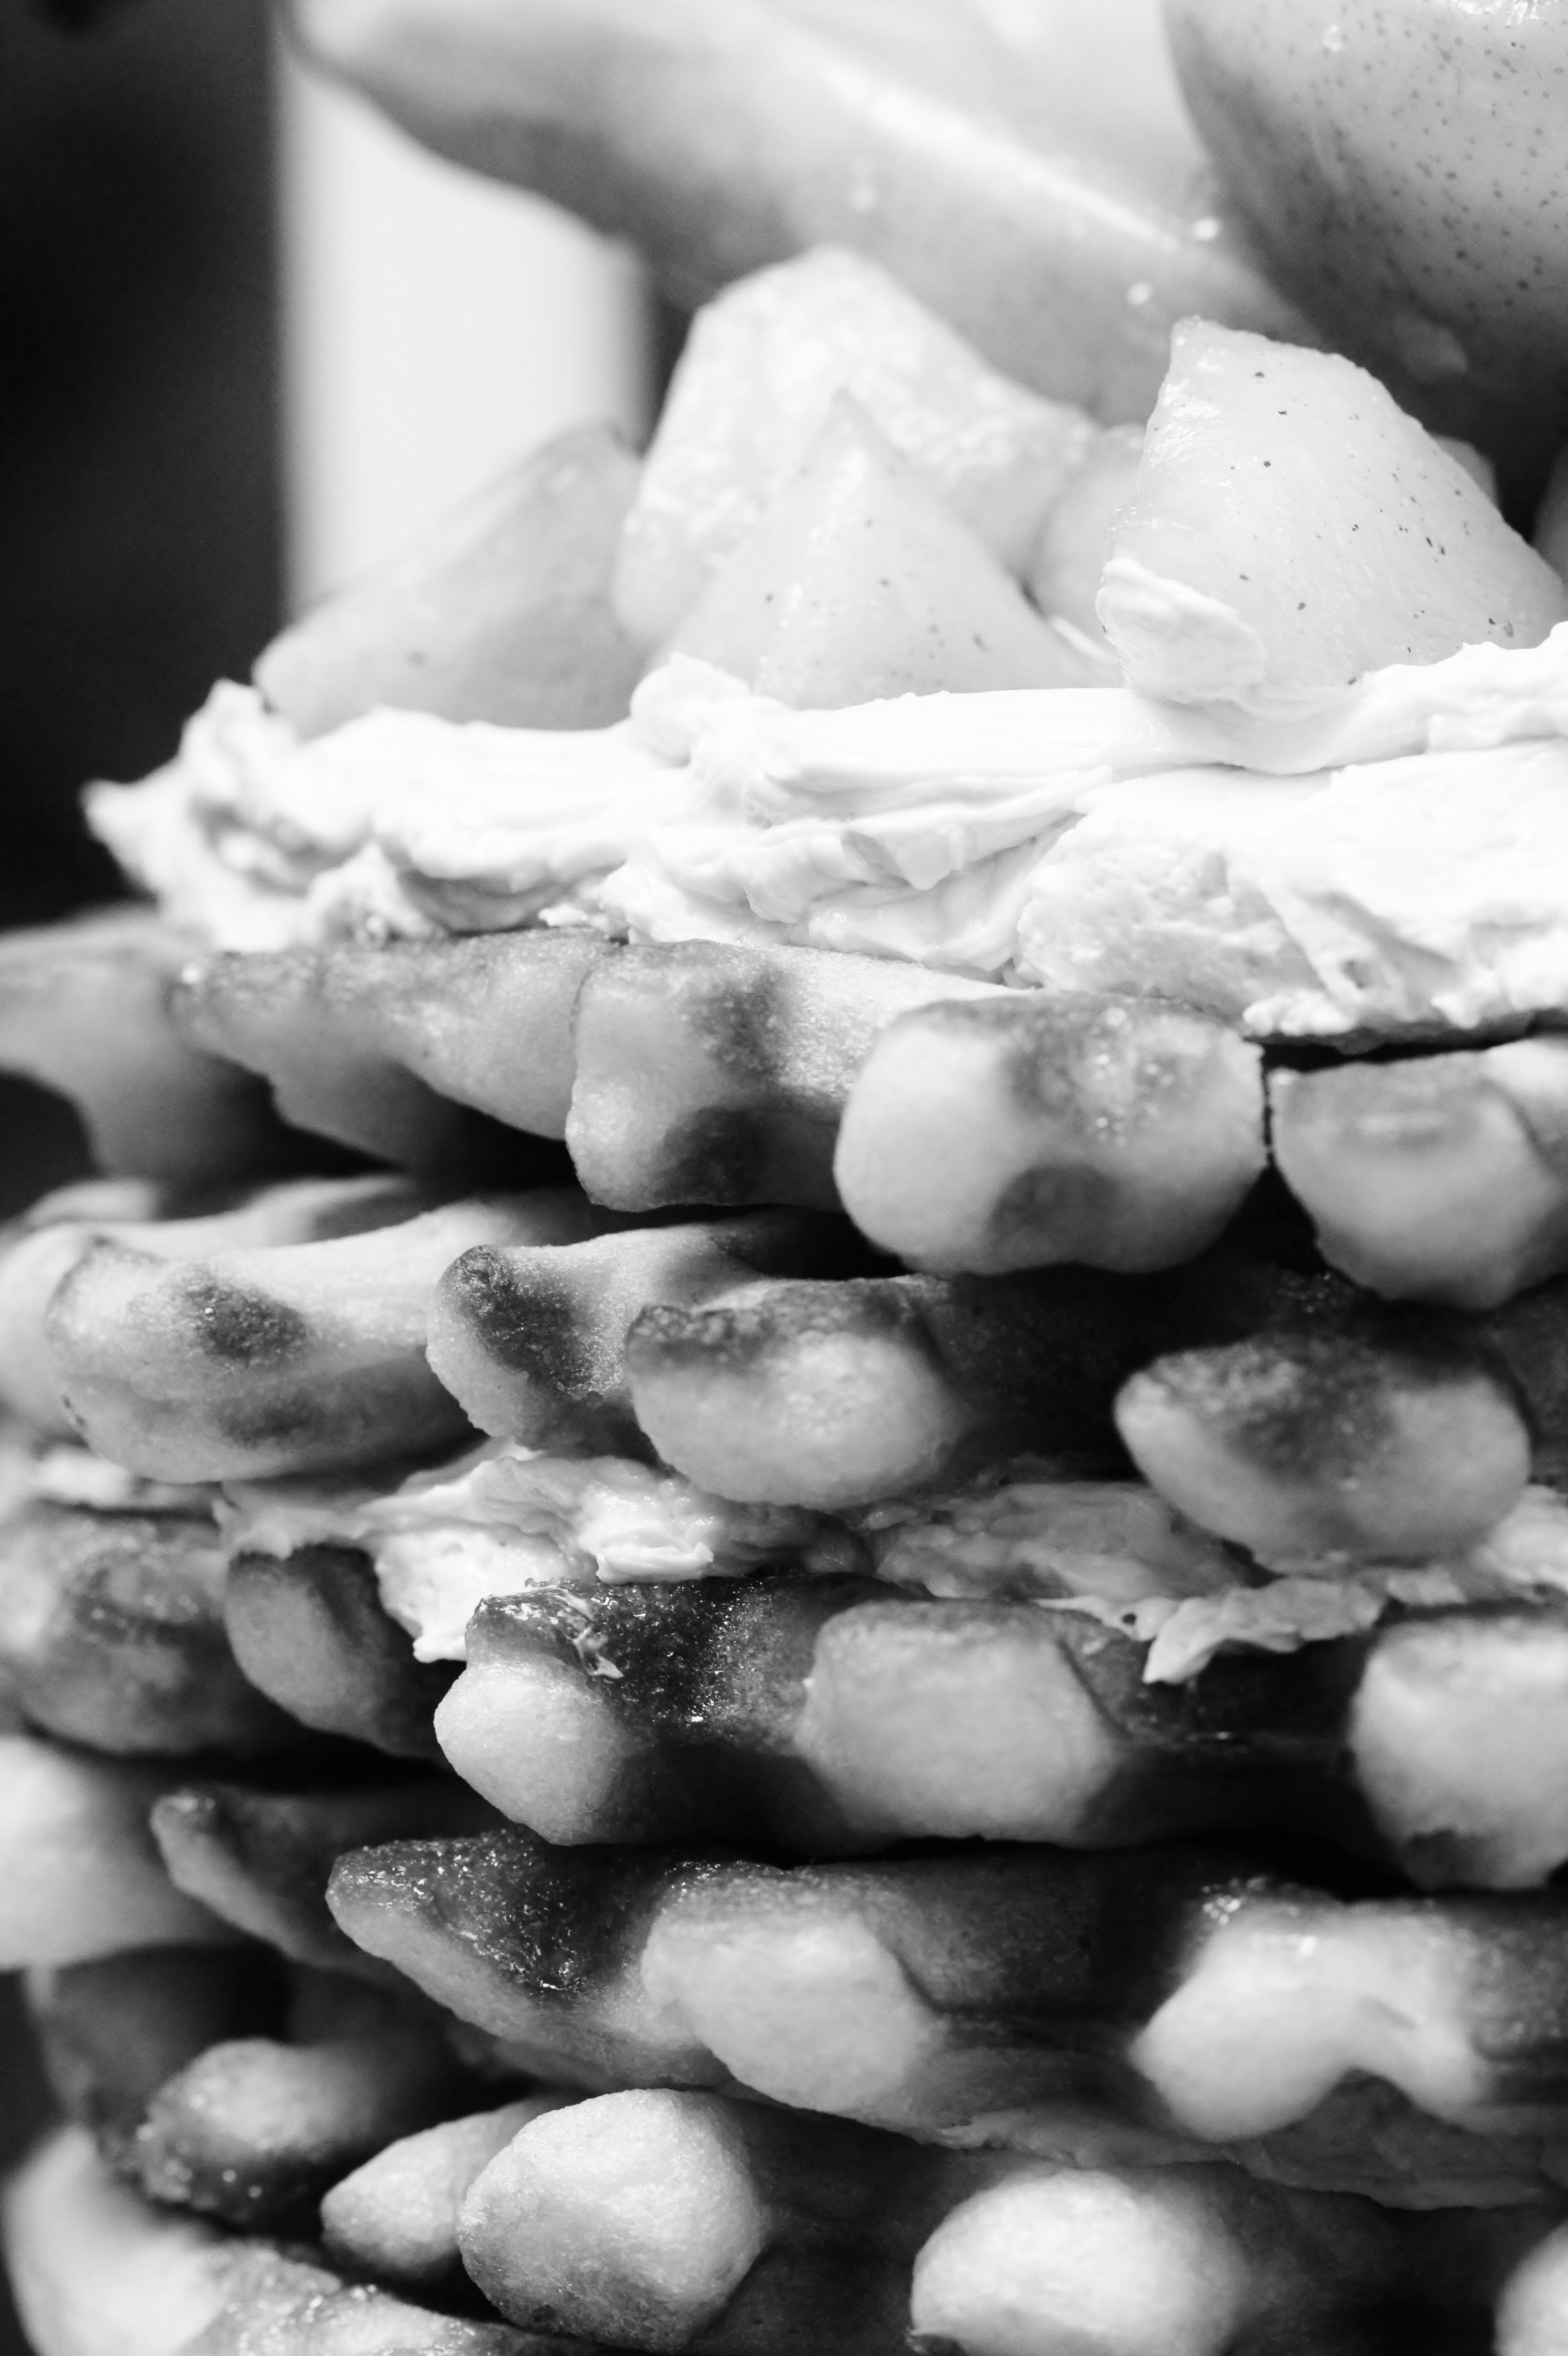
A classic cream cheesy glaze is lathered on top, making the already fluffy, buttery buns even more luxuriously sweet and sticky and creating rivals to even Cinnabon buns.

Pinky promise these will make whomever you live with happy.  They are irresistible!

Fluffy Overnight Cinnamon Rolls | La Pêche Fraîche

Fluffy Overnight Cinnamon Rolls 
makes 15 large buns
adapted from KAF

ingredients:
for the dough:
240 grams (1 cup) low-fat milk, 110 degrees F
2 1/2 teaspoons active dry yeast
2 eggs, room temperature
75 grams (1/3 cup) butter, soft and cut up
530 grams (4 1/2 cups) flour
1 3/4 teaspoon kosher salt
100 grams (1/2 cup) sugar

for the filling:
75 grams (1/3 cup) butter, soft
210 grams (1 cup) packed brown sugar
3 tablespoons cinnamon

for the glaze:
3 tablespoons cream cheese
1 teaspoon cream
170 grams (1 1/2 cups) powdered sugar
splash vanilla extract

directions:
Make the dough: bloom the yeast in the lukewarm water; set aside to become frothy.
Place flour, salt, and sugar in the bowl of a stand mixer fitted with the hook attachment.
Add in the frothy yeast mixture and stir on low; add in the eggs one at a time and knead until a rough dough comes together; add in the butter one piece at a time, waiting until each is fully incorporated before adding the next.
Knead on medium speed for 10 minutes, or until the dough isn’t too tacky and has created a “tornado” shape on the bottom of the bowl.
Dough should not be sticking to the sides of the bowl, but rather, be smooth and even and soft.
Remove from stand mixer bowl and form into a ball; place into a well-greased bowl and oil the top of the dough just a little.
Place in a warm, draft-free place with plastic wrap fitted snugly on top of the bowl.
Once doubled in size (about an hour), punch dough down.
Flour a surface lightly and grease a 9×13 or similar size pan.
Turn the dough out and roll out firmly into a 16″x21″ rectangle; dough should be fairly thin.
It will snap back as you roll it out, so be patient.
Once rolled out, spread the softened butter out all over the dough, leaving a small edge on one long side.
Sprinkle the brown sugar and cinnamon all over the butter.
Starting from the long side opposite the little empty lip, roll up the dough into a snug spiral.
Using a piece of string or flavorless floss or a serrated knife, cut the roll into 12 2″ buns.
Arrange them snugly into the greased pan.
Cover with plastic wrap and refrigerate overnight.
In the morning, remove from fridge and place in a warm, draft-free place.
Preheat oven to 375 degrees F.
When buns have doubled in size, remove plastic wrap and place in oven for 25-30 minutes, until golden brown and fragrant and a tester doesn’t stick in the center.
Remove from oven and allow to cool slightly while you prepare the frosting.
Whisk cream cheese and cream together with vanilla extract; sift in the powdered sugar and stir until a thick frosting comes together.
Spread over the still-warm buns in a thick layer.
Allow frosting to set, about 15 minutes, before serving with hot coffee.

A Donut A Day

IMG_9866_01

Happy national doughnut (donut?) day!

IMG_9858_01

Here.  Go make these ridiculous beignets from Mandy of Lady and Pups.
I’m coughing my lungs up (don’t ask me how I’ve managed to get so freaking sick right before exams…), and don’t feel like rewriting her thorough instructions.

Next time, I’m cutting mine into rounds and filling them with custard and jam.
This batch didn’t puff up nearly as much as I wanted, which only motivates me to retest and perfect.
In fact, I might do that tomorrow.  Just another reason to save your frying oil!!
Because doughnuts.

Also, if you have to ask whether that obnoxious amount of powdered sugar is really necessary, then I’m afraid you don’t deserve a beignet.  Visit Café Du Monde and you’ll see what I mean.

Back soon with pie. Xx

IMG_9881_01

Citrouille

IMG_5462_01

“Impossible, for a plain yellow pumpkin to become a golden carriage.
Impossible, for a plain country bumpkin and a prince to join in marriage.
A slipper made of glass is just a shoe and dreamers never make the dream come true. Impossible!”

-The Fairy Godmother, Cinderella

IMG_5506

You’re probably hoping that your eyes deceive you and that these buns are not, in fact, orange.

That these buns are not, in fact, made of pumpkin.

Another pumpkin recipe on the blogosphere?  Impossible!  It will explode, raining orange, autumnal purée and pepitas over all of us.

Impossible!  Surely!

P.S. Still lolling at that gif.  Like I can’t even.  Hahahahahahahahaaha.

IMG_5493_01

Okay.  Yes.  Oops.  It might be one pumpkin recipe too many.

I exploded the blogosphere and GET THIS IT GETS WORSE YES I KNOW

 because I still have at least one more pumpkin recipe

(but probably 2)

and then I’ll be done IpromiseI’msorryI’msorryIknowI’mabadblogger.

So let’s all forget that we’re sick of pumpkin.  Let’s pretend it’s a new and exciting medium in which I, as a food blogger, can work. (HA!)

Let’s just enjoy this damn orange vegetable while it’s still kind of fall and semi-acceptable.

Okay?  At least it’s November and not May.  Let’s look on the bright side of this tired squash.

IMG_5464_01

Bunz.

Let’s talk bunz.

Soft, brown-butter, yeasted and spiced pumpkin dough is folded around a butter, pumpkin spice, and sugar filling into which you will undoubtedly want to faceplant.

Strips are cut, then cut again, then twisted and folded and knotted and topped with heaping amounts of sugars.

The Swedish-inspired buns expand a little, rise a little more, and then get baked to golden perfection.

The bottoms of my buns got a little burned.  (Teehee.) Double up baking sheets so this terrible tragedy doesn’t happen to you.

These are perfect with a hot cup of tea or coffee.  They would be a most marvelous accompaniment for a Swedish fika.

Fika fika.

IMG_5470_01

Brown Butter Pumpkin Kanelbullens
inspired by Call me Cupcake! (Serious blog admiration/love/drool.)
makes approximately 16 buns

ingredients:
for the dough:
125 grams (approximately 1/2 cup) milk
125 grams (slightly heaping 1/2 cup) pumpkin
7 grams (1 packet, 1/4 ounce, 2 1/4 teaspoons) dry yeast
75 grams (5 tablespoons plus 1 teaspoon) butter, browned
45 grams (scant 1/4 cup) sugar
1/2 teaspoon pumpkin spice blend
420 grams (3 1/2 cups) flour

for the filling:
85 grams (6 tablespoons) butter, very soft
45 grams (scant 1/4 cup) sugar
2 teaspoons pumpkin spice blend

to finish:
1 egg beaten with 1 tablespoon water
granulated sugar and Swedish pearl sugar, for decorating

directions:
Place pumpkin and milk in a saucepan and heat to 110 degrees F; sprinkle the yeast over and allow to bloom for 5 minutes.
Whisk the browned butter, sugar, and pumpkin spice together very well.
When the yeast is dissolved and little bubbles are forming in the pumpkin/milk, whisk that mixture into the butter mixture.
Place in the bowl of a stand mixer and dump all the flour on top.
Mix with the dough hook for 7-10 minutes, until the dough is crazy soft and smooth, like a baby’s bottom.
You now have two options: leave the dough for up to 3 nights in the fridge in an oiled bowl with saran wrap pressed lightly against the surface, or let it rise at a warm room temp in the same bowl/wrapping situation until doubled in size, about 2 hours, depending on temperature.
If you refrigerate the dough, let it come to room temp before proceeding, which may take a while depending on the heat of your kitchen.
When you’re ready to finish the buns, roll the dough out into a large rectangle on a floured surface to a thickness of about 1/8 of an inch.
Mash the butter, sugar, and spices together with a fork or spoon (if your butter isn’t soft, use a mixer to soften it).
Spread the butter mixture over the rolled out dough- it should be very thinly spread.
Fold the short edges over, to fold the dough like a letter.
Cut strips of dough, then split them almost all the way up, leaving a small bit at the top still attached as one– like pants!
Twist the pant legs, then knot them together.
Place the buns on a well-insulated baking sheet (my bottoms got burned– I would recommend doubling up) lined with parchment.
Brush with egg wash and sprinkle with sugars.
Allow to rise while you preheat the oven to 350 degrees F.
Bake for 20-25 minutes, until the top is golden and the buns are baked all the way through (pull one apart to inspect).
Enjoy warm with tea or coffee!

Windy Wednesday

IMG_2744 (2)

Today’s post is brought to you by the letter W.

IMG_1964

Words are not one of the W’s.  They escape me today.

But rather: waffles, waterfalls, and wistful. (Wednesday, too, I suppose!)

Oh… and windy… Because, yes, I am in the Windy City.

IMG_2157

So, um, yes.  Here are some abstract pictures of a waffle cake.

And my dog, obviously.

IMG_2766 (2)

My waffle maker makes kind of smushed waffles.  It’s pretty old.  I don’t blame it.

The result of  stacking up these smushed waffles with a lightly spiced brown butter and maple pear-apple compote and a maple Italian meringue is a delicious but somewhat ugly cake.
I know!! So many ugly cakes lately.  Sorry.  Sometimes that’s how the cookie crumbles.
Whataryagonnado.

IMG_2772 (2)

Pssst… I even had a slice for breakfast!

(Ginger, on the other hand, did not.)
Which explains her facial expression.

IMG_1949


Pear and Apple Waffle Cake

for the waffles:
from King Arthur Flour
ingredients:
1 1/2 cups milk, warmed to 110 degrees F
6 tablespoons melted butter
2 tablespoons maple syrup
1 teaspoon kosher salt
1 teaspoon vanilla extract
2 eggs
2 cups flour
1 1/2 teaspoons active dry yeast
1 scant cup of Belgian pearl sugar

directions:
Sprinkle the yeast over the milk to prepare it for its job; after five minutes, whisk in the butter and maple syrup as well as the vanilla extract.
Stir in the eggs and the flour and salt; set the batter aside in a warm place, covered in plastic wrap, for one hour, to rest and rise.
Right before cooking, stir in the Belgian pearl sugar.
Cook the waffles in a waffle maker.
for the pear and apple compote:
ingredients:
2 medium pears, peeled and cored and chopped into small pieces
3 medium apples, peeled and cored and chopped into small pieces
3 tablespoons maple syrup
1/2 tablespoon butter
pinch salt
pinch cinnamon
pinch nutmeg

directions:
Brown the butter in a saute pan, then add all the apples and pears and saute them until they soften.
Add the maple syrup and allow it to reduce by 1/2.
Season to taste with salt, cinnamon, and nutmeg.
Allow to cool before using.

for the maple Italian meringue buttercream:
ingredients:
1 egg white
pinch salt
pinch cream of tartar
1/3 cup maple syrup
1 stick of butter, softened
directions:

Place egg white, salt, and cream of tartar in the bowl of a stand mixer.
Place maple syrup in a small pot and begin to heat it up.
Whip the egg white while heating the maple syrup to 240 degrees F.
The white should be at soft peaks when the syrup reaches temp; drizzle it in with the mixer running.
Once the meringue has cooled, beat in the butter.
Stack up the waffles with buttercream and compote.
Enjoy!

Pudd’nhead

“Adam was but human—this explains it all. He did not want the apple for the apple’s sake, he wanted it only because it was forbidden. The mistake was in not forbidding the serpent; then he would have eaten the serpent.”
-Mark Twain, Pudd’nhead Wilson
I have bad news.
I did that thing I do again.
That thing that I do that makes no sense.
I scratched my compulsive, everything-from-scratch itch again.
I made bread- but not just any bread, a very involved, intricate, fussy, time-consuming bread.
Then, I chopped it up and made bread pudding.
I know.  I think I’m crazy, too.
But this bread… Oh, this bread.
Soft, fluffy, snowy white.
Yes, white bread.  Even though I’m a nuts-and-seeds, whole-food, whole-grain, fermented, brown, brown, brown bread type of girl, I love white bread.
We all do.  I refuse to hear otherwise.
Think about it… crispy, crackly baguettes, eggy challah, white sourdough boules…
White bread is great, occasionally.
Now is one of those occasions.

I baked this bread following instructions at Kirbie’s Cravings.
She adapted it from a cookbook, 65 Degrees, which outlines the Tangzhong method of making bread.
This is a Japanese-style Hokkaido bread, which is a milk, butter, and cream enriched dough.
In my experience, enriched yeast doughs need a little more care to ensure they come out perfectly.
Her instructions could not be any better, so I’ll send you there if you’d like to try the bread.
I highly recommend it.
(You will need a scale.)

I halved the recipe so I would only get 1 loaf, but found myself regretting that we didn’t have two loaves.  
The tangzhong paste is sort of like a bread enhancer/saver, so it will last a bit longer than other homemade breads, another reason to make two loaves.

Here’s the link:

Kirbie’s Cravings’ Hokkaido Milk Toast

(Thanks so much, Kirbie!!)

Some tips that I learned while making this bread:
The tangzhong cooks very quickly, so stay near it while it cooks.
Set a timer for 20 minutes and let the dough knead the entire time: due to the enriched nature of the dough, the gluten development is slightly inhibited (the butter, cream, egg, and milk make it difficult for the gluten to form) and needs a long kneading period.
Your dough needs to pass the membrane/windowpane test, which Kirbie describes perfectly.  She even provides pictures.
Now, these bread puddings:
you should eat them warm, with a dollop of cold, freshly whipped cream.
The chocolate is melty, the plums are fall-apart tender and tart.
The top of the bread is crunchy and the underside is custardy.
 
Bread pudding is a fall dessert.  
This bread pudding showcases the best of late summer: plums.
They’re roasted until bubbling and syrupy, then cut into small pieces and layered among fluffy bread cubes and dark chocolate chips, then smothered in custard and baked, again, until bubbling.
The juices pour down the sides as the puddings puff up; when you pull them out of the oven they will deflate a bit, but the result of the deflation is a lovely, dense custard, filled with goodies.
 
You could make these with any white bread: challah, sourdough, sandwich, brioche… just cut the crusts off.
Or, you could make them with Hokkaido milk toast… Which obviously I highly recommend.
 
P.S. Heat any leftovers (what’s a leftover) in the microwave for 20 seconds, so they warm up again.  They’ll taste like they’re straight out of the oven.

Roasted Plum and Dark Chocolate Bread Pudding
makes 4 small ramekins, easily doubled, tripled, or quadrupled
ingredients:
2 plums or pluots
1 tablespoon of sugar
3 1/2 inch thick slices of brioche, challah, or sourdough, crusts removed and cubed
1 egg
3/4 cup milk
1/2 a vanilla bean, scraped
pinch of cinnamon
3 tablespoons sugar
4 tablespoons large chocolate chunks or chips
turbinado sugar, for sprinkling (optional)
whipped cream, for serving (optional)
directions:
Preheat oven to 375 degrees F.
Halve and pit the plums and place in a baking dish.  
Sprinkle with 1 tablespoon of sugar and bake until syrupy and soft, 12-15 minutes.
Remove from oven and allow to cool slightly.
Reduce oven temperature to 350 degrees F.
Whisk egg, milk, and 3 tablespoons sugar together with the scrapings of 1/2 a vanilla bean and a pinch of cinnamon.
Lay bread cubes over the bottom of each ramekin and place a few chocolate chips over that layer.
Cube the cooled plums; place a thick layer of plums over the first bread layer, about 1/2 plum per ramekin.  
Top with the remaining bread cubes and chocolate chips.
Pour 1/4 of the egg mixture over each dish, then sprinkle liberally with turbinado sugar.
Bake until puffed, golden, and juices overflowing, about 20 minutes.
Remove from oven and allow to cool slightly; serve warm with whipped cream.

That’s The Way

Uh huh uh huh, I like it, uh huh uh huh.

You’re welcome! That song will be stuck in your head for at least 5 minutes and up to a few days.
Then it’ll probably be Call Me Maybe.
Raspberry (actually, all berries) and lemon is like the ultimate ultimate combo for me (add some rhubarb and I’m done.  Seriously.  Done.)
 
Methinks it’s because I’m a photic sneezer. (whosamawhatsit?!)
 
photoptarmosis: uncontrollable sneezing in response to numerous stimuli
(Thanks, wikipedia.)
I sneeze when I eat chocolate.  And strong mint, like altoids or strong gum.  I sneeze when I look at the sun.
It’s kind of fun, and mildly entertaining.  Chocolate and gum are especially funny, seeing as I am nearly constantly snacking on one or the other.
Milk chocolate is less stimulating, I suppose, due to its lower cacao content, and I am less likely to sneeze when sneaking a taste of a Hershey bar than say, a dark chocolate cake or chocolate chip cookie.  
With dark chocolate, I’m sneezing all over the place.  
The longest sneezing fit I’ve ever had from chocolate was like 6 sneezes long.
My sneezes are especially dramatic (I mean, c’mon, it’s me.  Of course I’m going to be loud and obnoxious.), making these sneezing fits very… um… drawn out.
Achoo!  Pay attention to me!  Achoo!  Achoo!
So anyways, I think that’s why chocolate is not my favorite flavor.  
Don’t get me wrong, I love the stuff.  
It’s heaven sent (Theobroma cacao, literally “chocolate food of the gods,” and yes, I know the taxonomic name for chocolate without looking.  What kind of pastry-obsessive would I be if I didn’t?)
 
I would take a fruit-based dessert, especially one with citrus, over chocolate any day.
Curd over ganache, always.
(Actually, I would put them together.  I’m a greedy little pig.  Oink.)
It’s taking a while to get around to the moral of this story.
Moral of this story:  these sticky buns are right up my alley.
They’re sweet and very sticky, caramelized on the bottom and redolent with lemon zest.
The tangy cream cheese pairs well with tart lemons and raspberries, all of the sourness being balanced by the sweet, sugary filling and buttery dough.
These are yeasted buns, but they go from mind to oven to belly in less than 2 hours, most of it being hands-off, and none of it being labor intensive.
 
Mix the dough with a mixer, plop it into a bowl and let it rest, roll it out, fill it with the simplest filling ever (butter+sugar+lemon zest), roll ’em up and slice ’em, let ’em rise, bake, glaze, eat.
 
Be not afraid of yeast!  We love yeast!  Yeast loves us!
And the yeast will behave, I promise.
They smell fear.  Don’t be afraid and you will be just fine.  
I would hold your hand, but mine is very sticky from this sweet bun.


Lemon Raspberry Sticky Buns
adapted from here
ingredients:
3/4 cup milk
4 tablespoons butter, browned
3 1/4 cups flour
2 1/4 teaspoons yeast (.25 ounce, 1 packet)
1/4 cup sugar
Heaping 1/2 teaspoon kosher salt
1/4 cup water
1 egg
Zest of 1 1/2 lemons
3/4 cup sugar
4 tablespoons butter, browned
Raspberries
For the glaze:
Juice of 1 1/2 lemons
1 cup powdered sugar
4 ounces cream cheese, softened
Directions:
Bring milk to a simmer, remove from heat, and combine with 1st measure of butter and water.
Allow to cool to 110 degrees F.
Meanwhile, mix 2 1/4 cups of the flour, salt, yeast, and 1st measure of sugar in the bowl of a stand mixer with the dough hook.
Once milk mixture cools, pour over dry ingredients, mix briefly, and then add egg and last cup of flour.
Allow dough to knead until very smooth and pulling away from the sides of the bowl.
Place a slightly damp tea towel over the bowl and allow to rest for 10 minutes.
Meanwhile, rub lemon zest together with 2nd measure of sugar.
After 10 minutes, roll dough out into a rough rectangle.
Dough should be rolled very thinly, no thicker than 1/4 of an inch.
Brush the dough with the 2nd measure of brown butter, then sprinkle the lemon sugar over.
Break up raspberries and dot them all over the dough.
Roll the dough up and pinch the seam firmly shut.
Cut the roll into 1 1/4 inch thick buns.
Brush a 6×12 pan with butter and place the buns snugly in.
Place a slightly damp tea towel over the pan and allow to rise until doubled in size, about 30 minutes.
Meanwhile, preheat oven to 375 degrees F.
Bake buns until the interior reaches 190 degrees F, about 30-35 minutes.
If the top starts to brown, cover with foil and continue baking.

For the glaze, simply beat everything together until smooth.
Spread over warm buns right out of the oven.

Did Someone Say…

 
…donuts?!? (er… doughnuts?)
Why, yes, I done did.  
 
Three types of donuts, in fact: brown-butter maple bacon, Vietnamese coffee (cinnamon+coffee), and cherry-chocolate.

 
Now, I’ve always been leery of frying.  It’s a lot of hot, burbling oil, which makes me nervous.
 
I’ve sustained many burns in the kitchen over the years, and ones from oil splatters are the second worse, trumped only by sugar burns.
But… and this is an important but… I’ve wanted to make real donuts for ages.  
 
I finally decided to man up and get down with deep frying, with my dearest stomach readers in mind.
These donuts are miraculously puffy and soft little pillows of dough wrapped in just-barely crispy edges and sweet, sticky glaze.  
 
I decided to make a decidedly clichéd maple-bacon donut, using my absolute favorite glaze of all-time… brown-butter/maple/cider.  Ohmagah.  Once all the donuts were glazed, I couldn’t help myself.  Sneak a dip, lick, repeat.  Until the bowl was almost gone and my teeth were beginning to ache.  So worth it, people.  So worth it.
 
The second type I made was a chocolate-crémeux filled, cherry-glazed and pink heart adorned donut.  I wanted it to be pink and include chocolate because, well, firstly, who doesn’t love cherry-chocolate, and secondly, for a Valentine’s baking article for my school newspaper.  
 
I couldn’t just leave the poor little donut holes wallow in their teeny-tininess, could I?  So I fried those lil guys up and chucked them into a bowl of coffee glaze and from there, a bowl of crunchy cinnamon sugar.
 
 
A successful morning, I’d say.  I made the dough the night before and stuck it in my fridge, and the alluring smell of donuts filled my entire house by 11:00 the next morning, rousing any and all late sleepers.  They were all gone by the next morning.
 
Yeast-Raised Doughnuts
recipe from the wonderfully decadent Pioneer Woman, Ree
ingredients:
1/2 cup plus 1 tablespoon milk, warmed to 110 degrees F
2 tablespoons sugar
1 1/8 teaspoon (1/2 a regular package) yeast
1 egg
5 tablespoons butter, melted
2 cups flour
1/8 teaspoon salt
vegetable oil or shortening, for frying
directions:
Add sugar and yeast to warm milk and allow to proof for 5 minutes.  Whisk the egg and butter together quickly to ensure that the egg doesn’t scramble.  Add the egg/butter mixture and the yeast/milk mixture to the bowl of a standing mixer (with a dough hook) and mix together.  Once mixed, add the flour in in 1/4 cup increments until all the flour is gone; add the salt sometime in the middle of adding the flour (not at the very beginning or the very end).  Knead the dough on medium-low speed for 5 minutes, then turn the mixer off, scrape the bowl, and turn the mixer on medium-high for 30 seconds.  Let the dough rest for 10 minutes, then place it in a lightly oiled bowl, toss to coat, and press plastic wrap directly onto its surface.  Place in the fridge overnight (or 8 hours).  
The next morning, take the dough out and place it on a lightly floured surface.  Roll it out to 1/4 inch thickness, and working quickly, cut out as many rounds as you can.  If the dough gets too warm and begins to shrink back, stick it back in the fridge for 10 minutes.  Cut holes out of the rounds, unless you want to fill the donuts.  Place all your rounds and holes onto a parchment lined baking sheet, cover lightly with a dish towel, and let rise in a warm place for about an hour, or until the doughnuts are visibly puffy and look fluffy.
Heat 3 inches of vegetable oil in a heavy, large pot (I used my dutch oven) until it reaches 375 degrees F.  
Gently place the donuts in the oil and cook for 1 minute on each side.  Remove with a slotted spoon to paper towels, and dab/blot/roll the donut around to remove as much oil as possible.  Let cool slightly before glazing. 
Remember to keep checking your oil’s temperature; do not let it get over 380 or below 365.  375 is the ideal temperature.
 
I used this glaze for the maple-bacon donuts, and topped them off with freshly cooked bacon.
 
For the Vietnamese Coffee donuts:
ingredients:
1 cup powdered sugar
pinch salt
splash of vanilla extract
1 heaping tablespoon instant espresso
3 tablespoons milk, or as needed to thin
3/4 cup sugar plus 1 1/2 teaspoons cinnamon, for rolling
directions:
Dissolve the espresso into the milk.  Stir in the vanilla and salt, then whisk in the powdered sugar.  If the glaze is too thick, thin it with more milk.  As your donuts (or donut holes) cool, dunk them in the glaze, then quickly roll them in the cinnamon sugar.  You may want to wait for a few minutes after glazing to roll in the sugar, if your glaze is thin and drippy.  

Let Them Eat Cake


Hey y’all!
I hope you guys had a wonderful slew of holiday celebrations.
I’m here to give you some marvelous news: the good times keep on rollin’. 
Laissez les bons temps rouler!
 
Today is Epiphany, the celebratory feast of the last day of the twelve days of Christmas.  In the past, upcoming religious observances like Ash Wednesday, Lent, and Easter Sunday, were announced on Epiphany, when calendars were not readily available.
 
In France, today, Epiphany is often celebrated with one of two special cakes: un gâteau des rois or une galette des rois.  
 
The gâteau des rois (literally, cake of kings- indeed, this is where the New Orleans King Cake, which is eaten to signal the beginning of Lent, originated) is traditional in Provence, and consists of a brioche ring topped with crunchy pearl sugar and candied or dried fruit.  
 
The galette is a much slightly more indulgent affair, traditionally comprised of two rounds of buttery puff pastry sandwiching a layer of sweet almond frangipane. 
 
 
Now, keeping in mind the holiday feasts which have just passed, I chose to make un gâteau des rois, because brioche has about one tenth of the butter and far less sugar than puff pastry, and I used part whole wheat flour for an small but appreciated health boost.
So there you go!  You can have your cake, and eat it too.  Even if you’re in an early-January post-resolutions funk.  Yeah, you know what I’m talking about.


Gâteau des rois avec les kumquats confits
recipe lightly adapted from Tartelette
Ingredients:
75 mL (1/3 cup) milk, warmed to 110 degrees F
1 heaping teaspoon instant yeast
75 grams (3 tablespoons) sugar
1 small egg or 1/2 a large one (beat it and either weigh it and divide in two, or just eyeball it.  If you have jumbo eggs, a yolk will do just fine.  And if you cannot be bothered, just throw the whole egg in.  What I’m trying to say is that such a small amount of egg makes little difference here.)
small pinch sea salt (use 1/8 – 1/4 teaspoon)
1 tablespoon orange juice, or orange blossom water
140 grams (1 cup plus 2 tablespoons) flour (I used half white-whole wheat and half all-purpose)
35 g (2.5 tablespoons) butter, softened
1 egg yolk beaten with 1 teaspoon cream or milk, for egg wash
3 tablespoons jelly or preserves (I used a mix of meyer lemon and apricot)
Honeyed kumquats (see below)
Large pearl sugar (I used Belgian and Swedish)
Directions:
Measure out the warm milk in a glass measuring cup or bowl.  Stir the yeast and sugar in gently.  Let foam up for 5 or so minutes, then pour into the bowl of a stand mixer or just a large mixing bowl.  Stir in the egg, sea salt, and orange juice and mix until all combined.  Begin to add in flour (if you aren’t using a stand mixer, use a wooden spoon and gather all of your kneading strength and courage), until all is combined.  Knead for 1 minute, then begin to add in the butter, piece by piece, waiting until the previous piece is incorporated before adding the next.  Now, knead for at least 8 minutes.  It is a wet dough, so be aware.  Once the 8 minutes are up, the dough should be barely sticky and supple, and smell like sweet butter and yeast.  Either place in a lightly oiled bowl with plastic wrap pressed right onto the surface, and allow to age and mature overnight in the fridge (this will make for better flavor), or continue right on.  Divide the dough into 8 equal weight chunks- mine were 51 grams each and were approximately 1/4 cup in size.  Roll the chunks into smooth balls, (put a dried bean in the middle of one) and place on a sheet pan lined with parchment.  Make a circle of balls, then place a jelly jar in the middle of the ring.  Preheat oven to 350 degrees F.  Allow the brioche to rise until doubled in size and very puffy, about 1 hour, depending on the temperature of your kitchen.  Fill the jelly jar with water, so it does not crack in the oven, then brush the dough with the egg wash and bake until the internal temperature is 190 degrees F, or the dough is shiny and deep golden.  Remove from oven and let cool, then carefully remove the jelly jar.
Heat up the jam until liquid, and strain out any large pieces of fruit, if using preserves or jelly.  Brush hot glaze all over brioche, then sprinkle on pearl sugar and place the candied kumquats on each little bun.  Enjoy!

Honeyed Kumquats
ingredients:
1 tablespoon honey
1/2 cup sugar
1/4 cup water
1/2 pint fresh kumquats, washed and cut into thin rounds
directions:
place the honey, sugar, and water in a heavy, medium sized pot and bring to a boil.  Once the syrup reached 234 degrees F, place all the kumquat slices in and allow them to cook for 8-10 minutes, until translucent.  (If you double the recipe, do this in two stages so as not to overcrowd the pan.)  Remove from syrup with a slotted spoon, and place on a sheet of parchment until needed.