I Cannot Lie

IMG_1915

… I like big bundts and I cannot lie…

IMG_3049

I just hate photographing them.  In fact, I gave up photographing both of these cakes, both primarily because I kind of hate the shape of my bundt pan.

It’s great for making a dramatic cake without needing layers, but I can’t get the knack of photographing them.

They’re so… large and in charge.  Sometimes I feel awkward taking photos of them.

Like that maple bacon cake above and below?  I couldn’t get a single photo to not look lurid, so I threw in the towel, put in on a plain white floordrop, and took 3 photos of it.  Screw it. It’s not very attractive anyways.

The ginger-peach-lemon cake, I had 5 minutes to take photos of before needing to go to yoga.  It was still steaming, but the light was fading and I didn’t have my new (!!!!) lighting setup just yet.

So, I put it on a wood board next to a window and took 5 photos of it.  Screw it.

IMG_1904

 Bundt cakes are meh fun.  They’re quick and easy, and if made correctly, they’re quite delicious.

However, I have had (and made) many a dense, rock-like bundt cake.

The peach-ginger-lemon bundt cake was quite the opposite.  It was fluffy, moist, and flavorful.

However, now that peaches are out of season, I’m going to instead share the recipe for the maple-bacon-brown butter bundt cake that I Jackson-Pollacked for my brother’s birthday.

It might very well have been dense… I couldn’t exactly slice into it and eat a piece before shipping it down to D.C. for his birfday.  That’s bad form.
To be honest, I also think it’s ugly.  So let’s pray that it tasted good…

The recipe came from Martha, though, and lord knows I trust her.

Here goes:

IMG_3065Maple Brown Butter Bacon Bundt
adapted from Martha Stewart
ingredients:
2 cups flour
2 teaspoons baking powder
1/2 teaspoon baking soda
1/2 teaspoon salt
12 tablespoons butter, browned
1/2 cup packed brown sugar
2 eggs
1/2 cup maple syrup
2 teaspoons vanilla
1 cup buttermilk
directions:
Preheat oven to 350 degrees F.
Grease and flour a bundt pan.
Whisk the flour, baking powder, baking soda, and salt together.
Whisk the butter, brown sugar, eggs, maple syrup, and vanilla together.
Whisk the flour and buttermilk into the maple syrup mixture, alternating between dry and wet.
Pour into prepared pan and bake for 35 to 40 minutes, until a cake tester comes out clean.
Top with glaze and glazed bacon.

for the glazed bacon:
ingredients:
4 ounces bacon, cut into little lardons
1 tablespoon brown sugar
directions:
Cook bacon until crispy.
Drain fat and reserve for use in the glaze.
Return bacon to pan and add in the brown sugar.
Heat just until sugar melts, then spread out onto a piece of wax or parchment paper and allow to cool completely.

for the glaze:
ingredients:
6 tablespoons butter
fat rendered from 4 ounces of bacon (sub 1 1/2 tablespoons butter)
3/4 cup confectioner’s sugar
1/4 cup nonfat dry milk powder
3 tablespoons pure maple syrup, or as needed
directions:
Brown butter in a saucepan.
Once brown, dump in the sugar and bacon fat and whisk, creating what I like to call a “sugar roux”.
Once a creamy paste has formed, add in the maple syrup and powdered milk and stir.
Stir in extra maple syrup, as needed, to create a pourable but thick glaze.

16 September

IMG_3302

It’s my 18th birthday, today.

IMG_3352

Today is the only day of the year

where everyone writes

on my facebook wall.

Rejoice.

IMG_3306

I secretly hate my birthday.

IMG_3373

This may seem trite coming from a teenager, but I’ve always been acutely aware and afraid of growing older.

Each birthday that passes, a wave of fear and anxiety passes over me.  I’ve always been the baby.
I’m the baby of my family; I’m almost always the baby among friends.

Getting older makes me feel uneasy scares the shit out of me.

IMG_3358

Birthdays have hung heavy with regret, especially as I come close to adulthood.  (Am I an adult yet?)

I’m a worrier.  It’s my nature.

I worry that I haven’t done enough
haven’t enjoyed enough
haven’t appreciated enough
haven’t taken each and every last moment of my life, this precious and fleeting thing, and lived it to the fullest.

It’s futile, of course.

IMG_3314

That doesn’t stop me from thinking about it, waking in the dead of night, sweating, crying, scared, worried, tangled in the sheets, blinking like a bird roused from its nest.

IMG_3364

So, yes.  But birthdays come with cake.

And I love cake.

So.

IMG_3374

This was my birthday cake.

It’s a pavlova, which means it’s a baked meringue base, topped with whipped cream and fruits.

Mine is a simple French meringue, baked until the outside is crispy but the inside is still billowy and marshmallow-y, topped with a coconut/mascarpone whipped cream and pucker-inducing passion fruit sauce, and finished with raspberries and coconut flakes.

I love meringue cakes; this one is exactly how I like my cakes: light, airy, but packed with a walloping punch of vibrant flavors.

It was divine.

It almost made me like my birthday.

IMG_3235

Pavlova

ingredients:
4 large egg whites
pinch cream of tartar
1 cup sugar
2 teaspoons cornstarch
1 teaspoon white vinegar

1 cup passion fruit purée, liquid
1/3 cup sugar
1/2 teaspoon cornstarch

1 can of full-fat coconut milk, refrigerated and UNSHAKEN (see here)
1 cup of heavy cream, cold
2 tablespoons mascarpone
1 tablespoon confectioner’s sugar

1 pint of raspberries
coconut flakes, optional

directions:

Preheat oven to 175 degrees F.
Draw a 8 inch circle on a piece of parchment with a pencil and place it pencil side down on a sheet pan.
Combine egg whites and cream of tartar.
Beat until soft peaks form, then slowly stream in the sugar while beating at high speed.
Beat until stiff peaks form, then beat in the cornstarch and vinegar.
Spread out on the parchment, staying within the circle.
Bake for 2 hours, then turn the oven off and allow to cool completely in the oven.
Meanwhile, make the passion fruit sauce.
Place passion fruit, 1/3 cup sugar, and 1/2 teaspoon cornstarch in a saucepan and whisk to combine.
Bring to a boil and allow to boil for 1 1/2 minutes.
Remove from heat and allow to cool completely before using.
Make the coconut whipped cream by beating the separated coconut fat (detailed instructions here or here) until soft peaks form, then beating in the mascarpone and confectioner’s sugar.
Beat the heavy cream to stiff peaks separately, then beat it into the coconut/mascarpone mixture.
Chill until you need to use it.

Assemble the pavlova no more than 30 minutes before serving (don’t worry, it’s really simple).
Place the meringue on a serving dish, then pile the coconut whipped cream high on top of it.
Drizzle with the passionfruit sauce, and top with raspberries and coconut flakes, if desired.
Enjoy!

P.S.
As you may have noticed, you can now pin my photos simply by rolling over them and clicking the Pinterest symbol.
In addition, there are social media buttons at the bottom of each post.
You can share posts via twitter, linkedin, Google+, instagram, Pinterest, facebook, and email.
(Right below this!)

Charred

 To be honest, more than charred, I’m fried.
 
I’m dragging my feet, so much so that the edges of my toes are burned and my shoes have holes in them.
Or, they would, if I were wearing shoes.  The past two days, it has been scorchingly hot.
Like, dash-reads-100-degrees hot.  
Like, yes-absolutely-let’s-go-to-the-grocery-store-it-has-AC hot.
Like, why-the-f@&#-did-I-turn-on-the-oven hot.
 
It’s cooled down, now.
This morning/midday was Sahara desert-esque (right when I was making ratatouille AND savoiardi like wat why me), but this afternoon and evening…
Well, holy monsoon Batman!!
All that rain practically sizzled off of the sidewalks, but eventually drowned out the heat.
I mean, phew, cause I’ve started cooking with apples and pears already, and there’s no turning back.
I just ain’t got time for no more summer, let me tell you.
Ah, yes.  What am I dragging my feet for, you say?
Well, I have 9 8 more days left here in Ith, and I haven’t started packing!!
I have shit to do, guys!  And I can’t bring myself to do it.
It’s just like, ugh, it’s so hot and like I don’t really want to think about like organization and fitting my closet into my dorm room, let alone my kitchen.
Those are the two largest entities in my house.
 
Because, yes! 
Surprise (or, rather, less than a surprise) surprise, this blog is not stopping here.
I’ll have access to a kitchen…
Which means baking and blogging and sugar and butter and flour.
Comin’ at yo face.
In turn, this means that I have to make a packing list for normal living things- linens, clothing, cosmetics, decor, etc., but also for kitchen supplies.
I can’t bear to think of the beloved appliances I’ll have to leave behind.
Examples: my ice cream behemoth machine
my pro WOLF convection oven
my big food processor
my stand blender
copper pots, wok, little pots, little saucepans, omelette pan, panini pan, roasting pan, all MY PANS
random prop materials- china, silverware, fabrics, wooden pieces, marble, much of my mason jar collection
… Pour one out for da homiez.  Seriously.
On a less dour note, this is a lovely little charlotte that I’m sharing today.
Get it?!?!?! Charlotte- charred
No? Damn, and I thought I was being a clever little monkey. (Insert that cute emoji here, you know the one, the little monkey with its little hands over its mouth.)
A charlotte is a molded cake, usually with savoiardi, or ladyfingers, around the outside.
(There are a few variations on what is on the exterior.)  
Where the imagination and difference comes in is the interior.
You could make a charlotte with literally any flavor or idea.
I chose tiramisù, because ladyfingers. 
And because I had never made tiramisù before.
It’s incredibly simple- just 3 components to the dish- savoiardi, coffee/liqueur to soak, and a cream/zabaglione/mascarpone mixture to add richness.
So simple, in fact, that I undertook to make my own ladyfingers, which may seem imposing, but are, in actuality, very simple.
This is a cookie that’s been around for 600 or so years.  How hard can it be?  Fo’ realz. 
 
On the inside is a classic tiramisù, except that I used whiskey, which is, erm… not traditional.
But to hell with it.  Use whatever liqueur tickles your fancy.
The ladyfingers are sponge cake’s sister, just piped out.
They’re layered with coffee/whiskey/vanilla (can I have that as my morning pick-me-up?!) and a deeeeelicious mascarpone/heavy cream/zabaglione mixture (wait no I want that…), topped with a mountain of raspberries, then chilled until set.
 
Wrap a ribbon around the whole shebang and give it to someone as a present!
HA just kidding.  
Untie the ribbon, cut yourself a fat wedge, watch the raspberries tumble out like so many ruby jewels, and MANGIA! 

Tiramisù Charlotte
makes 1 6×3 inch cake
note: brew some strong coffee before starting, then allow it to cool.  If you are making ladyfingers, make those right after the coffee and let them cool as well.  You can always use store-bought.
for the savoiardi (ladyfingers):
makes 1 1/2 sheet pans of 4×1 inch savoiardi
ingredients:
3.5 egg yolks (1/2 yolk is approximately 1 1/2 teaspoons, or 0.3 ounce)
3 tablespoons sugar
3.5 egg whites (1/2 white is approximately 1 tablespoon, or 0.5 ounce)
pinch cream of tartar
4 tablespoons plus 1 1/2 teaspoons sugar
3/4 cup cake flour
directions:
Preheat oven to 350 degrees F.
Draw out 4×1 inch grids on two sheets of parchment paper; place them on two sheet pans, pencil or pen side down.
Have a pastry bag fitted with a 1 inch tip at the ready.
Place the egg yolks in a bowl with 3 tablespoons of sugar.
Place the egg whites in the bowl of a stand mixer with the cream of tartar.
Whip the egg yolks briskly (or with a hand mixer) until they become pale, thick, and double in size.
Meanwhile, whip the egg whites, slowly streaming in 4 tablespoons plus 1 1/2 teaspoons sugar once they begin to foam.  
Beat the egg whites until they hold stiff peaks.
Sift the cake flour over the egg yolks, but don’t mix in, then fold the egg whites into the egg yolk/flour until homogenous; be careful not to overmix.
Place into pastry bag and pipe out finger shapes, approximately 4×1 inch tall/wide.  (They will touch each other during baking.)
Bake for 8-10 minutes, until they are golden and puffy but not particularly hard. (They should not feel raw or look runny, but should still be slightly spongy to the touch.)
Remove from oven and allow to cool completely.

for the mascarpone cream:
adapted from Chef Dennis via Bake and Bait
ingredients:
3 egg yolks
3 tablespoons sugar
1/2 cup plus 2 tablespoons mascarpone
scant cup heavy cream
directions:
Whisk yolks and sugar together very well; place in a small pot over low heat and cook until sugar is completely dissolved.
Remove from heat, pour into a different bowl, and whip until thick and about doubled in size.
Whisk in mascarpone.
In a separate bowl, whip the heavy cream to stiff peaks, then fold it into the zabaglione/mascarpone mixture.
Set in fridge until ready to use (but not for too long; an hour at most before you should use it).

to assemble:
ingredients:
1/4 cup coffee, cold but strong
1 tablespoon liqueur (Marsala, Kahlua, etc.  Go nuts.)
1 teaspoon vanilla extract
cocoa powder, for dusting
1 pint of raspberries, optional
mascarpone cream, recipe above
ladyfingers (about 30 small ones, less if you have larger), either store bought or homemade, recipe above
directions:
Line a 6×3 inch pan with ladyfingers standing upright.
Place a cake board in the bottom, then place as many ladyfingers as can fit along the bottom, using torn pieces to fill in gaps.
Stir the coffee, liqueur, and vanilla together.
Using a pastry brush, lightly brush the coffee mixture over the ladyfingers- they should absorb it, but do not add so much that they are soaked.  
Smooth 1/3 of the cream mixture onto the soaked ladyfingers.
Layer more ladyfingers over the cream mixture, brush with coffee, and layer with cream.
Repeat layering once more.
Dust the top of the tiramisu with cocoa powder, and top with raspberries, if desired.
Refrigerate for at least 1 1/2 hours before unmolding.
Tie a ribbon around the outside for clean presentation.
Enjoy!

Round Two!

Deco rolls are going to be a problem.
I can feel it in my bones.
Why was I allowed to fall down this rabbit hole of adorable cakes?
WHO LET THIS HAPPEN?
I am going to blame everyone except myself (as per usual) because I am head over heels for these stupid cakes.
They’re just so cuteeeeeeeee I mean look at them all rolled up and pretty and full of fruits and cream.
Ugh.
So, um, yes.  Here is my second deco cake roll.
I was not wholly pleased
but then again
when am I ever wholly pleased.
Never, that’s when.
As you can see, the stripes are kind of wonky.
Okay, very wonky.  The white is vanilla bean and the green is matcha.
I made Junko’s sponge cake batter, divided it in two, added vanilla bean to one and matcha powder to the other, then attempted to pipe them out into stripes.
It worked to some extent, but all the mixing and folding combined with the pressure of piping deflated my batter slightly (sponge cakes rely only on natural inflation from the whipping of the eggs, not chemical leaveners), which resulted in a thinner cake.
I filled it with Junko’s filling of choice, softly whipped cream and fruits- I chose strawberry and mango.
Overall, I loved the flavor and, of course, the texture.
Light and fluffy sponge cakes call out to me unlike any others.
I just wish it were neater, cleaner, more perfect.
In fact, I have a third deco roll in the works.
Lord have mercy.
Click here for my version of the recipe.

Mo’ Mo’

Do you know of Piet Mondrian?
Dutch painter, theorist and draughtsman. His work marks the transition at the start of the 20th century from the Hague school and Symbolism to Neo-Impressionism and Cubism. His key position within the international avant-garde is determined by works produced after 1920. He set out his theory in the periodical of De Stijl, in a series of articles that were summarized in a separate booklet published in Paris in 1920 under the title Le Néo-plasticisme (see Neo-plasticism) by Léonce Rosenberg. The essence of Mondrian’s ideas is that painting, composed of the most fundamental aspects of line and colour, must set an example to the other arts for achieving a society in which art as such has no place but belongs instead to the total realization of ‘beauty’. The representation of the universal, dynamic pulse of life, also expressed in modern jazz and the metropolis, was Mondrian’s point of departure. Even in his lifetime he was regarded as the founder of the most modern art. His artistic integrity caused him to be honoured as a classical master by artists who were aligned with entirely different styles, as well as by musicians and architects. He was able to make a living from the sale of his works in the Netherlands, Germany, Switzerland, England and the USA.
© 2009 Oxford University Press
TL;DR
Basically, he represented a change in the art world from the Hague School/Symbolism to Neo-Impressionism and Cubism.
Yes, that was all from the second sentence, and no, I didn’t read past that.
But, yeah.  We’re here to talk about cake.
Cake art.
Art cake?
Either way, this is a cake inspired by Mondrian, via SFMoMA’s awesome, kick-ass cafe, an extension of Blue Bottle Coffee.
Head pastry chef Caitlin Freeman makes a Mondrian cake, among a myriad of other, incredible desserts inspired by modern art.
I fell in love with this cake.
As my father said, it’s so me.
So fussy.  So intricate.
So head-hurting, brain-frustrating, concentration-heavy.
So complicated and irritating.
I love it.
But! My cake didn’t come out quite how I wish it did.
I should have used a few different pans, which I was going to.
Instead, I used one very huge lasagna dish, plus one loaf pan, to bake my cakes.
It made the job a lot more lopsided and tricky, because I had to try to fit all the pieces and ended up with a ton of leftovers when they didn’t fit.
I should have used a protractor, to get all my lines just right.
I shouldn’t have used a serrated knife.
I still need to figure out how to make cakes with tighter crumbs.
I didn’t cream the butter and sugar, for this cake, because I know that creates air bubbles which create a light and airy texture in the finished cake.
It still didn’t quite make it to the tight crumb of a pound cake, which is where I wanted it to be.
 
And yet, I am pleased.  It is okay.  It is a first attempt at making a wacko battenburg cake.
And I did it sans recipe or guide, with just an idea in my head and a sketch of my own Mondrian-inspired idea.
Actually, I had to make a few sketches.  It gave me an excuse to break out my crayons.
God, I love crayons.
I completely and utterly winged this cake, by making a lot of sketches and baking a huge white velvet cake.
I don’t own Chef Freeman’s book, but if you’re interested in making this cake, I suggest you buy the book/follow her instructions.
Do you see her Mondrian cake?  Amazing.

Subpar

 
It was my dad’s birthday today!
 
My dad is not your average father… So, obviously, I made him a not so average birthday cake.
It’s birthday cake… with a twist.
Actually, a few twists.
Or a few kicks.  However you want to say it.
 
I’m very tired while writing this post (on Sundays, the credits of Breaking Bad pretty much signal bedtime to me), so I’ll keep it short and hopefully sweet.
 
My dad is a wonderful human being.  Just superb.  I mean, really.
I could not ask for a more supportive, caring, and understanding father.
He is truly the rock to which I am tethered.
I could not have weathered any storms without him keeping me from blowing away.
 
He’s watching golf, now that we’ve finished Breaking Bad, which is maybe his only bad habit.
Watching golf.  Or maybe playing golf.
He just loves golf so much… I guess I forgive him for it.  Depending on my mood, that is.
BUT I should clarify the title of this post: I mean subpar in a golf way, not in a real world way.
Even though it’s not a term they use, I don’t think.
What I mean is that he’s better than average.
Or something like that.
I don’t know.  Stop looking at me like that.
So this cake… It’s spicy.
Spicy, sweet, and over-the-top.
It’s a rich chocolate cake with a silky cheesecake in the center, sandwiched with spicy strawberry-cayenne jam, frosted with a super smooth Italian meringue buttercream, and topped with cayenne-gianduja macarons.
 
Everything balances out very nicely:
deep, smoky chocolate
slightly sour, rich, thick cheesecake
spicy and tart strawberry
silkier than silky IMBC, which is super buttery and offsets the intense flavors well
slightly crispy, chewy macs with a hint of spice and gianduja (AKA nutella).
This is truly a celebration cake.  You can expect to see more macaron-topped cakes from me in the future.
Once I get my macs down perfectly, that is.
Happy birthday, Daddy!  I love you!
Kickin’ Chocolate Birthday Cake
 
Cayenne Gianduja Macarons
adapted from Jo the Tart Queen
ingredients:
for the first mixture:
70 grams egg whites
130 grams hazelnut flour
25 grams cocoa powder
150 grams powdered sugar
A few pinches cayenne pepper, depending how spicy you want the cookies
for the second mixture:
60 grams egg whites
Pinch cream of tartar
150 grams granulated sugar
30 grams water
directions:
Preheat oven to 320 degrees.
Line 2 baking sheets with parchment paper.
Process hazelnut flour, confectioners sugar, cocoa powder, and cayenne together in a food processor until all lumps are gone.
Place in a bowl and fold in the first measure of egg whites until the mixture is mostly combined; it will look crumbly and dry.
Make the second mixture.
Place the egg whites in the bowl of a stand mixer with the cream of tartar.
Place the sugar and water in a small saucepan.
Heat the sugar and water over medium heat while the egg whites are whipping.
When the sugar syrup reaches 320 degrees F, the egg whites should be at soft peaks.
Heat the syrup until it reaches 340 degrees F.
With the mixer running, slowly pour the syrup over the meringue.
Allow to whip until the meringue has cooled and is stiff.
Fold the first and second mixtures together until the batter is like lava.
Pipe out circles and leave to dry for 15 minutes.
Bake for 12 minutes, or until cookies lift cleanly off the parchment.

Miniature Cheesecake
adapted from Miette

ingredients:
1/2 pound (8 ounces) cream cheese, softened
1/4 cup sugar
1 egg
2 tablespoons half and half
1 teaspoon vanilla extract
directions:
Preheat oven to 350 degrees F and put a large kettle on to boil.
Wrap a 6-inch springform pan tightly in aluminum foil and lightly grease the inside; place inside a roasting pan.
Beat cream cheese until soft and fluffy; stream in sugar and beat until well incorporated.
Scrape the sides of the bowl and beat in the egg, half and half, and vanilla.
Pour into prepared pan.
Carefully pour boiling water around the springform into the roasting pan.
Bake for 1 hour and 20 minutes, until set and the center jiggles only slightly.
Allow to cool completely, then freeze prior to placing in the cake.

Strawberry Cayenne Jam
ingredients:
1 quart strawberries
1/4 cup sugar
1 teaspoon pectin (low or no sugar)
Few pinches cayenne pepper
directions:
Chop strawberries finely and place in a wide saucepan with the sugar, pectin, and cayenne.
Cook until thickened and jammy, about 10 minutes.
Purée if desired.


6-inch Chocolate cake
adapted from the back of a Hershey’s cocoa powder
ingredients:
1 cup sugar
3/4 cup plus 2 tablespoons flour
1/4 cup plus 2 tablespoons cocoa powder
3/4 teaspoon baking powder
3/4 teaspoon baking soda
1/2 teaspoon salt
1 egg
1/2 cup milk
1/4 cup oil
1 teaspoon vanilla extract
1/2 cup hot coffee
directions:
Preheat oven to 350 degrees F.
Grease 2 6-inch pans.
Whisk dry ingredients together.
Whisk wet ingredients (except coffee) together, then whisk into the dry ingredients.
Whisk in the hot coffee and pour into prepared pans.
Bake for 25 minutes, until a toothpick comes out clean.

Italian Meringue Buttercream
Same as here. 1/2 the recipe.

To assemble:
Place one cake on a cake plate.  
Spread with 3 tablespoons jam, then top with the frozen cheesecake.
Spread 3 tablespoons jam on the underside of the second cake, then place it jam side down onto the cheesecake.
Crumb coat with the buttercream.
Pipe 6 swirls on top of the cake, nestle in macarons that have been sandwiched with a little jam (3/4 teaspoon-1 teaspoon per cookie) or extra buttercream.
Serve at room temperature.

Kawaii!

^.^
Hai!

I’m home home home after driving 12 hours in the past 32.
Needless to say, after shoveling leftover, cold Indian food into my mouth late last night just after arriving home, I fell right asleep, snuggled deep into my comfortable bed.

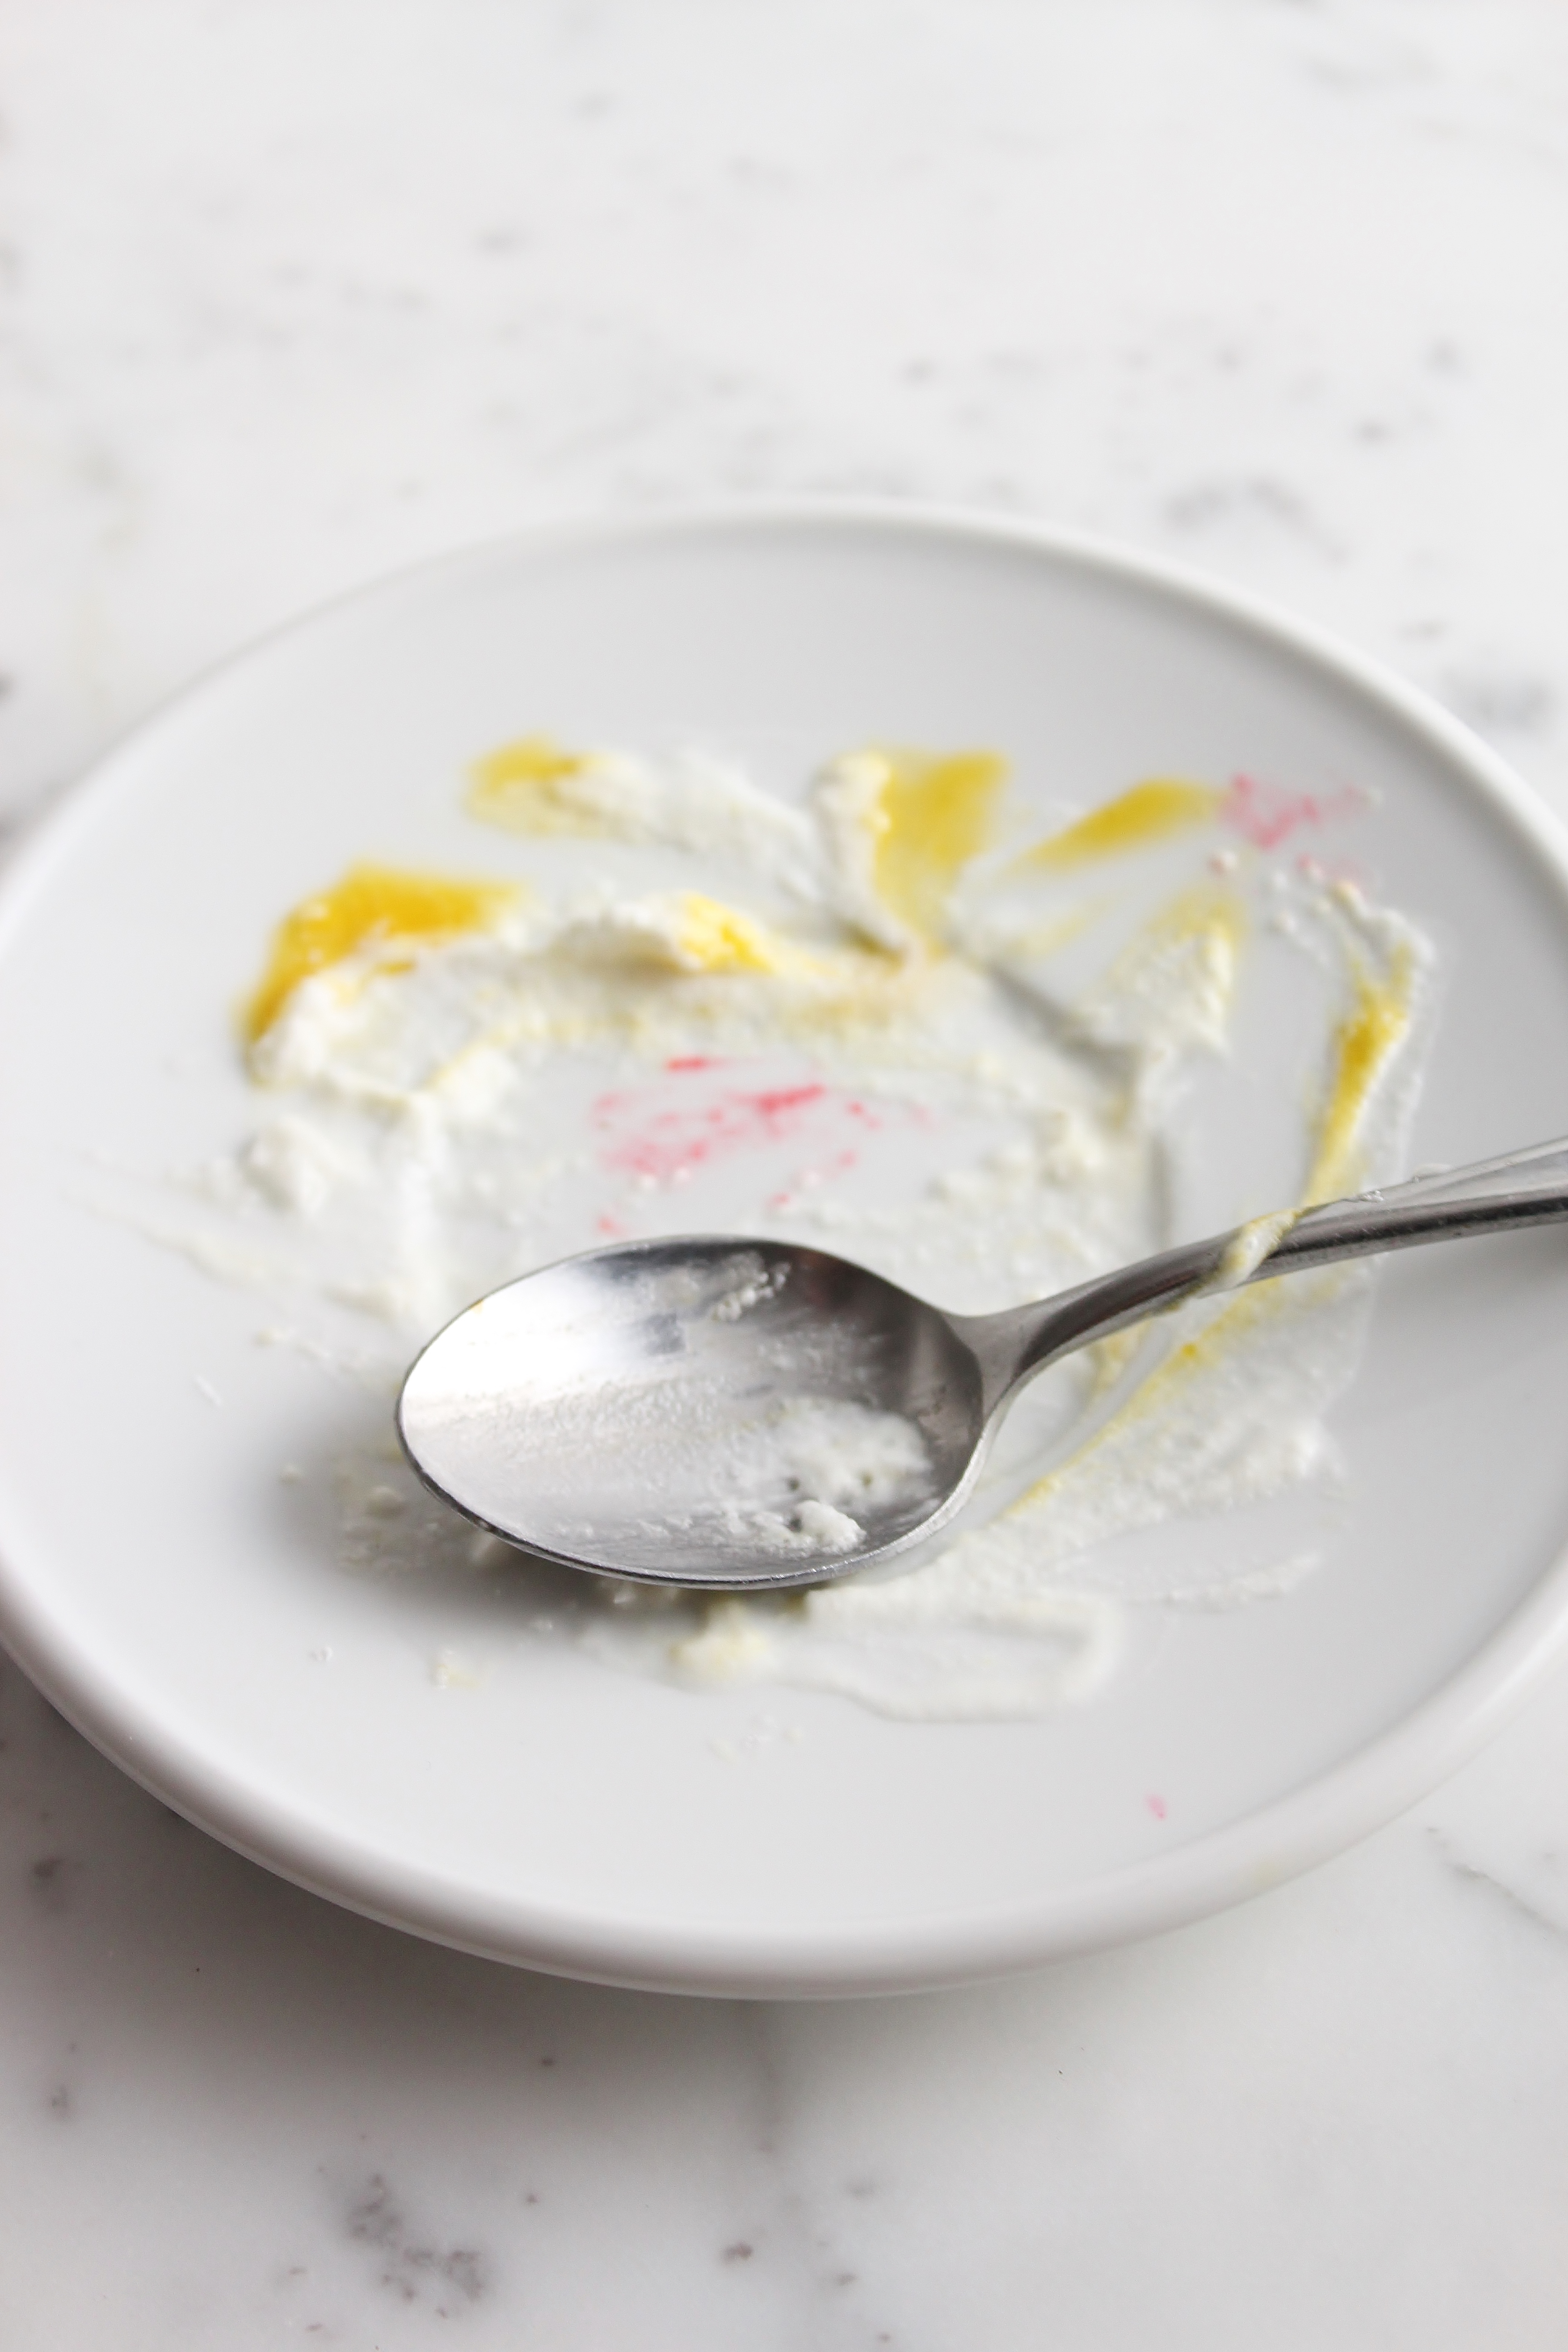
I woke up this morning and peered in my fridge- surprise!
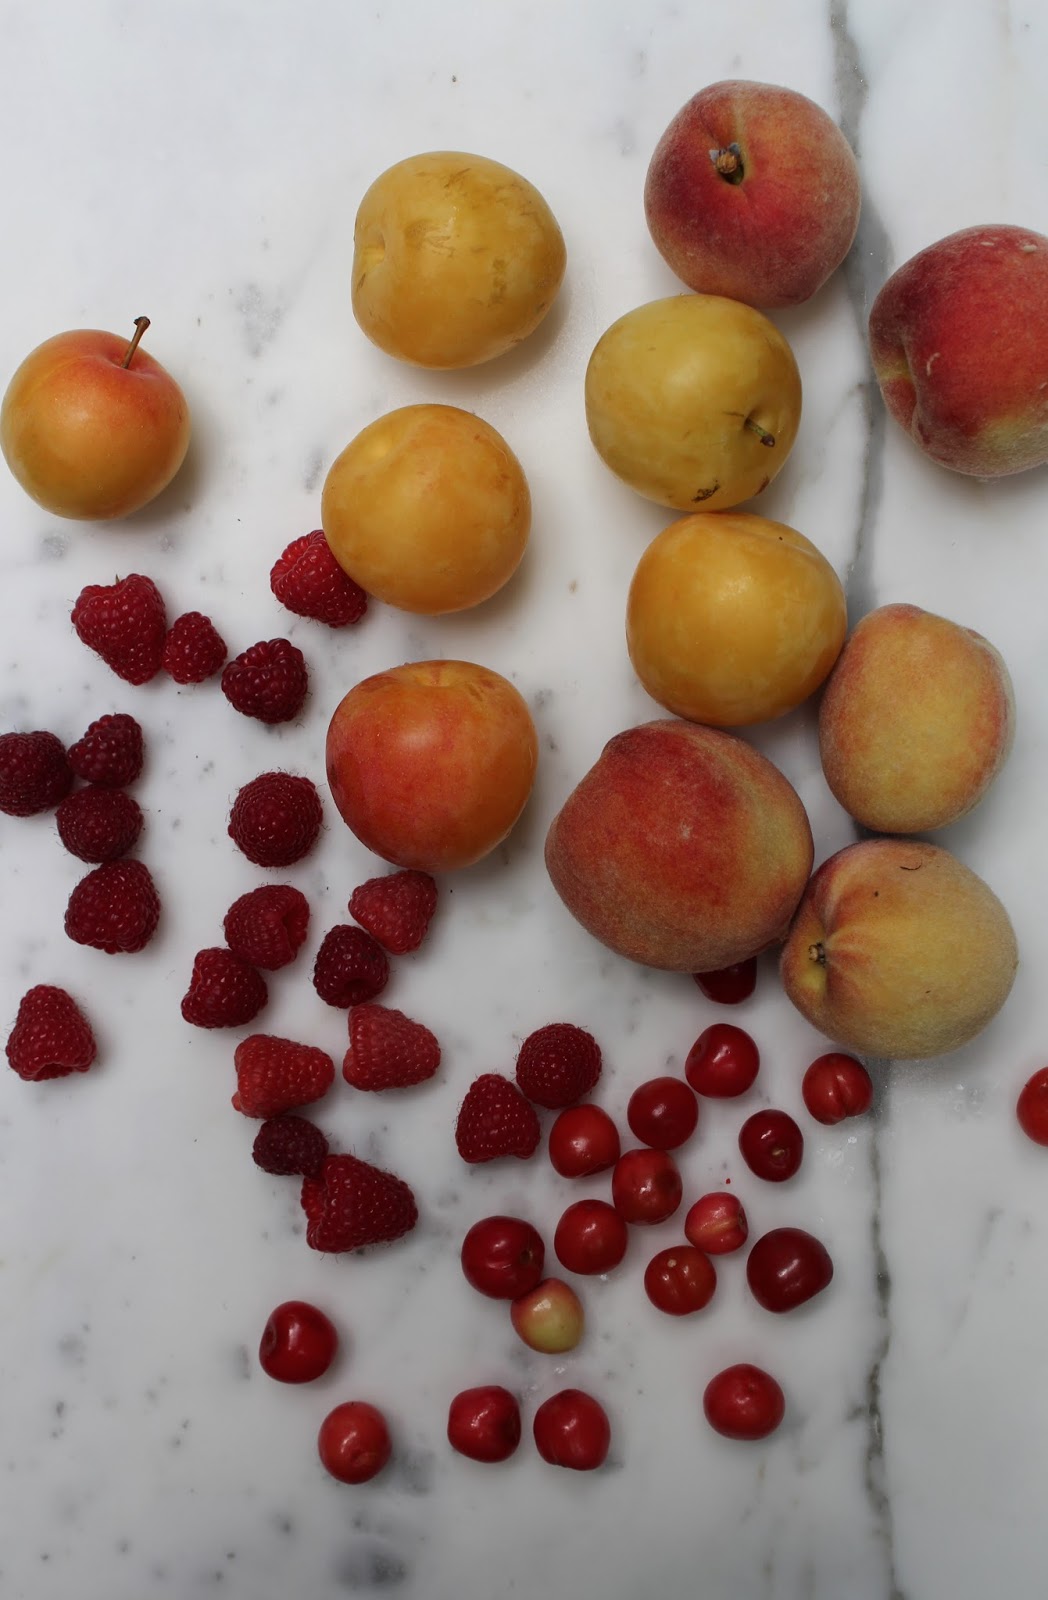
My mama had made lots of yummy jams from all the fruit we had picked on Saturday.
Raspberry raspberry raspberry sour cherry and a vat of peach and lemon thyme on the stove, simmering away.
Swirled into some yogurt- a lovely way to wake up and greet the day.
Now, I’ve spent the last two hours taking an alcohol education program (online) that’s required for my school and taking instagram videos of my kitten.
(I’ve never done an instagram video before… though since its installation, my Vine has fallen to the wayside.)
Not the loveliest way to greet the day, but whatever.
 
I’ve been meaning to write this blog post for a while.
I can’t find very inspired words.
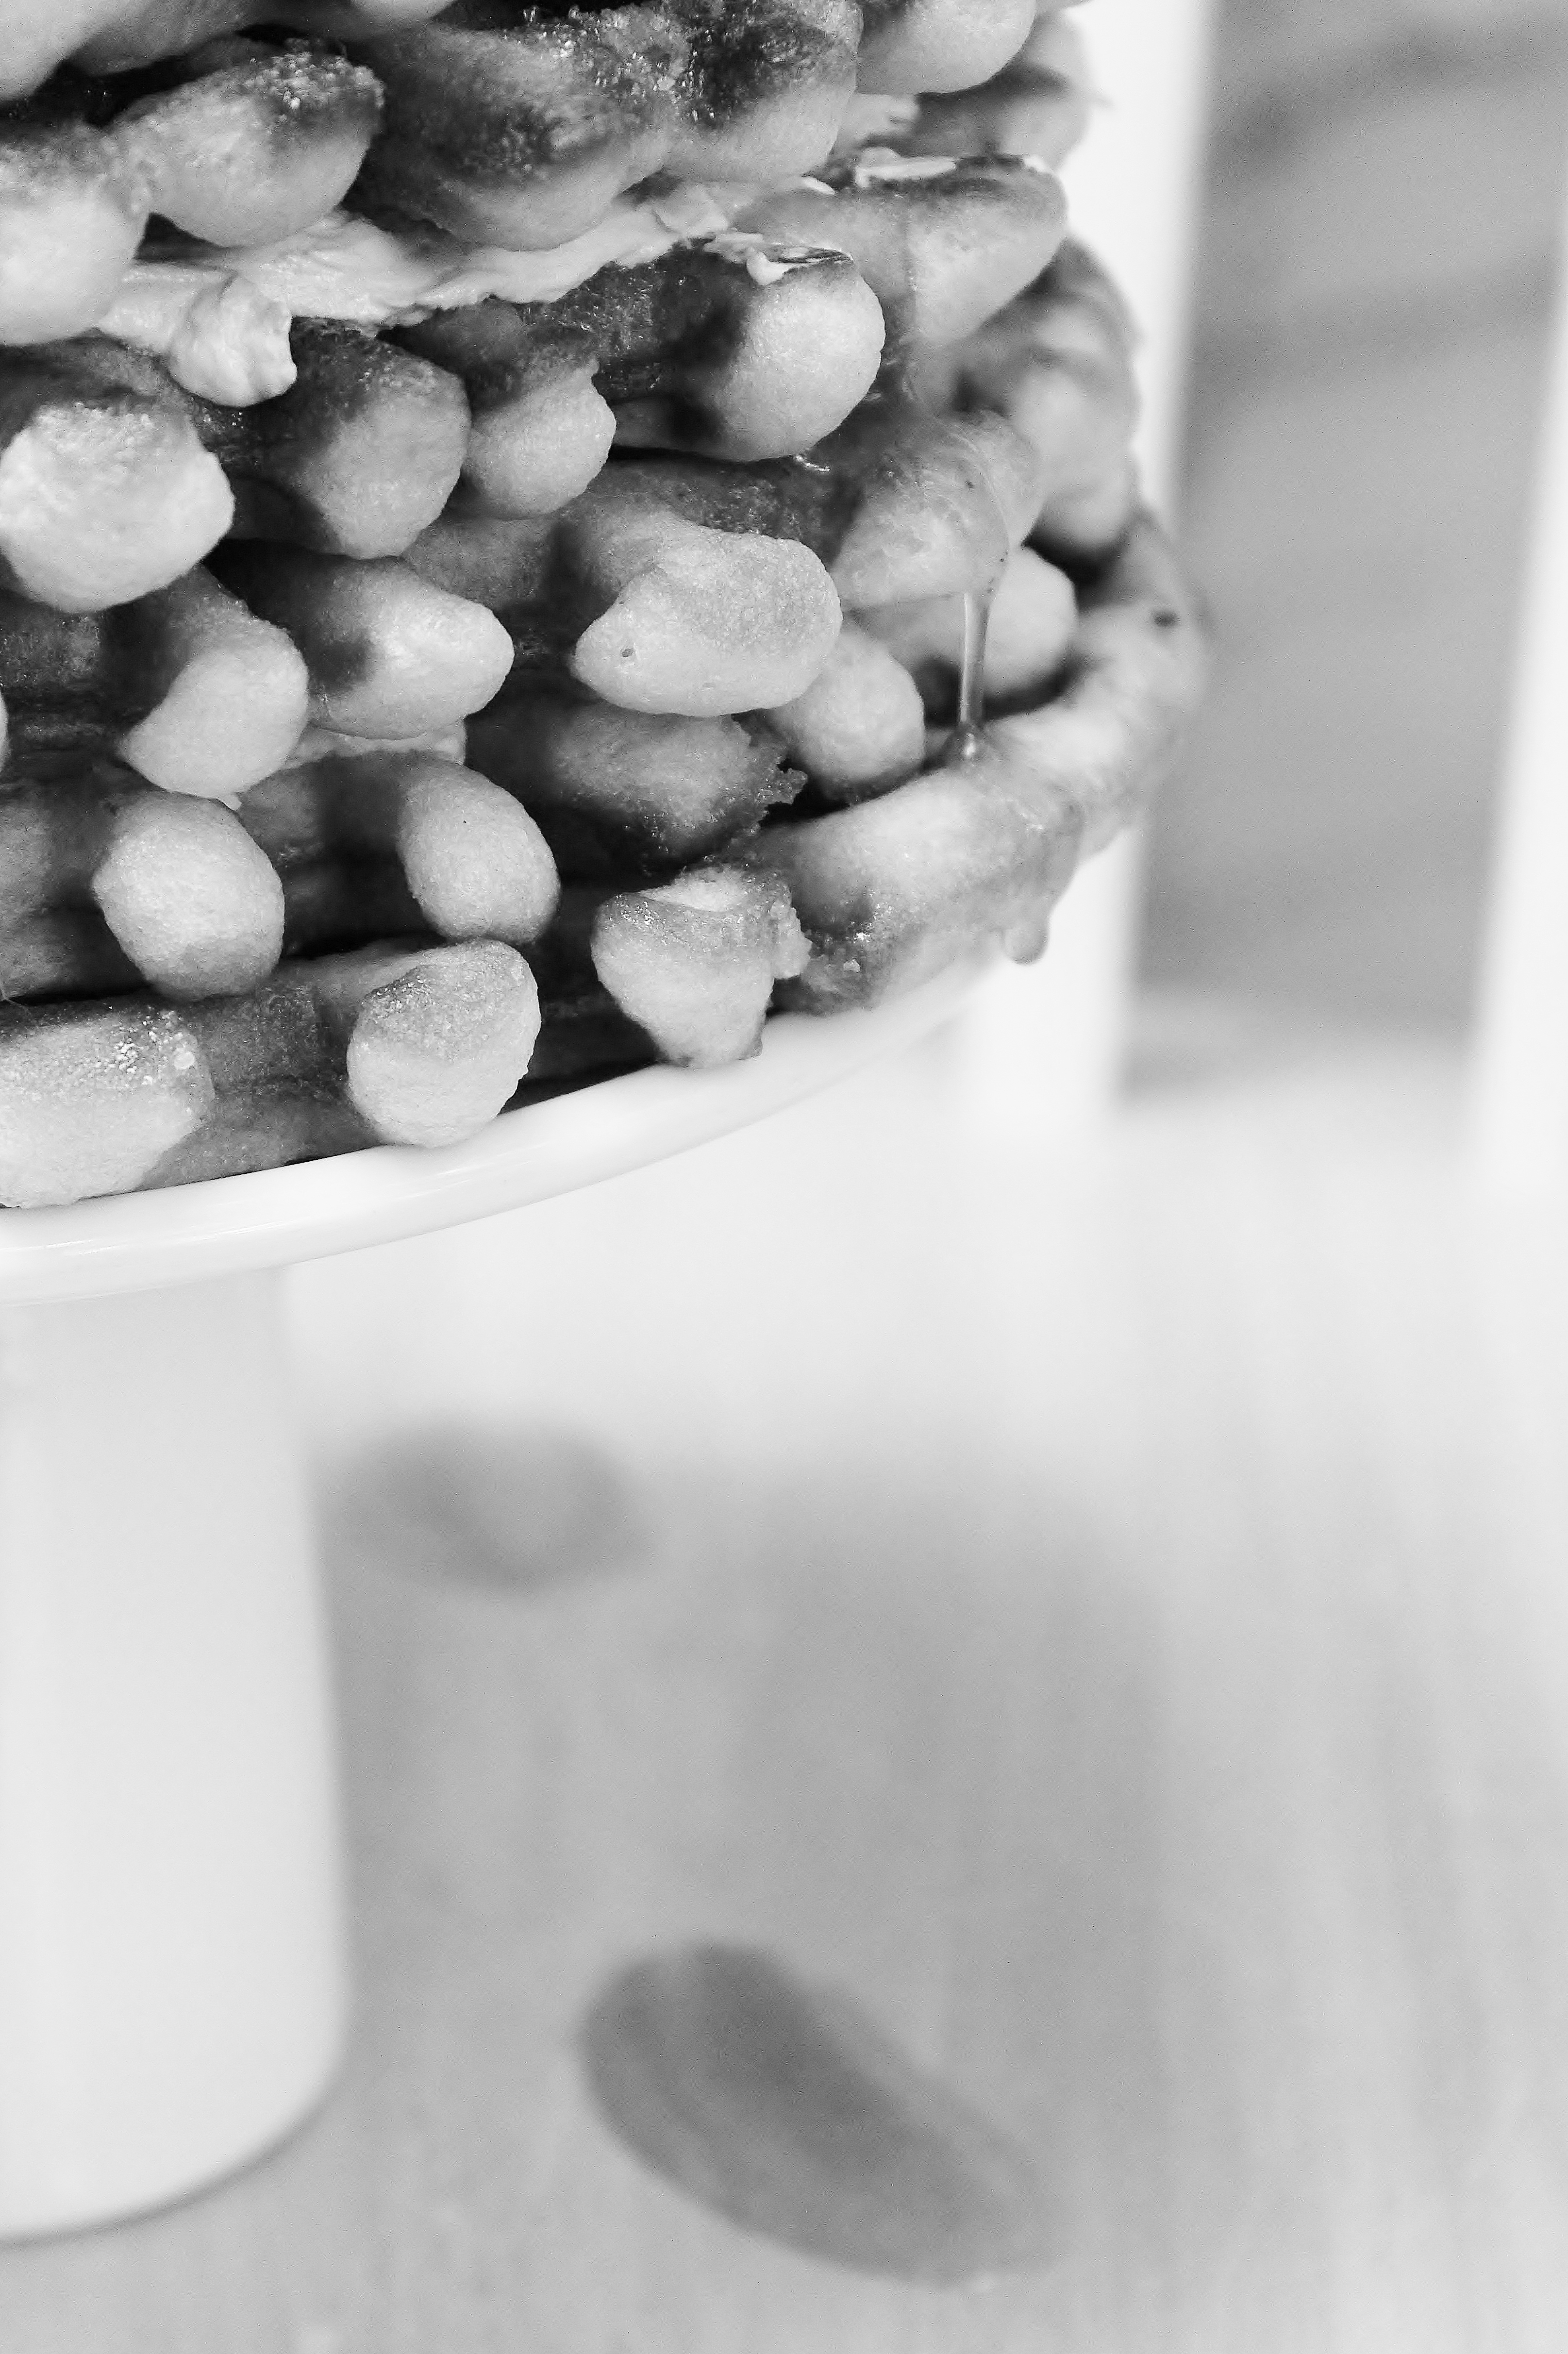
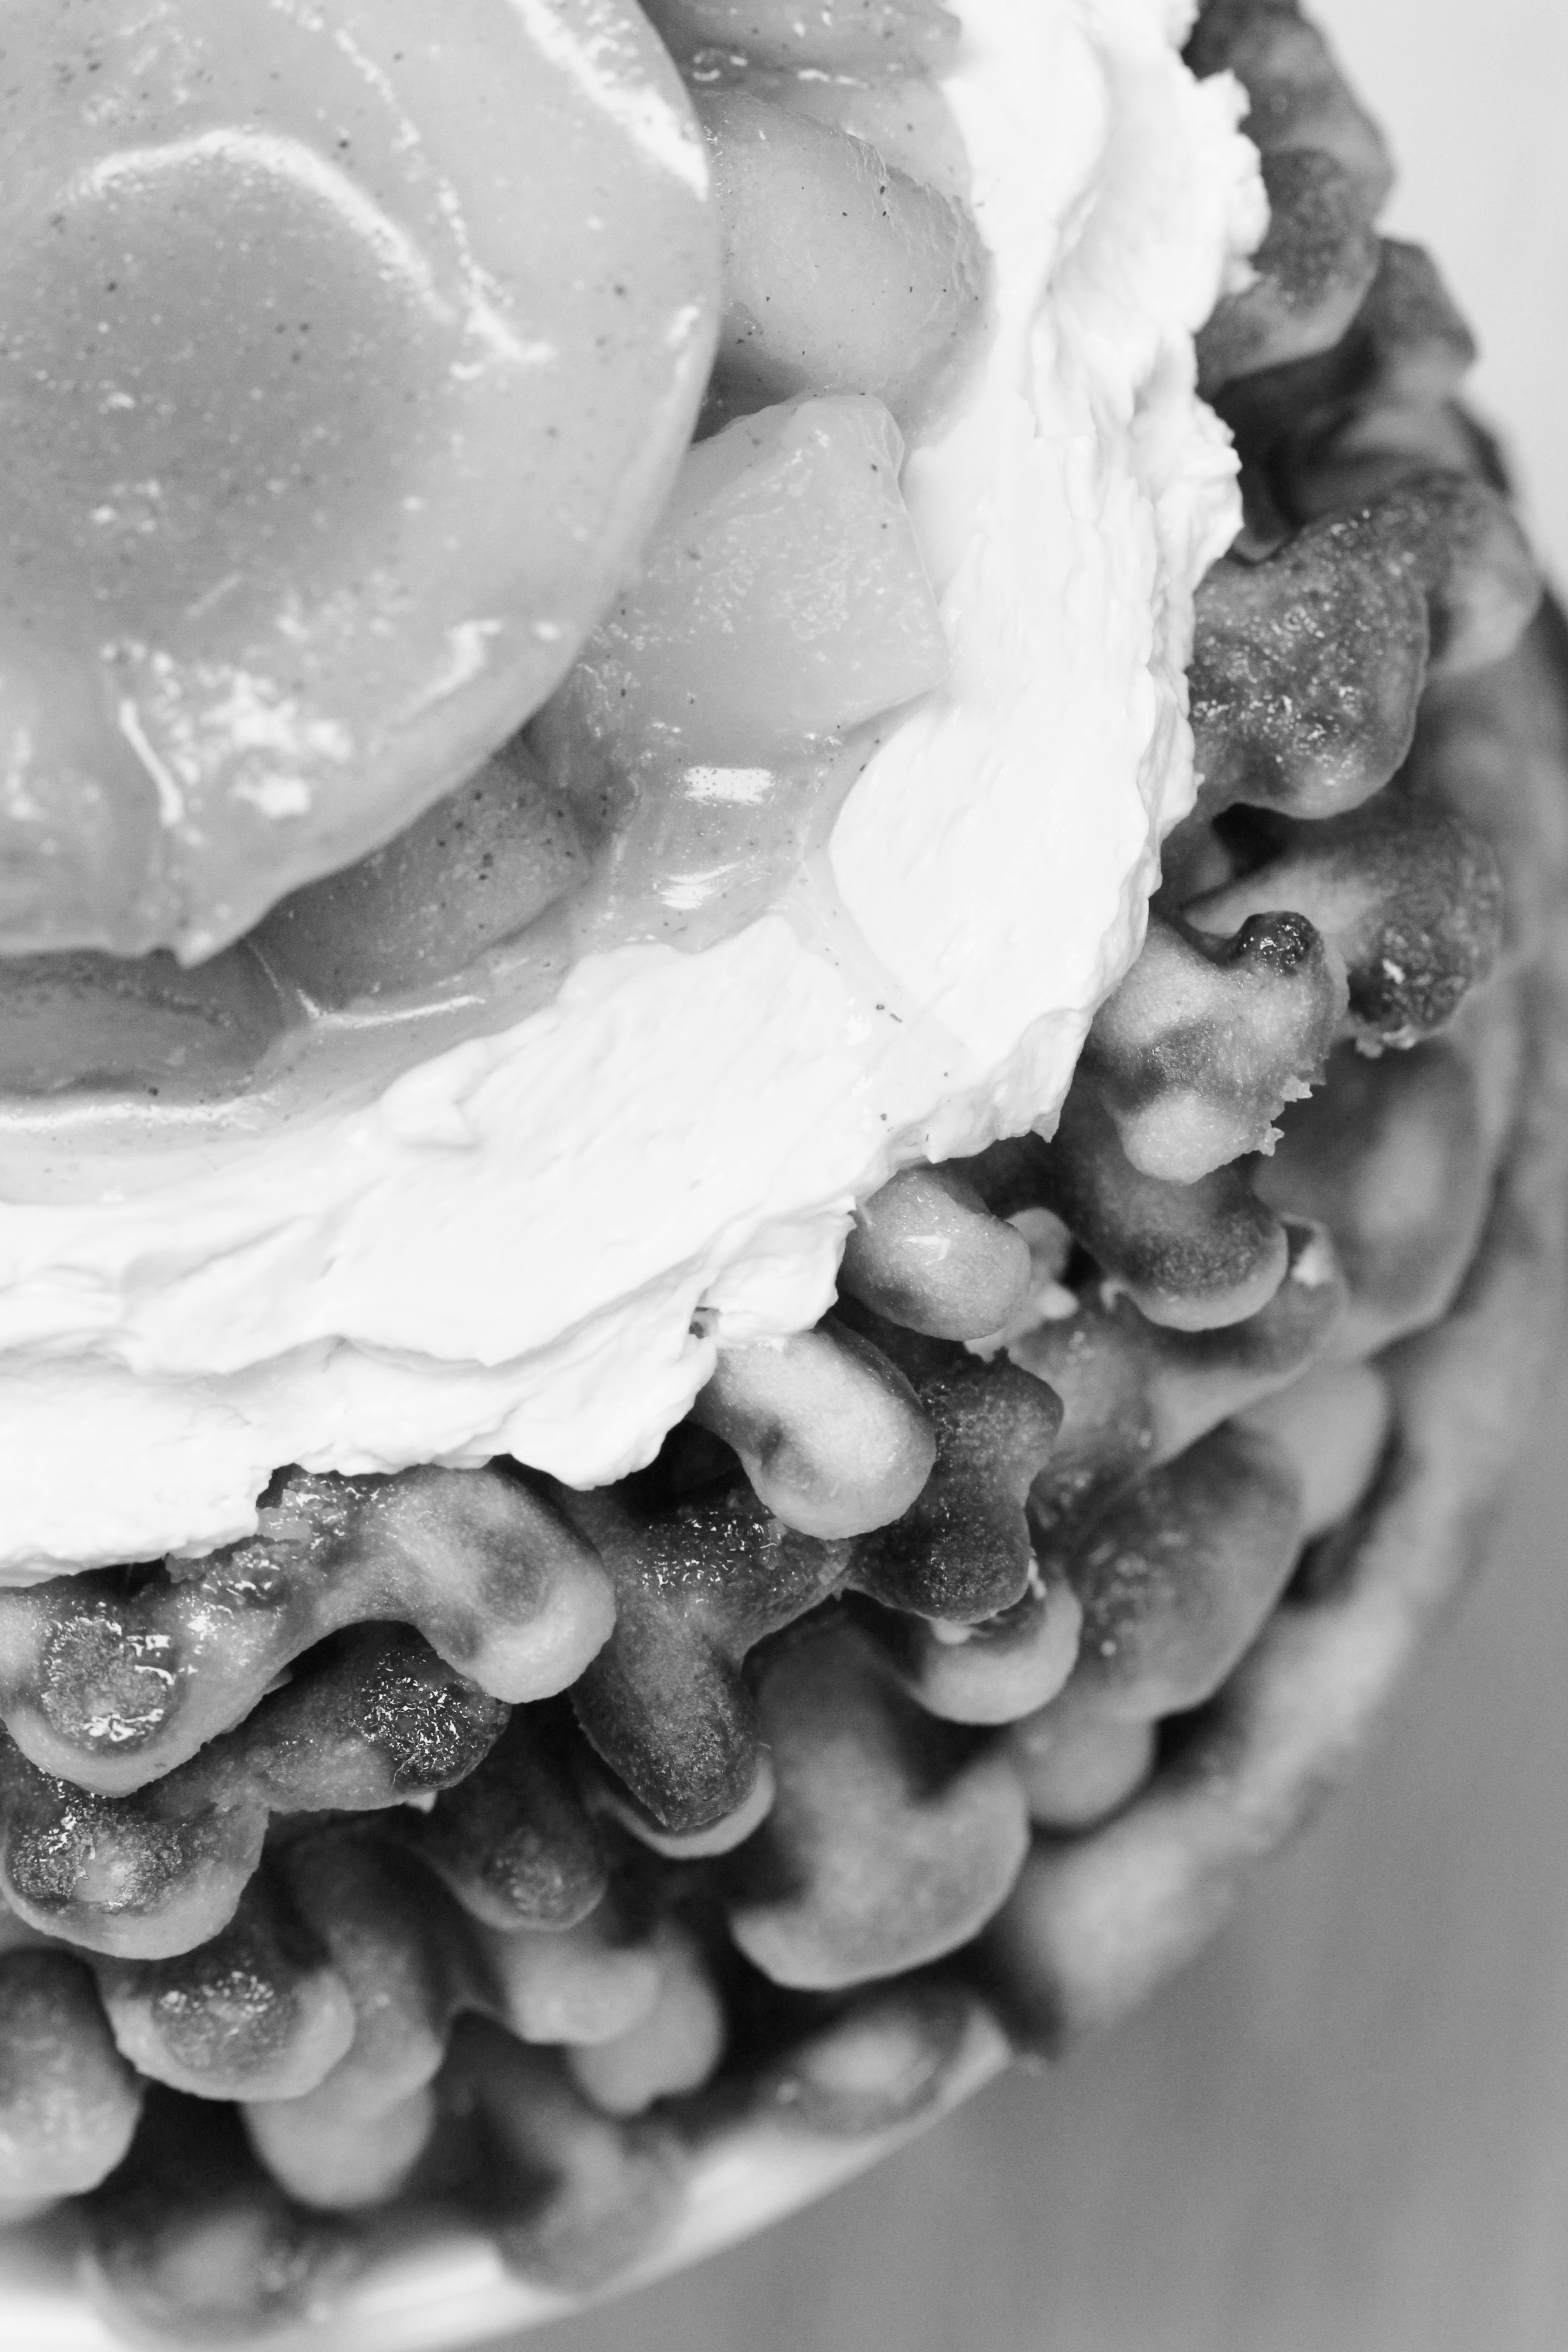
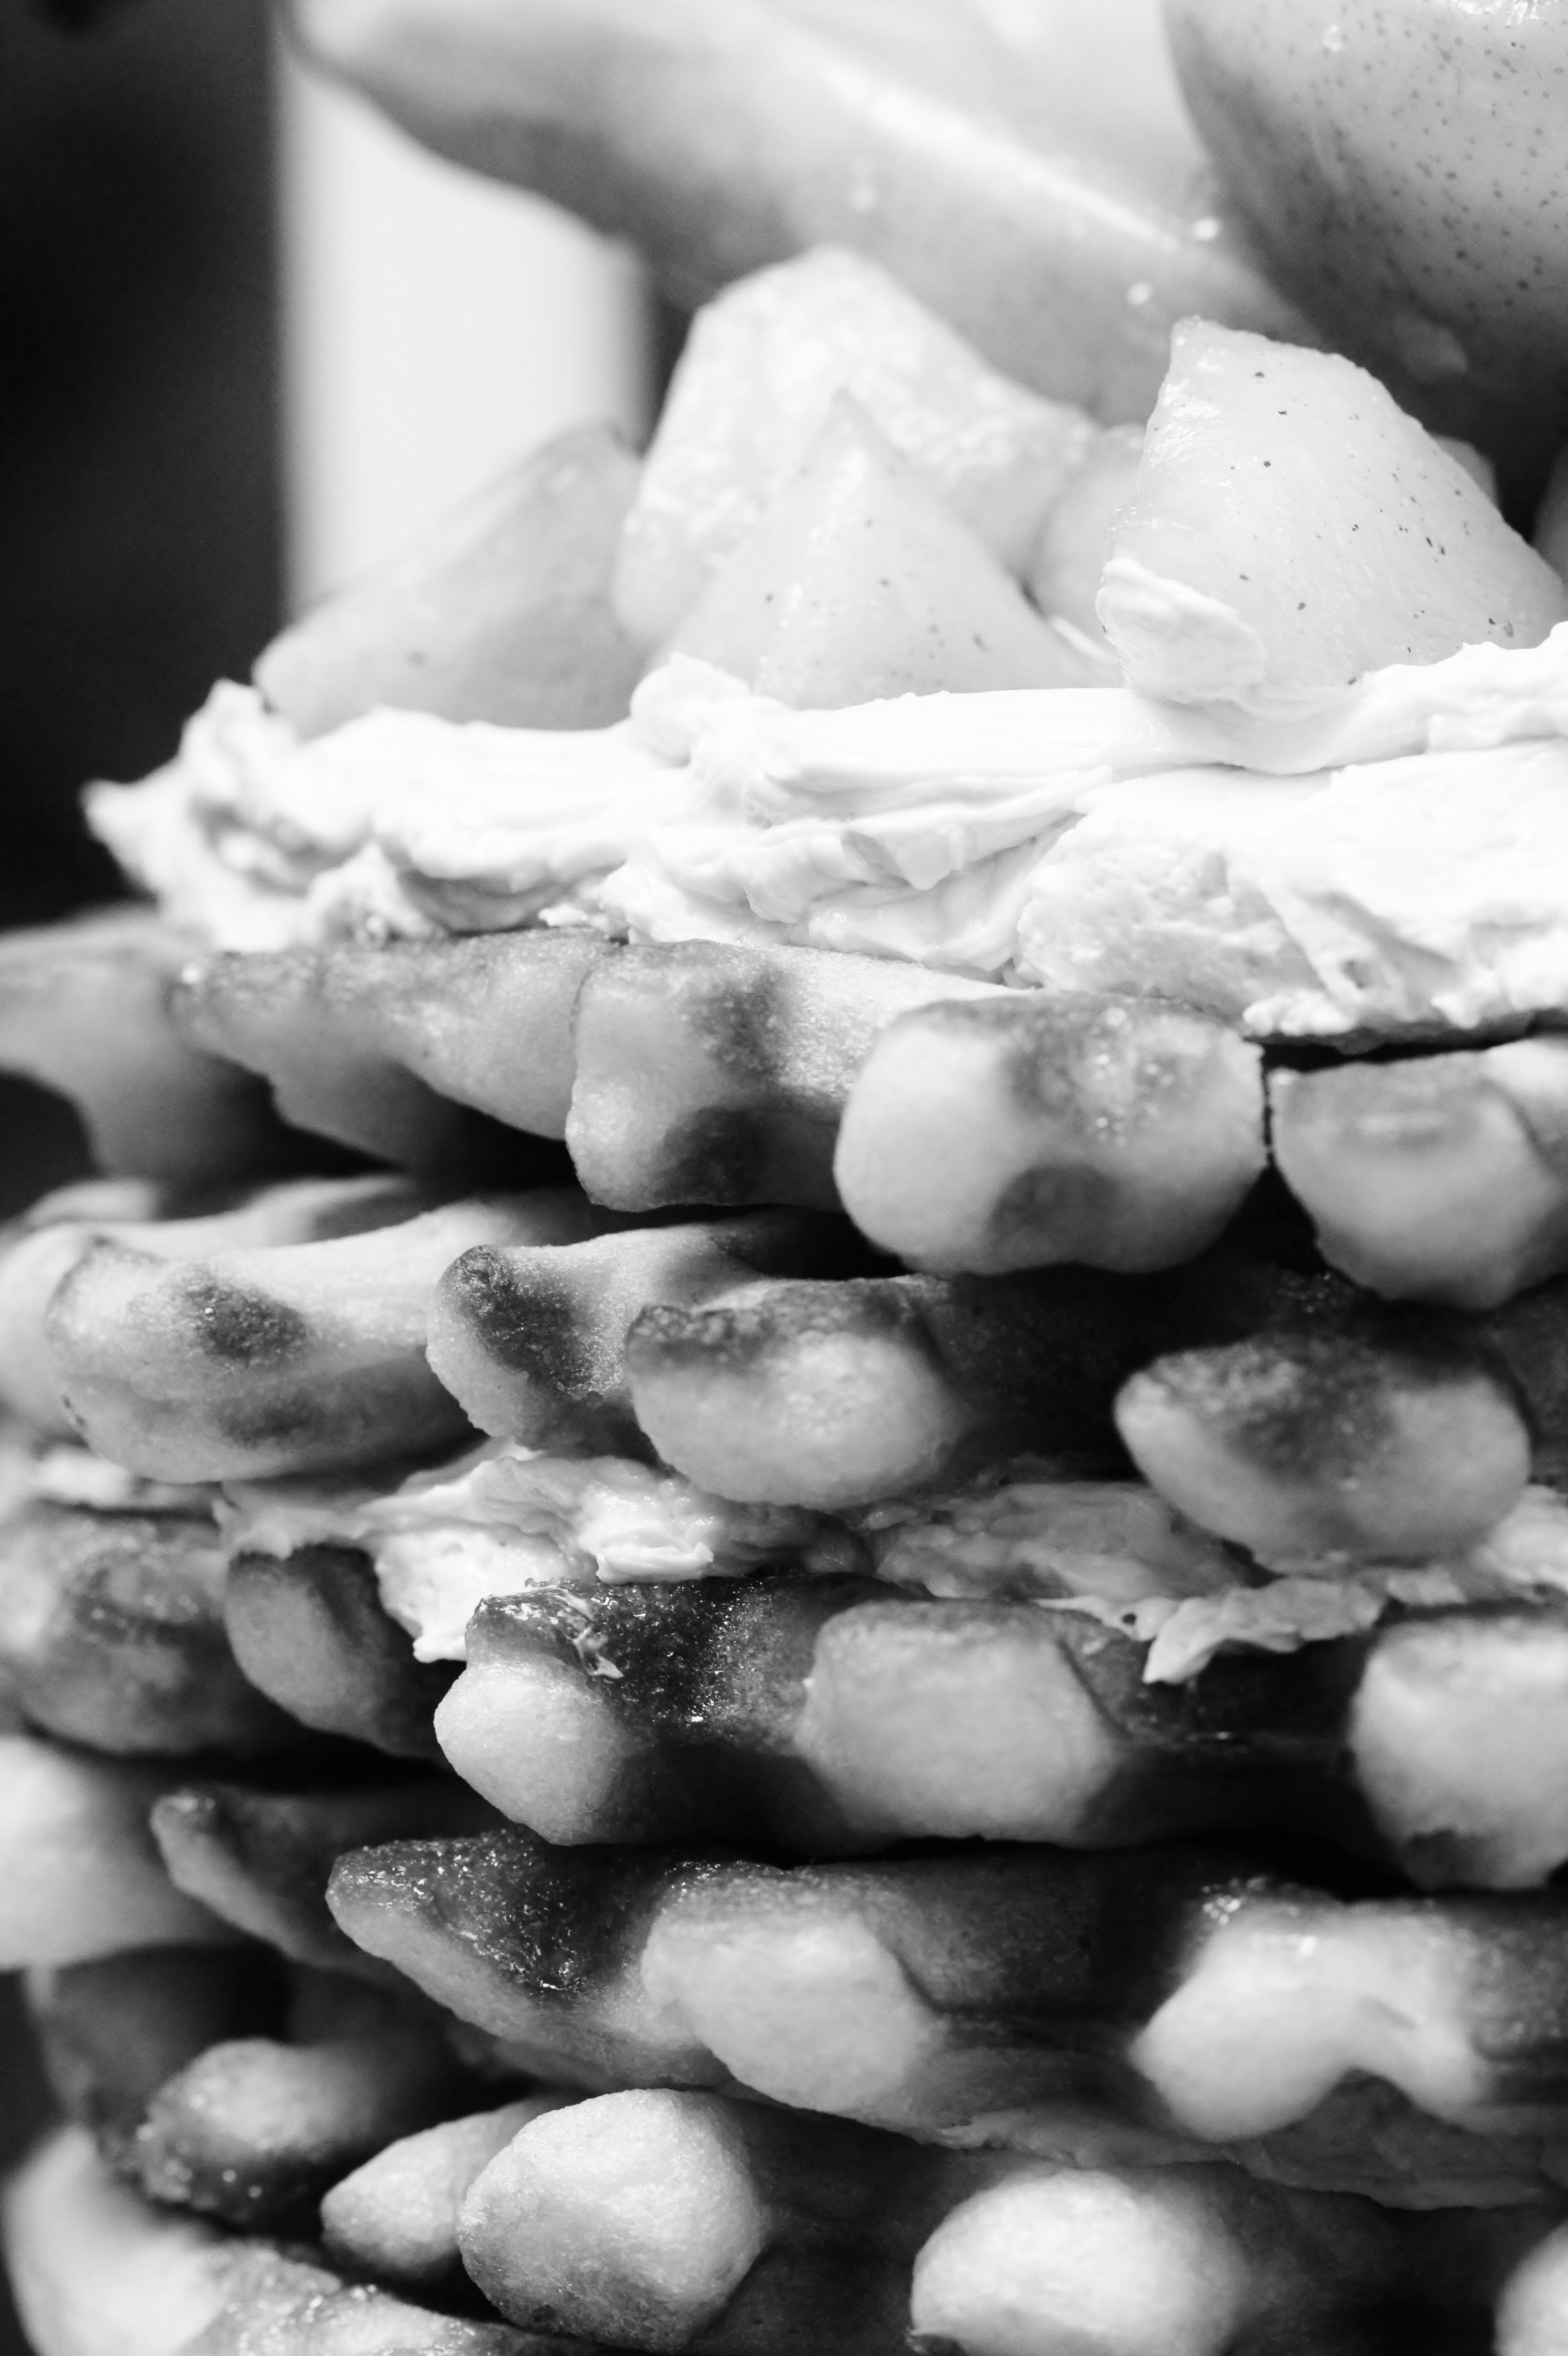
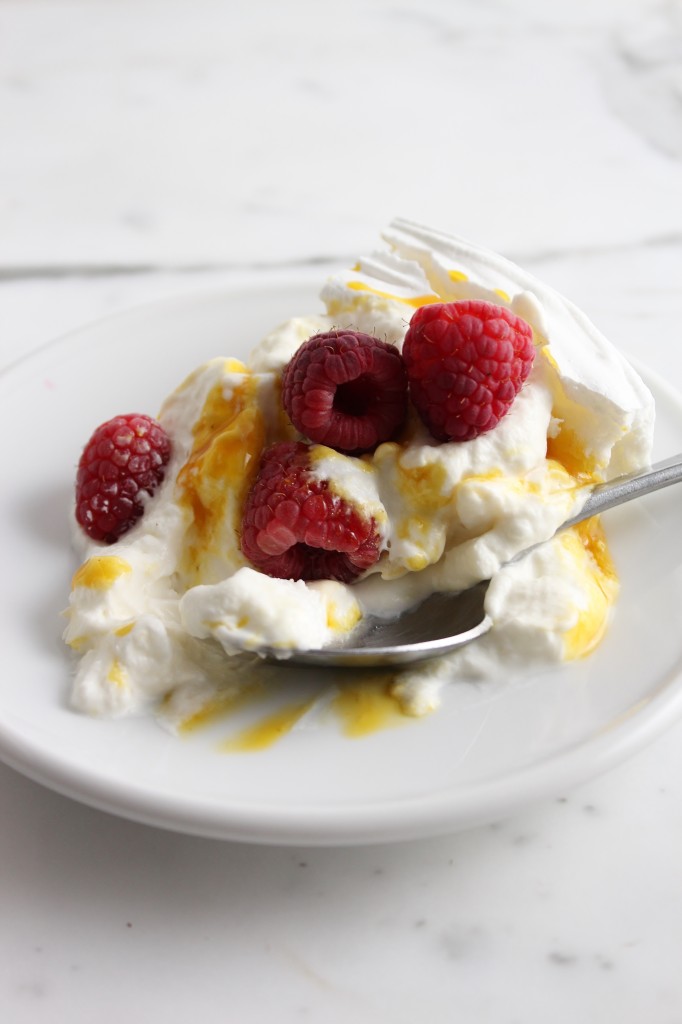
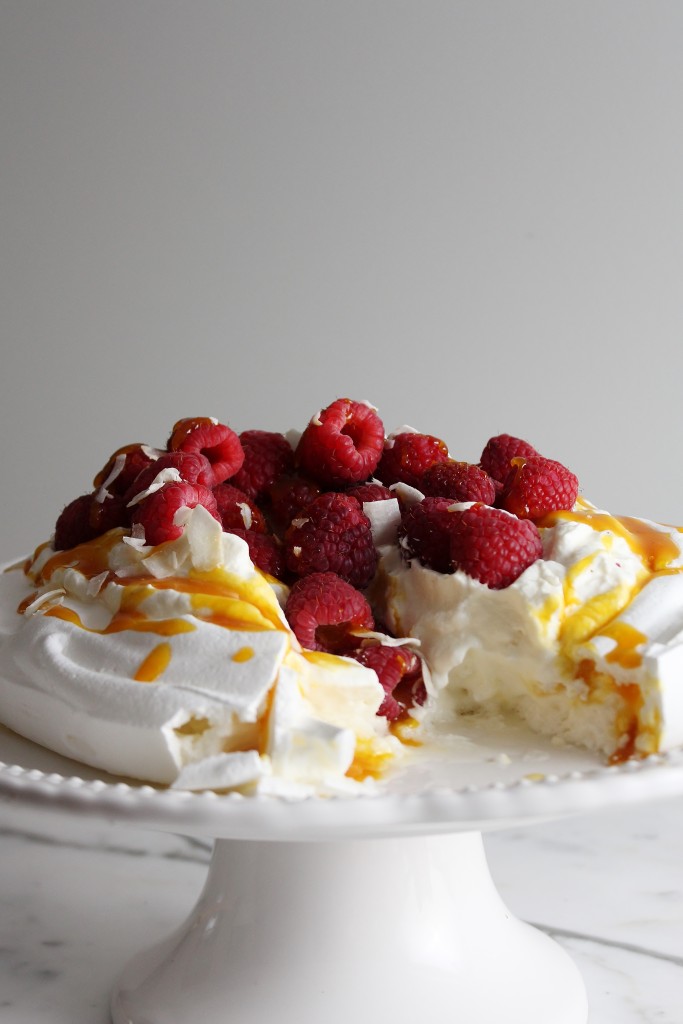
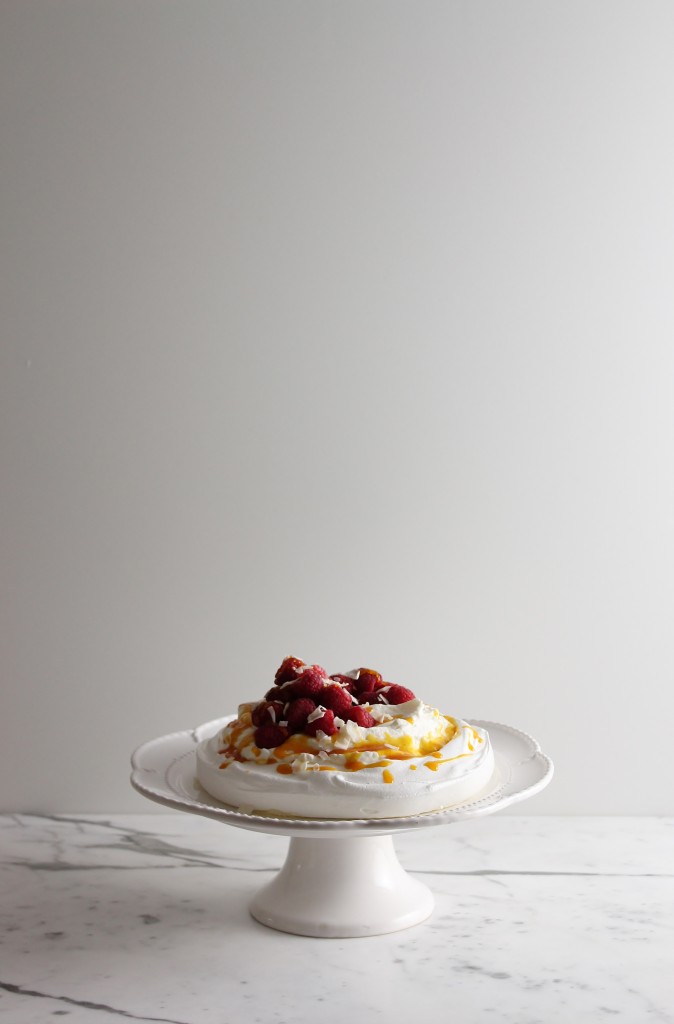
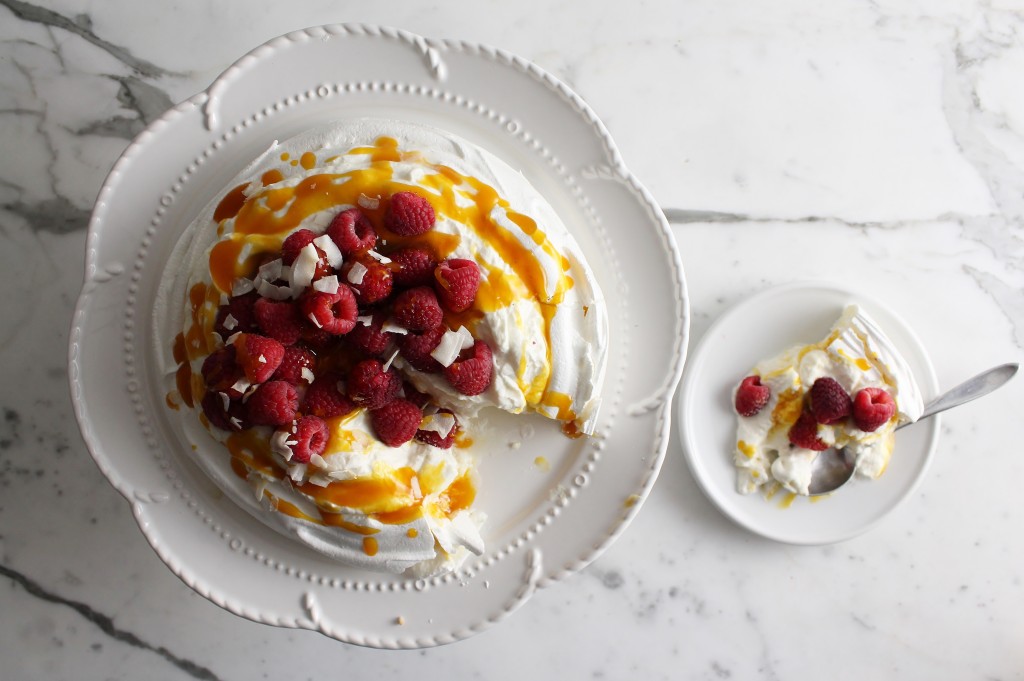
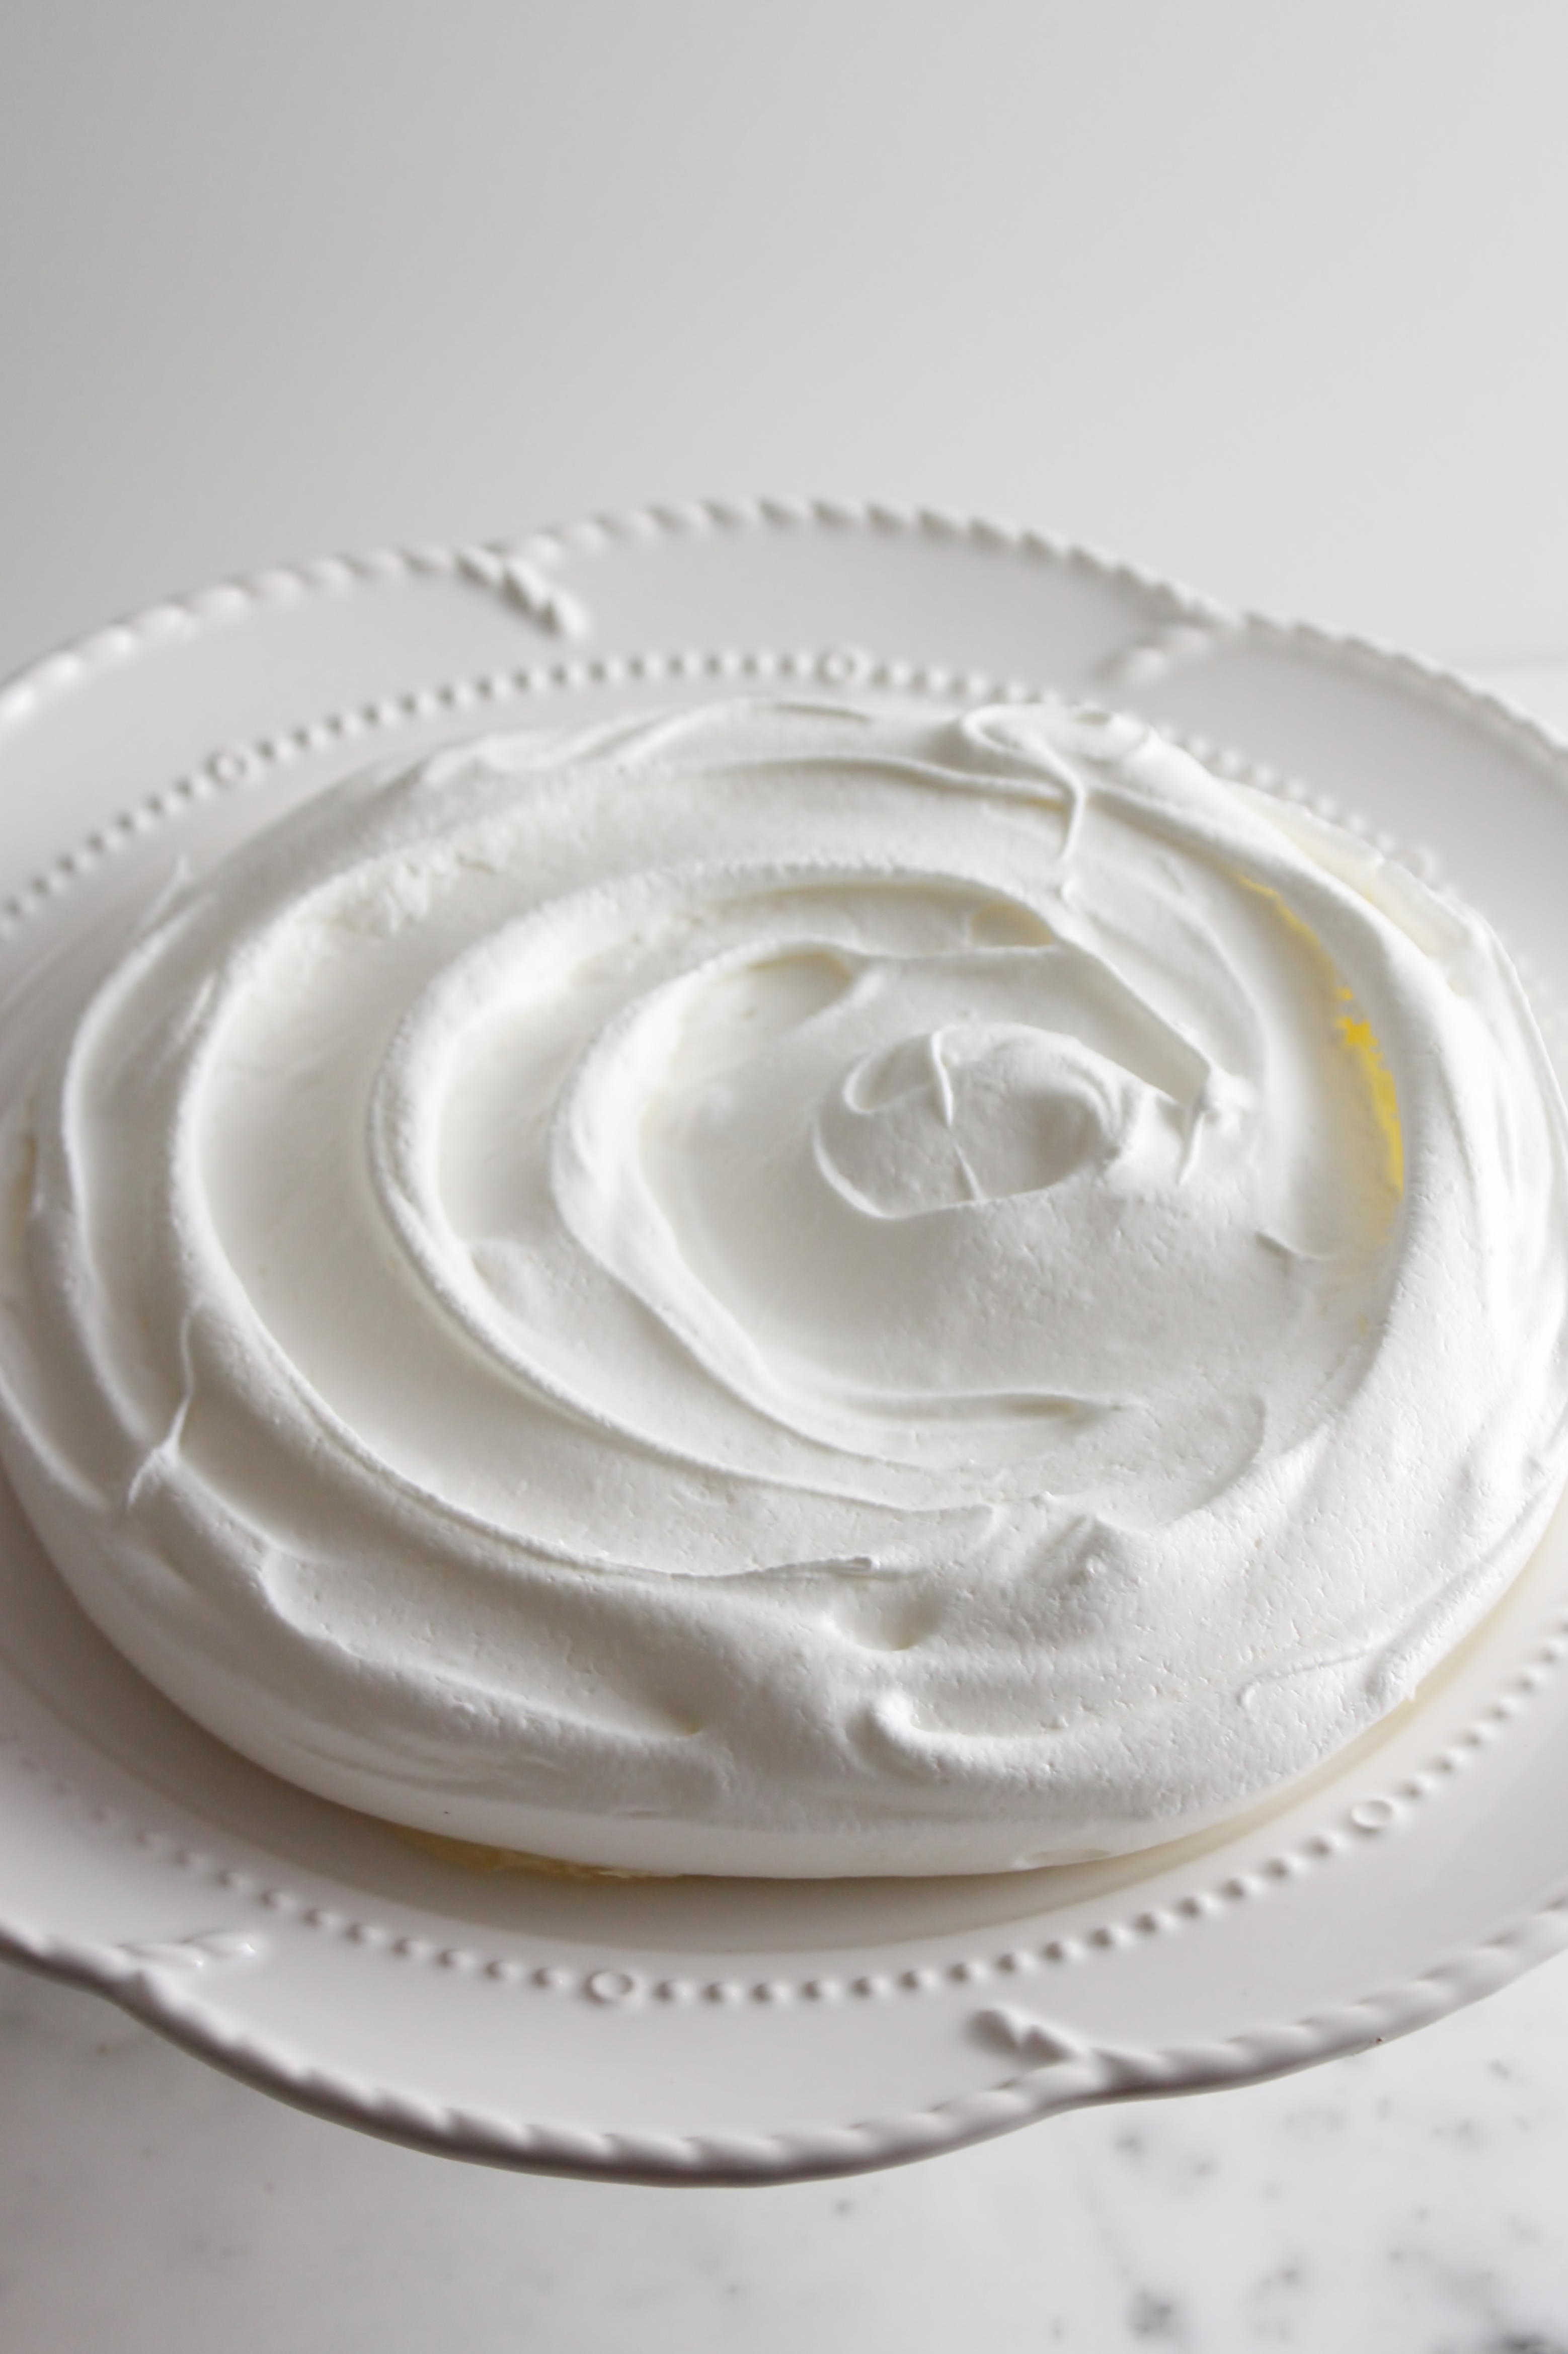
I don’t know if an in-depth post is really necessary with this cake- I mean, what can I say, I look at it and can’t help but smile… It’s just so goshdarn cute.
This is the first trial of what will probably-maybe-definitely become an obsession.  
I think deco roll cakes are just so, well, kawaii. 
They’re Japanese-born, mainly thanks to Junko, who has written a few books about them and whose roll cakes are incredible.
 
Unfortunately, I don’t speak Japanese, so I used someone else’s adaptation of the Google translated recipe on Junko’s blog and I used a joconde imprime decor paste (used for joconde, or almond flour, sponge cakes).  
It didn’t come out quite how I wanted, as the imprime decor paste didn’t meld well with the actual sponge batter.
I’m going to hunt for some more deco sponge cake recipes/techniques to try, so that the decorations will be more united with the cake.
 
I made other adaptations that I liked- I added a vanilla bean Italian meringue on the interior instead of the traditional whipped cream, because I just love that marshmallow-y fluff, and it added sweetness without being overpowering.
Some notes: if you aren’t familiar with sponge cakes, don’t do the decorations.
Instead, focus on learning how to make the (two) batters and roll the cake without cracking it.
The trick is to use a couple liberally sugared towels to roll the cake up before filling it.
Also, wait till it’s cool!
 
Deco-Roll– Trial 1
 
for the joconde decor paste:
adapted from Bake In Paris
ingredients:
100 grams unsalted butter
100 grams confectioner’s sugar
100 grams egg whites
14 grams cornstarch
96 grams AP flour
food coloring 
directions:
Cream the butter and sugar together for at least 3 minutes, until fluffy, shiny, and pale.
Add in the egg whites; mixture will appear to curdle.
Mix as well as you can to get the mixture as homogeneous as possible; it won’t be completely mixed.
Scrape down the sides of the bowl.
Stir the cornstarch and flour together and add into the mixture. 
Beat on high until just combined.
Divide the mixture into 4 100-gram measures and tint as desired.
Pipe your designs onto a greased, parchment paper lined 15×10 sheet pan (jelly roll pan) as desired; I piped small polka dots.
Freeze for at least 15 minutes, or until designs are completely hard.
Meanwhile, prepare sponge batter.
 
for the sponge batter:
ingredients:
part A: egg yolk batter
3 egg yolks
30 grams sugar
60 grams milk
1 teaspoon vanilla extract
40 grams canola or vegetable oil
10 grams cornstarch
70 grams AP flour
part B: meringue
3 egg whites
30 grams sugar
big pinch cream of tartar
directions:
Preheat oven to 350 degrees F.
Combine the egg yolks and sugar in a bowl (not your stand mixer bowl, if you have one!  Use a whisk or electric mixer for the yolks and a stand mixer for the meringue).
Place the whites (for the meringue) with the sugar and cream of tartar in the bowl of your stand mixer (if you do not have a stand mixer, simply prepare the yolk batter first, then use your whisk or mixer to prepare the meringue second.  If you happen to have both an electric and stand mixer, you can prepare both components of the batter at the same time.) and begin to beat on medium speed (about a 4 on a KitchenAid.)
Beat the yolks on high or whisk briskly for 3 minutes, until doubled or tripled in size and very pale.
Add in the milk, oil, and vanilla and beat just to combine.
Check on your egg whites; once they reach stiff peaks, turn the mixer off.
Sift the cornstarch and flour over the egg yolk mixture and fold to mix.
Now, bring the two batters together.
Take 1/3 of your meringue and gently mix it into the egg yolk batter with a spatula.
Once combined, fold the rest of the meringue into the batter gently.
Once it is all mixed, remove your sheet pan from the freezer and gently spread the batter over the piped design.
Bake for 12 minutes.
While the sponge is baking, prepare yourself to flip it and roll it.
 
for flipping and rolling:
you will need:
a larger sheet pan, or a cutting board
2 dish towels that are larger than your cake
plenty of powdered sugar
a wire cooling rack
directions:
Lay out one of the towels on top of the sheet pan or cutting board and sift powdered sugar all over it, very liberally.
Lay out your other towel on a countertop and sift powdered sugar over it, very liberally.
Once your cake comes out of the oven, you will flip it onto the sheet pan or cutting board that has been lined with the towel.  
You will then peel the parchment paper off of the cake; you will see the baked-in designs- this will be the outside of the roll.
You will then take the sheet pan/cutting board and flip the cake over onto the other prepared towel that has been covered in powdered sugar.
You will then carefully roll the cake up in the towel, secure it by twisting the ends slightly, and place it on the wire cooling rack to cool completely.
It is best to run over the steps in your mind before doing them so that you do not panic when the sheet cake is warm, because time is of the essence when rolling.
Rolling a warm cake will prevent cracks, but stay cool and composed.
Once the cake is cooled, you will unroll and release it from the towel and fill it with meringue.
 
for the vanilla bean Italian meringue:
ingredients:
75 grams egg whites (about 2)
pinch cream of tartar
150 grams sugar
50 grams water
scrapings of 1/2 a vanilla bean
directions:
Place the egg whites and cream of tartar in the clean bowl of your stand mixer and turn it on to a speed around 3-5 on a KitchenAid.
Meanwhile, place the sugar and water in a heavy bottomed pan fitted with a thermometer.
Heat the sugar syrup until it reaches 245 degrees F, at which point the whites should have reached stiff peaks.
Slowly pour the syrup into the whites with the mixer running; allow to whip until the meringue reaches body temperature.
Sometime while the mixer is still running, add in the vanilla seeds.
Once the meringue is cooled, spread a thick layer over the interior of the cake roll.
Roll up the cake and pipe some decorative meringue on top.
Enjoy!
 

Early Golden

 
These plums are so juicy sweet.
Out of this world juicy sweet.
 
My mama and I went fruit picking this morning.
It was the perfect day- breezy, sunny but slightly cloudy, and warm without being overbearing.
We returned a few hours later with two quarts of sour cherries, two quarts of delicate raspberries, a 1/2 peck of peach “seconds” and a quart of yellow summer plums.
Quite a haul.
(We only picked the raspberries and cherries, though.  Cheaters.)
 
 
We quickly threw the raspberries in a pot with some turbinado sugar and honey, something that was to become a jam, but, upon realizing that we could not for the life of us find that damn pectin, would have to be a thickened compote.
Oh well- I shall eat it swirled into thick, creamy Greek yogurt with hazelnuts and flax seeds.
A fine breakfast, if you ask me!
Then, we picked over the cherries and threw them in a pot with sugar and a spent vanilla bean.
 
I took charge of the plums.
After hastily eating 3, I decided to bake them into a quick cake.
This whole thing took, start to finish, about 45 minutes.  
I swirled some (measurements are not precise, here, people: I free pour.  Sorry.) maple syrup, honey, and a little nub of butter together, then nestled the plums among it.
I topped it with a quickly thrown together almond-olive oil cake batter.
 
The most wondrous thing happens with upside-down cakes: the caramel-syrup mixture melts into the fruit, creating jammy little pockets of heaven, and the cake, while crisp at the very top, absorbs some of the fruity, maple-honey syrup and becomes wonderfully perfumed.
 
These plums (called Early Goldens) turned from a pale yellow to an apricot orange.
The almond and vanilla pair just beautifully with these sweet little nuggets of summer.
If you can get your hands on some fresh, sweet stone fruit- I would suggest pluots or plums- make this cake.
It’s quick, moderately healthy, and delicious!
 
 
Psst… It’s also naturally gluten-free!
 
Upside-down Plum Cake
cake proportions adapted from Comfy Belly
ingredients:
8 small plums, halved and pitted
1/3 cup honey
1/4 cup maple syrup
1 tablespoon butter
pinch sea salt
1 1/2 cups almond flour
1 teaspoon baking soda
1/4 teaspoon kosher salt
scrapings of 1/2 a vanilla bean
1/3 cup honey
1/3 cup oil (I used olive)
1 teaspoon apple cider vinegar
2 eggs
directions:
Preheat oven to 350 degrees F.
Combine 1/3 cup honey, maple syrup, butter, and sea salt in a small pot and bring to a boil.
Pour into the bottom of an 8×8 pan.
Arrange the plums in the syrup mixture.
Make the cake: whisk almond flour, baking soda, salt, and vanilla scrapings.
Make a well and add the honey, olive oil, vinegar, and eggs into the center.
Whisk the entire batter together and then spread over the plums.
Bake until the top is deeply tanned and a cake tester comes out clean.
Allow to cool, then slide a knife around the edge and invert onto a serving platter.
 

Swiss Myths

Nothing bad can come of a foodstuff with the word “butter” directly incorporated into its name.
Let’s talk meringue buttercream, people.
Meringue buttercreams are used by professional bakers and cake makers because of their stability, fluffiness, shine, and taste.
When you first taste a meringue buttercream, you will be amazed by the lightness of it.
They are, by far, my favorite way to finish cakes.
American buttercreams, which are a simple combination of butter, powdered sugar, and a liquid, become crusty as the butter dries out and are always too sweet and cloying for my taste.
(I have a common opinion with Rosie of Sweetapolita, however; I agree that cupcakes can be very delightful with a good American buttercream.)
 
Cooked frostings, often called heritage or boiled frostings, made by cooking flour and milk to sub for part of the butter, lack the richness that I think an icing should have and can turn out grainy.
Bloggers extol the virtues of SMB- Swiss meringue buttercream.
I wholly agree; however, SMB can be a real pain in the ass.
First of all, it involves making a Swiss meringue, for which I have no patience.
You have to stand, over a stove, whisking egg whites and sugar in a double boiler as they gently come to temperature and the sugar dissolves.
There’s little hands-off time during this period.  You don’t want the eggs to scramble.
(I hate double boilers!)
 
Whenever I make SMB, I notice a nasty, albeit minuscule  strip of cooked egg whites and sugar right at the top of the mass; these are tiny little flecks that I didn’t sweep up in time, and because the sides of the bowl become very hot from the steam, those tiny flecks cook quickly and become crusty. 
(They’re not omelette-y or eggy or anything, because they’re mainly sugar.  Just crusty.)
I don’t like that.  At all.
 
I don’t want to have to deal with that every time I make a buttercream.
In fact, I don’t ever want to have to deal with a crusty ring of anything.
Thankyouverymuch.
So all this talk about SMB being the best?  I’m here to debunk it.
I prefer the easier, fluffier, and glossier alternative:
SMB’s cousin, or sister, or whoever, Italian meringue buttercream.
Here’s why.
First off, for all the reasons why any egg-based buttercream is great.
1. They are not as sweet as an American buttercream.    
Without all the sugar coating your tongue, flavors are intensified and cleaner.
 
2. They store beautifully.
Whether it’s in the fridge or the freezer, they are wonderful to store and use later, so never think twice if you cannot downsize a recipe and you end up with extra.
There are always uses for buttercream, and there’s nothing more wonderful than pre-made delicious buttercream when you need to frost a couple cupcakes but can’t be bothered to make another batch.
3.  They’re simple.
See that photo right above?  Do any of those four ingredients scare you?
No?  Really? Eggs, butter, sugar, and lemon juice don’t scare you?
Hmm.  Then I guess European-style buttercreams shouldn’t either.
 
4.  They’re not made with Crisco.  Ever.
Buttercream is buttercream for a reason.
Ahem.  
Then, the reasons why I choose IMB over any other European buttercream.

1.  It’s not as rich (or wasteful) as French buttercream.
French buttercream is made with egg yolks in the same manner as Italian meringue- whipping eggs while pouring sugar syrup over them.
All those yolks make for a very, very rich buttercream: almost too rich for me.
Yolks are used in custards, curds, puddings, and ice cream, and as a result, I rarely, if ever, have extra yolks.
Yolks also do not keep well and I always have egg whites on hand from said used yolks.
Egg whites keep well in an airtight container in the fridge for ages.
If I were to make French buttercream as often as I do IMB, I’d be drowning in egg whites.
Absolutely over my head.  

And furthermore, the best use for these egg whites would be an IMB.  It’s the circle of life.
 
2.  It’s quicker and has far less downtime than German buttercream.
German buttercream is based on a thick custard which is allowed to cool and congeal completely, then has butter whipped in.
German buttercream is awesome- don’t get me wrong.  
It tastes like ice cream, because it basically is ice cream, just not frozen and with a whole lot of butter whipped in.
Like ice cream, but better.
More butter= more better.
 
Here’s the thing: in order for the butter to emulsify with the custard, which is already a feat, when you think about it, because custards are already pretty high fat and you’re just shoving a brick of butter into that and expecting to get frosting to come out, you need the custard to be cool.
Like, completely cool.  Like, stick it in your fridge and wait a few hours.
I ain’t got time for dat.
Seriously… once you get your IMB down pat, you can even start to cut time on the relatively short prep time because you’ll be able to add colder butter to a warmer meringue and still have it all work out perfectly.
German buttercream?  Not so much.  You must wait.
I am bad at waiting.
Thus, IMB wins this battle.  Sorry, Germany.
 
3.  Finally, in my humble opinion, Italian meringue trumps Swiss meringue.  On a lot of accounts, enough to convince me that IMB>SMB. 
Italian meringue is quicker.
SMB requires patience to prevent scrambled eggs.  
You have to cook the eggs, then whip the meringue.
With IMB, you cook the eggs while making the meringue.  The whole process of making the buttercream takes only a slight bit longer than making a meringue.

IMB is wonderful because you can incorporate a wealth of flavors right in, by infusing the sugar syrup with another ingredient.
For example, when making a lemon IMB, you can use lemon juice to make the syrup, thus giving the final product a lovely and prominent lemon tang, whereas with an SMB, you must use lemon extract, or whip in a lemon curd (yet another time-costly step) as there’s no direct way to incorporate substantial amounts of liquids.
 
Italian meringues are much more stable than Swiss meringues.
They’re thicker, glossier, and less prone to weeping than Swiss meringues, because they have been fully cooked and stabilized by the hot sugar.
I have had instances where my SMB weeps (little droplets of water escaping from the emulsion and beading on the cake, causing the frosting to separate and slough off, as well as look incredibly unappetizing), but never, ever, has an IMB wept, in mine own experiences, of course.
Okay.  Have I got you sold on Italian meringue buttercream?
Great.
Now how the heck do we make it?
Realtalk:  you’re going to be a little put off when you read any recipe for IMB.
Recipe writers (myself included, sorrynotsorry), are all like…
 meanwhile, while this boiling hot sugar syrup is burbling and bubbling like a cauldron, whip up some egg whites real quick and they should be just perfectly soft but yet stable when you pour this boiling hot sugar over the whipping attachment and try not to hit the whisk because it will shoot syrup straight into your eye or the back of your knee or wherever is most painful and good luck see you on the other side don’t forget the sugar syrup is hot…
 
It’s a load of cra mumbo jumbo.  And the timing thing really throws people off.
Don’t let it throw you off!
I promise, it is not stressful to make a successful IMB, and when people bite into your cake and look up at you with starry eyes and a full mouth and smile, you will be drawn back to make more buttercream.  I just know it.
It’s irresistible for both the baker and the consumer.
Win-win!
So here’s how we do this.
(I’m going to do all of this in American volume measurements to make it more accessible. 
 Generally, however, I do stick to weight with IMB.  Whatever floats your boat, guys.)
 
First, get your mise en place, well, en place.
Gather everything you’re going to need.
Here’s a checklist for a lemon Italian meringue, which is what we’re making today for that cake way the hell up there past all those boring shots of my mixer:
 
1 lemon (2 lemon, red lemon, blue lemon…)
1 cup of sugar
a pinch of cream of tartar
4 egg whites
12 ounces (24 tablespoons, 3 sticks) butter, softened but cool and cut into pieces
measuring cup
thermometer
small-medium heavy bottomed pan
stand mixer fitted with a whisk attachment
 
Squeeze dat lemon!  
Get 1/3 cup of juice in your measuring cup and place it straight into your saucepan, right in the middle.  
Now, take your sugar and pour that into the middle of the saucepan as well, right in the middle of your puddle of lemon juice.  
Avoid letting any dry sugar touch the sides of the pan.  This will prevent crystallization.
Place the egg whites and the pinch of cream of tartar into the bowl of your stand mixer.
Start your engines.  On low-medium speed (4-6 on a kitchenaid), begin to whip your egg whites.
Great.  Now ignore them for a little while.

Let’s turn our attention back to the pot; place it on your stove and turn the heat on to a medium-high setting.
Place your thermometer in the pot.
Now, wait.  The sugar will dissolve and the syrup will begin to bubble.
We’re waiting until it hits 245 degrees F.
 
Look back at your egg whites.  How fluffy are they?
When the syrup hits 200, they should be all foam- no thick, liquid egg whites left.
When it hits 240, they should be soft peaks- there should be definite peaks, but they shouldn’t look dry or stiff.
Here’s a secret.  I’ve accidentally added the sugar syrup to over-whipped egg whites, ones that are already at stiff peaks, and under-whipped egg whites, ones that are only beginning to hold peaks.
It works out.  I promise.
Even better?  If you’re nervous that one of the two horses is winning the race by too large a margin, rein it in.  You can turn down the heat on the syrup, or even take it off the heat for 30 seconds.  You can slow down the mixer or even stop it completely.
It works out.  I promise.
Now, your syrup has come to temp and your egg whites are at soft peaks.  Brilliant!
Carefully pour the syrup into the measuring cup.
With the mixer on medium speed (4-5 on a kitchenaid), drizzle the syrup over the meringue, about 1 1/2 inches from the side of the bowl.
That’s the sweet spot; however, if you don’t feel comfortable pouring the sugar with the mixer whipping, don’t.
Instead, turn the mixer off, lift the attachment, drizzle a couple teaspoons on top of the meringue, lower the attachment, and whip on high for 10 seconds.  
Continue to repeat this until all the syrup is gone.  
I think you will quickly find yourself pouring the syrup with the mixer whipping; it is much less tedious.
You’re almost there!
Whip the meringue on high until it has cooled to body temperature; you can feel the sides of the bowl as an indicator.
If your mixer is huffing and puffing and can’t possibly last, just turn it off after 5 or so minutes and let the meringue cool for 10, then whip on high again.
Once your meringue is at body temp, add in your butter a few pieces at a time.
 
You are now going to enter the 5 stages of making an egg-based buttercream.
Here’s the remedy.  Stop freaking out, and keep whipping.
Do.  Not.  Stop.  Whipping.
Don’t you dare touch that lever.
I’m watching you.
Keep whipping.
 
1. (Blissful) Ignorance
When you’re first throwing your butter into the bowl, you could care less.  
You’re not even really paying attention- Real Housewives of Miami is on!  
 
Hey, you throw that butter in there man, the commercial break is over.
Just let it whip.
 
2. Denial
Return to the bowl, la dee da… Oh.  Oh.  Wait.  It looks like my meringue has fallen.
No… the butter must just be on the top.  Right?
I worked too hard to get that meringue to be all fluffy and glossy to have it fall down on me now!
That’s not a fallen meringue, right?!?
Wait.  No.  Babe.  Wait.  Babe! Babe! No!  No! Babe! Wait!  Babe, wait!  Wait, babe!
 
Relax: your meringue is supposed to fall.  That’s the point of this step.  
A fallen meringue is normal and I promise all your baking friends’ meringues have fallen, too.
 
3. Panic (re: curdling)
Now what?  Well, your buttercream looks really curdled.  
There are all these nasty little butter pieces.  
It looks like you should trash the whole shebang.
Definitely trash it.  Oh my gosh.  What do I do?  Look at those curds- what are those?!
 
Do.  Not.  Stop.  Whipping. 
A curdled look just indicates that your butter was a touch too cold.
If you keep whipping, the temperatures will become more evenly distributed and the curdling will disappear.
Keep whipping.
 
4. Anger (re: liquidity)
Okay, the curds have gone away.  Now it looks like I have a glaze type deal going on in my mixing bowl.
Why is it so damn thin?  I thought this was supposed to be some fluffy s#*!.
I swear to GOD I am never going back on that dumb blog.  Tuh!
 
Surprise!  You know what the solution is going to be?
If you guessed “keep whipping,” you’re getting somewhere.
Liquid is normal.  The butter will soon emulsify.
You’ll hear a noise while the frosting is thin, a splashy sort of mixing noise.
When the butter starts to emulsify, the noise will thicken, and become a whap-whap-whap noise; this will indicate that your buttercream is getting some body and oomph!
Keep whipping until you hear that noise!
 
5. Satisfaction
You frost that cake, you sassy little minx!  Look at you and your fluffy, shiny, gorgeous IMB.
You rock.  You roll.
You should be the next Food Network Star looking all professional with that buttercream.
Mmmhmmm.
Moral of the story: making a meringue buttercream is not that bad.  And it’s totally worth it.

You can use it to frost a cake like the one I have here today, which was made to celebrate my dad and also my parents’ anniversary, which was a few days back.
(27 years!  You go, Glen Coco!)

It’s a strawberry cake sandwiched with the lightest white cake imaginable, and surrounded with a thick, luscious layer of lemon IMB.
It’s a striking cake.  It screams summer.
And it’s great practice for some Italian meringue buttercream frosting.

A few words, then I’ll shut up, because this post is long enough already-god who do I think I am trying to make you read this long post while you have all that work that’s sitting by the wayside crazy food temptress blogger lady.

Straight out of the mixing bowl, IMB is perfect for crumb coats and smooth finishes.
Refrigerate it for 15 or so minutes to firm it up a bit in order to pipe roses and the like.

Congratulations to my father, you are an inspiration.
And to the both of my two wonderful parents, I like you guys alright. 

Hoo!  Boy, I need a nap and a piece of cake stat.
 

Berries and Cream Cake
for the strawberry cake:
heavily adapted from A Dash of Sass
ingredients:
1 1/2 cups AP flour
2 1/4 teaspoons baking powder
scant 1 teaspoon kosher salt
1 scant cup frozen strawberries
1 cup sugar
3 ounces (6 tablespoons, 3/4 stick) butter
3 eggs
splash vanilla
splash strawberry extract, optional
rose colored food coloring, optional
directions:

Preheat the oven to 350 degrees F and grease and flour two 6-inch pans.
Stir the flour, baking powder, and salt together.
Microwave the strawberries until they are falling apart and have released their juice, about 1 minute.
Puree the berries and measure out 3/4 cup.
Cream the butter and sugar together until light and fluffy, about 3 minutes.
Add in the eggs one at a tim.
Scrape the sides of the bowl and add the strawberry and vanilla extracts and food coloring, if desired.
Add the strawberry puree and mix on high until well blended.
Add in the flour and mix until homogeneous.

Pour into prepared pans and bake for 20-25 minutes, until a tester comes out clean.
for the white cake:
adapted from i am baker
ingredients:
1 cup AP flour
2 tablespoons cornstarch
1/2 teaspoon kosher salt
2 teaspoons baking powder
3/4 cup plus 2 tablespoons sugar
6 tablespoons butter, cut into pieces
1/2 cup milk
3 egg whites
splash vanilla extract
directions:
Preheat oven to 350 degrees F and grease and flour two 6-inch pans.
Mix the flour, cornstarch, salt, baking powder, and sugar together.
Mix the milk, egg whites, and vanilla together in a measuring cup.
Add the butter and mix until most of the butter is broken up; add in half of the milk mixture and allow to beat on high until everything is incorporated (batter will still be very thick).
Add in the second half of the milk mixture and mix to combine.
Scrape the sides of the bowl and mix again.
Pour batter into prepared pans and bake for 20-25 minutes, until the tops are golden and a tester comes out clean.
for the lemon Italian meringue buttercream:
adapted from Sky High
ingredients:
1/3 cup fresh lemon juice
1 cup sugar
4 egg whites
pinch cream of tartar
12 ounces (3 sticks) butter, softened but cool and cut into pieces
directions:
Place the lemon juice in a heavy bottomed pan and add the sugar to the center of the pan.
Place the egg whites and cream of tartar in the bowl of a stand mixer fitted with a whisk attachment.
Start to whip the egg whites.
Meanwhile, cook the sugar syrup: without stirring, allow the syrup to come up to 245 degrees F, about 5 minutes.
Keep an eye on the egg whites; when your syrup reaches 240 degrees F, your egg whites should be soft peaks.
Once your syrup comes up to temperature, remove it from the heat and pour it into a measuring cup.
With the mixer running on medium speed, slowly and carefully drizzle the hot syrup over the meringue.
Try to avoid hitting the whisk attachment directly, as this will cause splattering on the sides of the bowl.
Once all the syrup has been added, whip on high for 10 or so minutes, until the meringue is cooled to body temperature.
Once the meringue has cooled, add in the butter a few pieces at a time while whipping on high.

After adding all the butter, the frosting may be liquid-like; keep whipping until it thickens up and becomes fluffy.
(You will hear a sudden change in the sound of the mixer; this indicates that the frosting is thickening up.)
to assemble:
Place one of the cooled strawberry cakes on your cake plate or other serving dish.
Place 1/4 cup of frosting over the cake and spread out; add a few more tablespoons if you need to.
Place a cooled white cake over that layer and repeat.
Repeat with the next two cakes.
Thinly frost the cake to ensure that no crumbs will escape.
Add the rest of the frosting to the top of the cake and smooth it out, moving down the sides to create crisp edges.
Finish as desired; serve at a cool room temperature.