Holidazed

IMG_6621_01

All the cookies!

IMG_6574_02

‘Tis the season for cookies.
We alllll know it.
And you know, I ain’t mad at it.  Cookies and I get along very well.

Anyways, this year we’re stepping up our cookie game.  Right?
Let’s give away cookies that take the lackluster cookie platter to the next level.

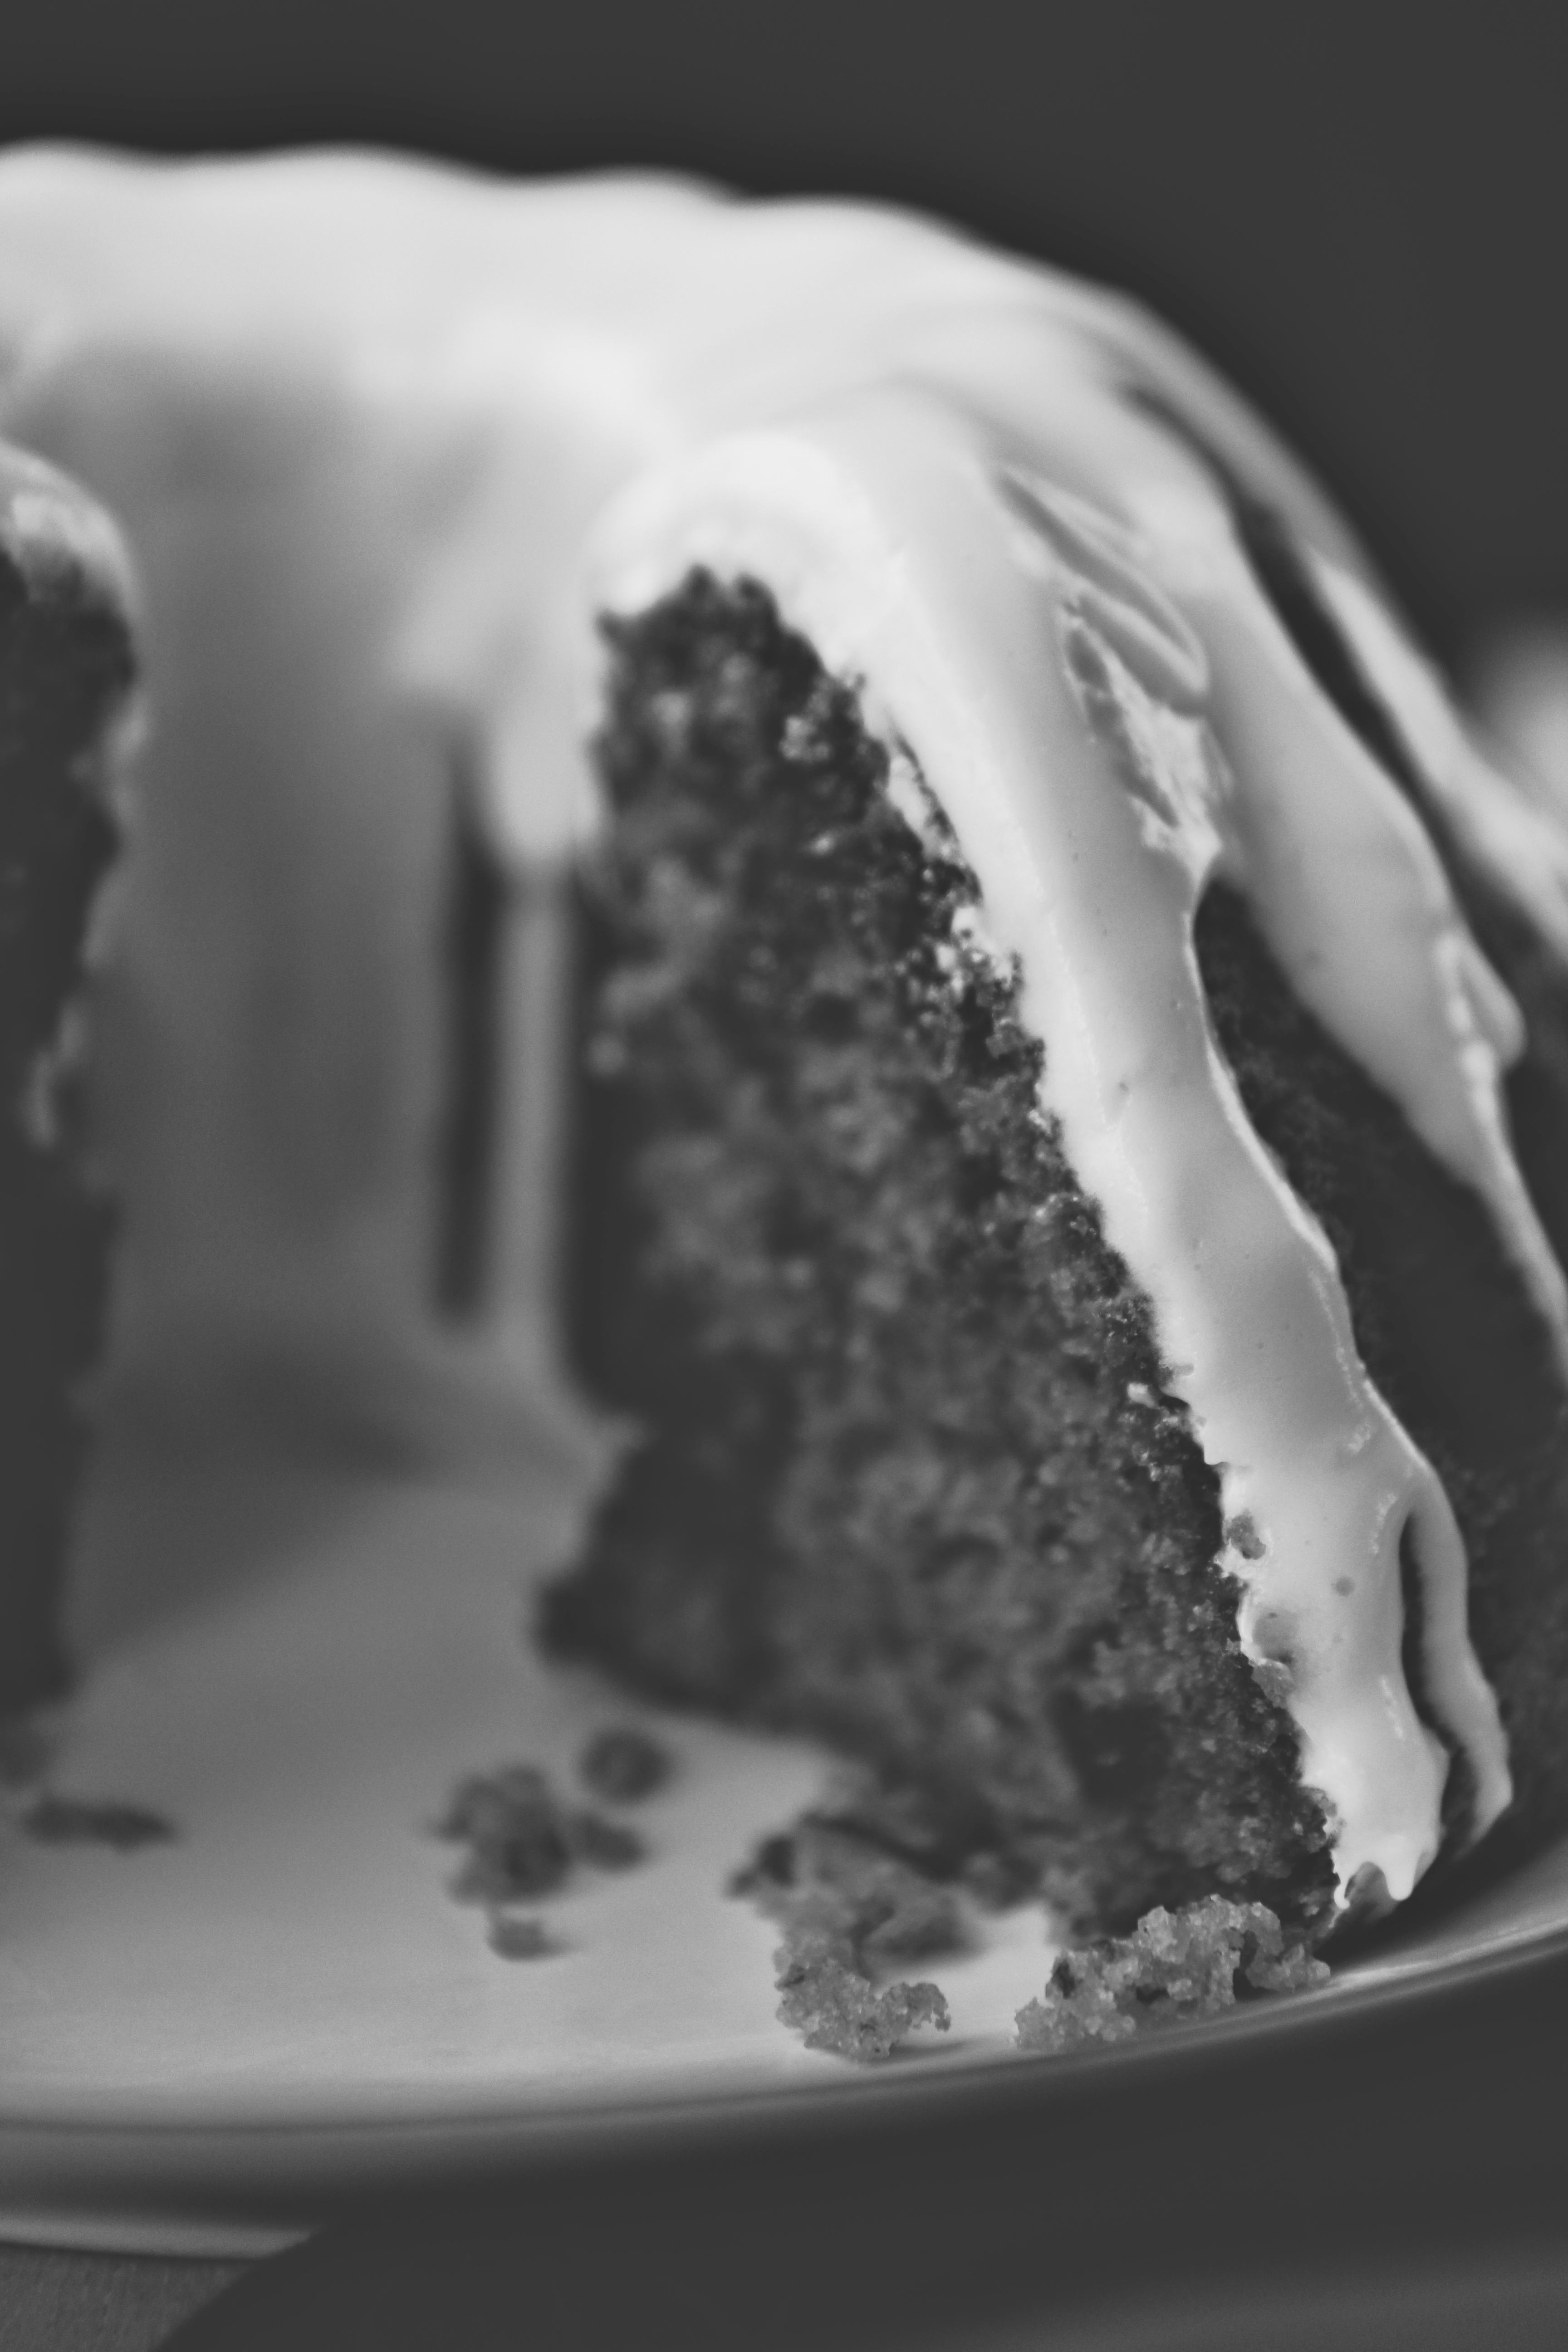
We started with nutmeg, maple, and rye sugar cookies.
Now, we’re doing traditional, but we’re doing it a better way.

IMG_6581_01

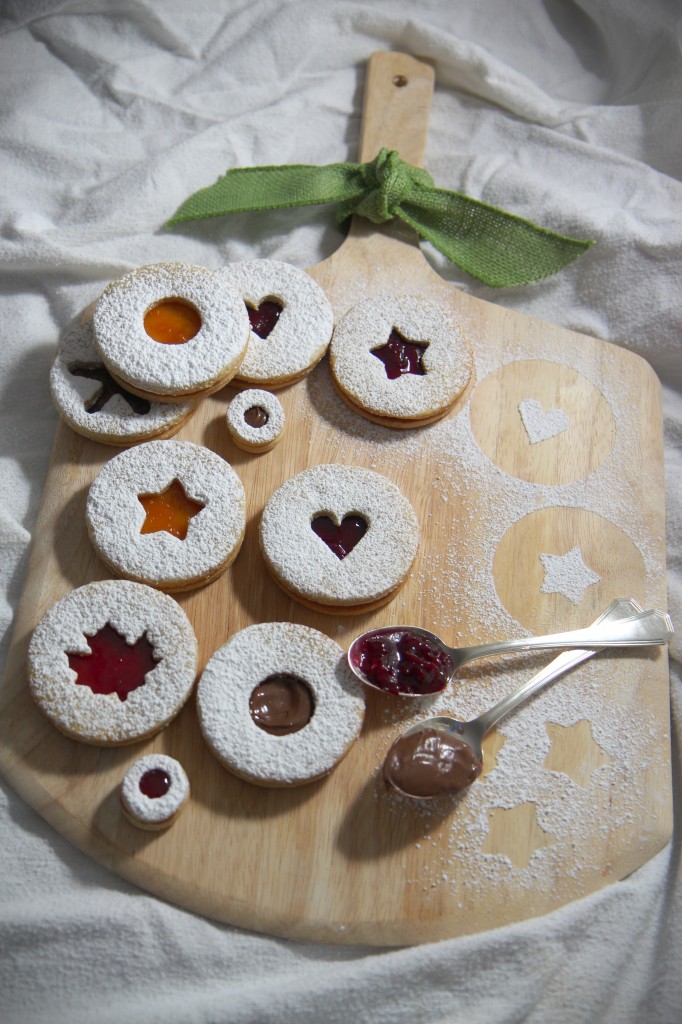
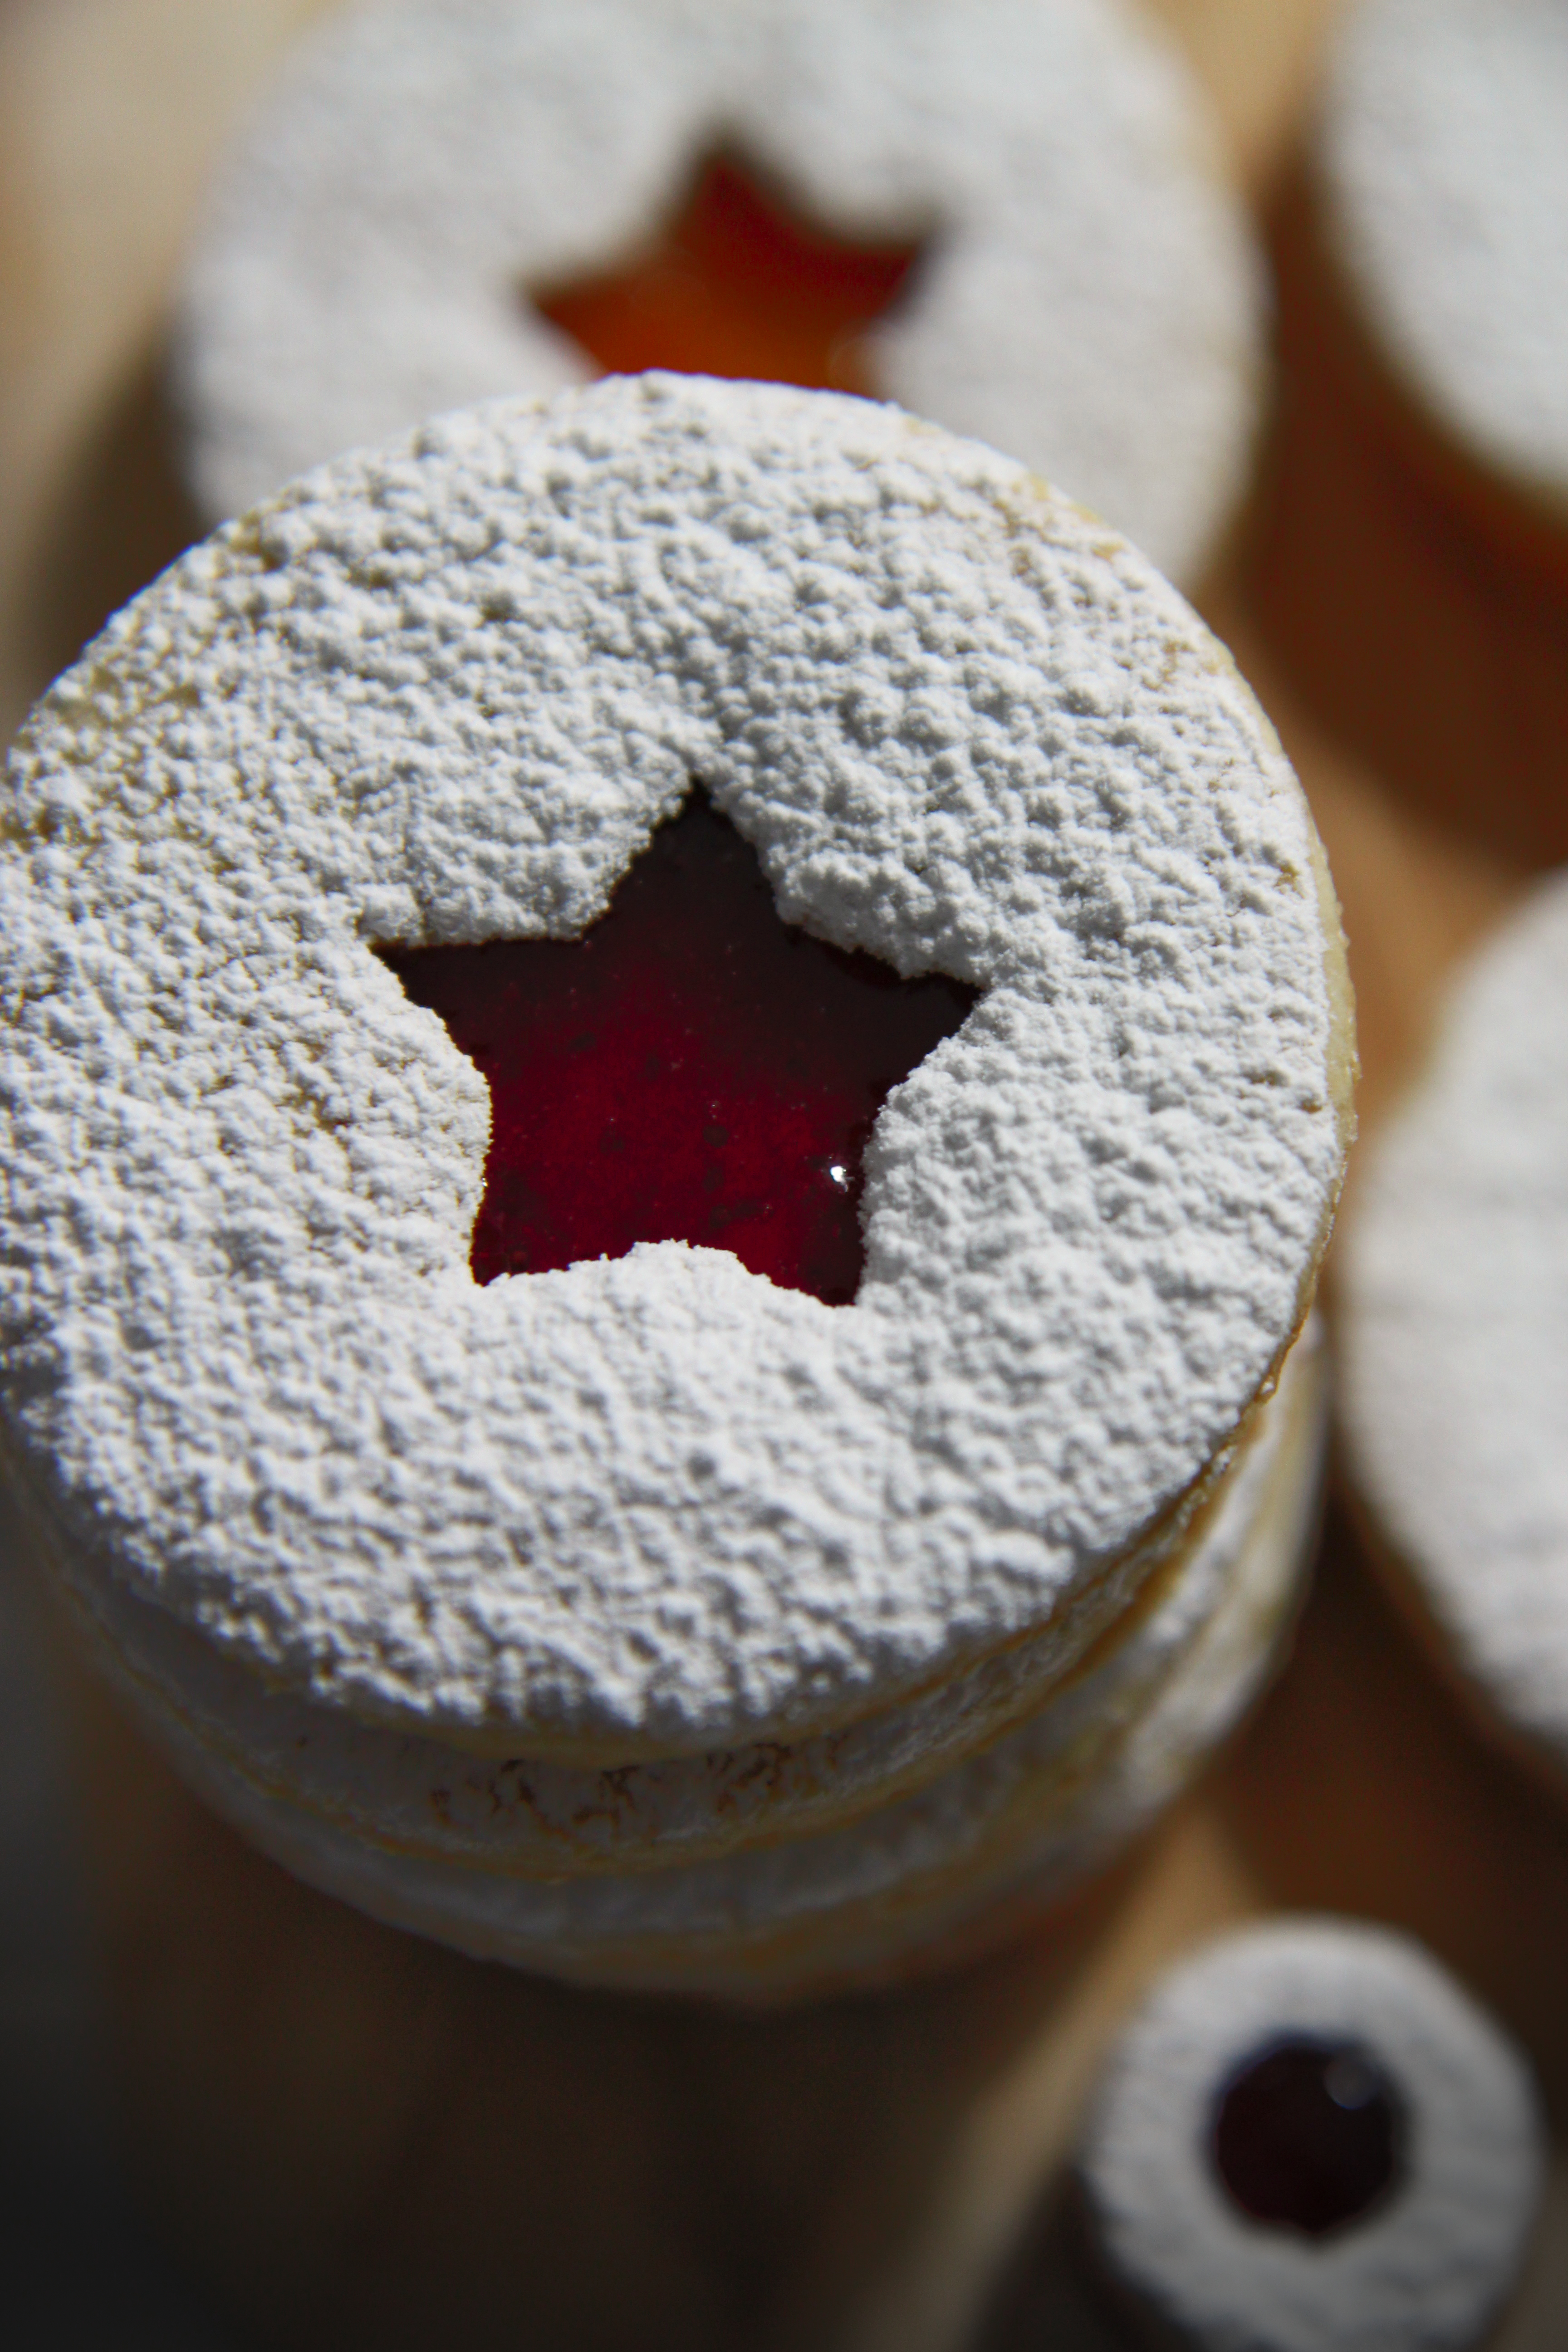
Linzer cookies are totally a staple on holiday cookie platters.
Butter cookies with a cut out, filled with jam.  You’ve seen ’em.  You’ve enjoyed eaten them.

Here’s the problem: too often they are dry and crumbly, sucking the moisture right out of your mouth and leaving a telltale trail of crumbs down the front of your ugly sweater. (What?! We all do it.)

Or, they’re utterly boring.  Not enough punch; plain Jane fillings and plain Jane casings.
Not so with these Linzer cookies!  They’ve got a hefty pinch of salt, a touch of spice, and fillings with body.

IMG_6537_01_01_01

These cookies are made with almond flour and minimal sugar, which means the flavors stay clean and un-muddled on your tongue.
To ensure that they have a good bite, not too crumbly nor too firm, we use a technique most often utilized in making fluffy cakes with tight crumbs: reverse creaming.

Reverse creaming involves whisking all the dry ingredients together, then beating in soft butter followed by the wet ingredients.  It creates a dough with minimal air pockets, meaning your cookies will be nice and flat and less prone to crumbling.

We’ve got a good base going: lightly spiced and sweetened, with hints of almond and a firm, crisp bite.

Don’t mess it up with the fillings!  Use good quality jams.
My favorite was the D’arbo sour cherry jam, which went well with the almond undertones (almonds+stone fruit=magic), and also offset the butteriness of the cookies masterfully, what with its tart, fruity self.
I highly recommend choosing fillings with a little kick.
In the future, I’d add a pinch of cayenne to the Bonne Maman strawberry jam, and a sprinkle of salt to the Nutella.  I’m partial to apricot as is, but I bet an extra touch of nutmeg would work wonders.

IMG_6591_01

Sorry that my posts haven’t been very wordy.  It’s the holidays, and my brain is fried.
Holidazed and confused…

More cookies coming your way in a day or so.
Hint: there’s peppermint involved.  Get excited.

IMG_6604_01

Linzer Cookies
adapted from Martha Stewart
makes approximately 20 large sandwich cookies
ingredients:
5 ounces (1 cup and 3 tablespoons) almond flour or finely ground almonds
3.6 ounces (1/2 cup) sugar
1 teaspoon cinnamon
1/8 teaspoon freshly ground nutmeg
1 teaspoon baking powder
big pinch kosher salt
9 ounces (2 cups plus 2 tablespoons) flour
8 ounces (16 tablespoons) butter, softened and cut into small chunks
1 egg
splash vanilla extract
confectioner’s sugar, for dusting
fruit jams or Nutella, as desired

directions:
In the bowl of a stand mixer fitted with the paddle, add the almond flour, sugar, spices, baking powder, salt, and flour and mix to combine.
Add in the softened butter and paddle until the mixture resembles a coarse meal.
Add in the egg and vanilla and mix until a dough forms.
Turn the dough out onto a lightly floured surface and roll out to 1/4 inch thickness.
Cut out circles, and cut a small shape out of half of the circles.
Place onto parchment lined baking sheets and freeze or chill for at least 30 minutes.
Preheat oven to 350 degrees F.
Bake the frozen/chilled cookies for 9-11 minutes, until set and lightly golden.
Allow to cool completely.
Spread 1 1/2 teaspoons of filling of choice onto the cookies without cut outs.
Dust the cookies with the cutouts with plenty of confectioners sugar, then sandwich them on top of the filling and uncut cookies.

Great Scott!

IMG_6173_01
It’s the 3rd Annual Great Food Blogger Cookie Swap!

IMG_6166_01

The GFBCS is a multiple nation wide food blogger swap which is sponsored by OXO, Dixie Crystals, and Grandma’s Molasses; all the profits go to the charity Cookies for Kids’ Cancer, which supports pediatric cancer research.

Pretty much a good time all around, right?

Not only did I receive three delicious types of cookies and have the opportunity to share my cookies with three other bloggers, but it was for a good cause.

IMG_6193_01

Also, OXO sent me three super fancy, brand-spanking new spatulas.  I’ve never been more excited to see a spatula before.  Ugh I’m in love.

This is the second year I’ve participated in the swap, and I’ve worked with Cookies for Kids’ Cancer for a service project as well.
It’s always a pleasure.

IMG_6180_01

With that, here are the details:

I received…

muddy buddy cookies (genius idea!) from Marley of Chicago Foodies
date pinwheel cookies (a family recipe!) from Jessica of Kettler Cuisine
and marbled shortbread (so cute!) from Lauren of a Dash of Soul.

I gave…

des petits sablés aux noix: pressed walnut sablés, buttery and rich, half dipped in 70% Scharrfen Berger chocolate

to Jenne of Mooshu Jenne,
Brooke of Crackers on the Couch (who sent out crackers— how perfect is that?)
and Joanna of A Kosher Kitchen.

Happy holidays to all!  I hope you enjoyed your cookies.

Until next year, Great Food Blogger Cookie Swap!

IMG_6179_01

Walnut Sablés

ingredients:
660 grams (5 cups) flour
120 grams (1 cup) walnut halves
450 grams (4 sticks, 1 lb) butter
400 grams (2 cups) sugar
2 teaspoons kosher salt
2 splashes vanilla extract
2 eggs
1 egg beaten with 1 tablespoon water, for egg wash
melted bittersweet chocolate, if desired, for dipping

directions:
In a food processor, pulse the flour and walnut halves until a uniform flour forms; careful not to over process, as the walnuts will start to form butter.
In a stand mixer, beat the butter for 4 minutes, until light and fluffy.
Scrape the sides of the bowl and add in the sugar and salt.
Beat for 2 more minutes, until all the grit is gone and the mixture is very pale.
Add in the vanilla and eggs and beat for 2 more minutes.
Scrape the bowl and dump in all of the walnut flour mixture.
Mix on low until a dough forms.
Chill for at least 45 minutes.
Roll out on a very well-floured surface, and press with a cookie stamp (alternately, just cut out shapes) and cut out.
Chill for at least 30 more minutes.
Preheat oven to 350 degrees F.
Brush chilled cookies with the egg wash and bake for 10-12 minutes, until golden brown.
Remove from oven and let cool completely before dipping in chocolate.
Place the cookies on a cooling rack to let the chocolate drip through.

5-Star

IMG_6330_01

Let’s pretend to be sophisticated and make grown-up candies this holiday season.

IMG_6314_01

Here’s something funny annoying that I know I’m going to end up doing this winter.

I’ve had many no-bake things that are gift-worthy (fudge, chocolate, candies, etc.) on my mind due to my current situation.
I’ve been trying to pretend that I actually want to be making candies instead of baking cakes and cookies.
In reality, I can’t wait to get back to an oven and stove.

However, and here’s the annoying part, I know that when I get home I’ll have so many no-bake ideas built up that I will continue to neglect my oven and rely instead on my refrigerator.

I know.  Eye roll.  Let’s hope that it won’t happen.

IMG_6338_01

For now, I have these grown-up chocolate cups to share.

70% bittersweet chocolate cups filled with dulce de leche spiked with salt and chinese 5-spice.

Spicy, salty, warm, and rotund, these candies are an experience: the crisp shell, after a quick bite, melts and luxuriously coats your tongue with a myriad of flavors.

I love the kick of spice and burn from the pepper and the warmth from the cloves and star anise.
I was inspired by a small canister of Dean and Deluca 5-spice I picked up at the grocery store.

I don’t have a stove, so I used a store-bought can of dulce de leche, which is a great substitute iff you add a lot of salt.
Alternately, make your own dulce de leche.  Don’t forget the salt!  It is ultra-super-critical.

This flavor combination is coming back.  Soon.
Consider yourself warned.

IMG_6311_01

Five Spice and Dulce de Leche Chocolates
makes about 24 candies

ingredients:
1.5 lbs 70% bittersweet chocolate
1 14-ounce can of dulce de leche (or make your own)
2 pinches kosher salt
2 teaspoons Chinese 5-spice

directions:
Set out 24 mini cupcake liners (the aluminum and paper ones) on a sheet pan.
Chop and melt your chocolate slowly to avoid burning; carefully paint a thin layer of chocolate on the bottom and sides of your cupcake liners.
Place in a fridge or freezer for 5-10 minutes to set.
Stir the dulce de leche, salt, and spice together.
Place 2 teaspoons of dulce de leche in the chocolate cups.
Rap the sheet pan a few times to even out the dulce de leche layer.
Top off with melted chocolate until the edges lay flush with the chocolate; rap the sheet pan on a counter, hard, to even the chocolate layer out and remove any air bubbles.
Return to the fridge/freezer until the top layer of chocolate has set.
Remove from the wrappers, if desired, and enjoy!

Far to Fall

IMG_6216_01

Peanut butter Pollock.

IMG_6231_01

Thank god for no-bake recipes.

When you don’t have a kitchen (just a microwave and a fridge and a bureau for counter space), you have limitations.

i.e. I’ve been washing dishes in the bathroom.  Which only has push-button faucets, which means every 8 seconds, the water turns off and I have to hold down the handle again.  As if washing dishes could be MORE torturous.

Also, no oven.  Or stove.  Which means that recipes cannot only be no-bake, but no-cook.

Also, it’s finals week.  Which means, I ain’t got time.  For anything.  Other than crying and Game of Thrones, of course.

Stop looking at me like that.

IMG_6257_01

These bars are dead simple, and deadly delicious.
Just 6 ingredients, and they can be whipped up in just a few minutes.

It’s really hard to go wrong with peanut butter and chocolate.  But PB, chocolate, and graham crackers?
It is LITERALLY impossible.  It cannot be done.

For example: graham crackers sandwiched with peanut butter and chocolate.  Impossible to do wrong.

The best part of these bar cookies, aside from their no-bake conception, is the fact that the graham cracker crumbs stay crunchy in the melted butter/PB base, which creates an airiness and crunchiness that is incredibly difficult to resist.

Actually, impossible to resist.  Cut these small, because that means you can eat a million and one of them.

IMG_6241_01

Peanut Butter Graham Bars (no bake)
makes 1 8×8 or 9×9 inch pan of bars

ingredients:
8 tablespoons butter, melted
scant 1 cup smooth peanut butter
big pinch salt
1 1/4 cups confectioner’s sugar
1 1/3 cups graham cracker crumbs (about 10 sheets of crackers)
1 1/4 cup chopped dark chocolate
1 teaspoon butter
1 tablespoon chopped dark chocolate plus 1 tablespoon white chocolate, optional
1 tablespoon peanut butter plus 2 teaspoons chopped white chocolate, optional

directions:
Butter a 9×9 or 8×8 square pan.
Melt the peanut butter and butter together in a microwave; stir until smooth.
Stir in the salt, confectioner’s sugar, and graham cracker crumbs.
Press into the pan firmly; refrigerate until set.
Meanwhile, melt the dark chocolate with the second measure of butter; pour over cooled and set peanut butter base and smooth out; rap on the counter a few times to release air bubbles.
Refrigerate until set.
To decorate, melt the dark chocolate together with the white chocolate; stir until smooth.
Melt the peanut butter with the white chocolate; stir until smooth.
Splatter and drip the two mixtures over the set bars; allow to cool for 15 minutes before slicing to ensure that topping is set.

Nanners

IMG_5568_01

Hellooooo buttermilk-cream cheese glaze, I want to bathe in you omg.

IMG_5610_01

“Best thing I’ve ever eaten.” -#JonS

“Favorite thing you’ve made.” -Tom

“Oh my god.” -D. Frankel

“Mmmffm” -CJ

IMG_5577_01

It’s pretty hard to go wrong with bananas, brown butter, chocolate, buttermilk, and cream cheese.

Impossible, actually.  You could probably smush them all up and stick them in the microwave and it would taste good.
(Ugh. Banana mug cake?!?!?)

But more on that later: let’s talk technology!

Talk tech to me…

IMG_5685_01

Remember how I admitted to having a bad case of lens lust?

How all I wanted all I needed all I ever desired ever was a new lens?

Something shiny, big, and full of glass?

IMG_5655_01

I bought myself one!
After the horrors of 7th week (1 paper, 2 midterms, 3 p-sets and no sleep) I decided I was deserving.  Ahem.

But, y’all, let me tell you: I am bad at ebay.  I do not do ebay good.

I lost 4 (four!) auctions for various 17-55 mm f2.8 USM Canon lenses.

I had fallen into a pit of despair (FWP), when suddenly, I noticed a new BUY IT NOW lens and I jumped out of my seat and my pants and bought the damn thing.

I promptly put my pants back on and sat down
but nevertheless, my excitement was not dampered.

IMG_5587_01

The lens came super quickly (it only took the weekend to arrive!) and I was stunned.

It’s really a beaut; there is so much glass!  I’m unused to that, and I find it truly gorgeous.

It makes my camera look gigantic, yes, but ooooo mami that depth of field will getcha!
Compared to my lil’ eensy kit lens (which I still and will always love.  It’s got sentimental value, okay?  Sentimental value and no lens cap.  Oops.), this thing is a giant monster princess who will be treated with love and care and kept safe.

Very safe.  (She says as she smudges glaze all over it.)

IMG_5596_01

Obviously, I was very excited to bake something and take photos of it with my new toy.
Obviously, knowing me, I was going to choose something I hate photographing.

Whyyyyy am I so stubborn and ridiculous?

I hate bundt cakes.  Wait, no, I hate photographing bundt cakes.  We’ve been through this.  I’m bad at it.
And yet, I baked a bundt cake. Hmph.

This cake, doe.
It is a never fail.  I have made it so many different ways, and have yet to be displeased.
This is my favorite adaptation.

IMG_5680_01

First, I brown half the butter.  Half is creamed until light and fluffy, and then its nutty, flavorful, melted partner gets poured in.
The result?  All of the benefits of the brown butter with an accompanying light and fluffy crumb due to the aeration from creaming, which cannot be done with solely melted butter.
The cake would be much denser if all the butter were to be browned.

Next: I freeze my bananas.  Solid.  Then I melt them in the microwave and discard most of the banana water.  It will make your cake too wet and dense.  You concentrate the flavor of the bananas a bit with the heat of the microwave, then you get rid of the excess liquid: boom.
Bigger, bolder banana flavor.

Brown sugar makes up the majority of the added sweeteners here, and it gives depth and warmth thanks to the molasses.

Buttermilk keeps the crumb tender and soft; we only need a touch, as too much would make the cake soggy and crumbly.

Finally, a smattering of chocolate chips, because chocolate.

To top the cake, buttermilk, cream cheese, powdered sugar, and milk powder get whizzed together to make a thick glaze that is not too sweet and has just the right amount of tang.

‘Tis a beautiful bundt.  There.  I said it.  The interior makes up for the photos exterior.

IMG_5692_01

Perfect Banana Bundt
makes 1 bundt cake
adapted from Dorie Greenspan

ingredients:
225 grams (8 ounces, 16 tablespoons) butter, divided in two
150 grams (3/4 cup) granulated sugar
250 grams (1 1/4 cup) brown sugar
2 eggs
splash vanilla extract
4 medium bananas, frozen solid
120 grams (1/2 cup) buttermilk
big pinch salt
2 teaspoons baking soda
360 grams (3 cups) flour
200 grams (heaping 1 cup) chocolate chips, if desired

directions:
Preheat oven to 350 degrees F and grease and flour a bundt pan very thoroughly.
In a small saucepan, melt half the butter; keep cooking it until there are little brown pieces and it smells nutty; remove from heat and set aside to cool slightly.
Cream the other half of the butter with the sugars for at least 5 minutes, until light and fluffy.
Stream in the browned butter and beat until combined.
Beat in both of the eggs and the vanilla and beat for at least 3 more minutes, until the mixture is pale, fluffy, and very smooth.
Meanwhile, place your bananas in a microwave safe bowl and microwave for 30 seconds, or until the peels are just starting to soften; peel the bananas and return them to the bowl.
Microwave for about 1 1/2 minutes in 15-30 second bursts.
The bananas should be melty and should have let off a bit of liquid.
Using your hands to hold the bananas in the bowl, press and pour as much of the liquid out of the bananas as possible, without losing any banana pieces.
Pour the bananas into the creamed butter and sugar and beat until homogeneous; the mixture will look very curdled.
Pour in the buttermilk and beat to combine; the batter will still look curdled.
Dump the flour on top of the batter, then add the salt and baking soda to the top of the flour mound.
Mix on low until the batter is homogeneous and smooth; stir in the chocolate chips, if desired.
Spread the batter into the prepared bundt pan and bake for about 1 hour, or until a tester comes out completely clean; the top will be firm and dark brown, but due to a bundt pan’s shape, the interior might not be done.
Check in multiple places to ensure a completely cooked cake.
Allow the cake to cool for at least 15 minutes in the pan before inverting it onto a serving platter and glazing.

Buttermilk and Cream Cheese Glaze

ingredients:
120 grams (1/2 cup) buttermilk
140 grams (5 ounces) cream cheese, softened
200 grams (approximately 2 cups) powdered sugar, sifted
30 grams (approximately 1/3 cup) milk powder

directions:
In a food processor or with an immersion blender, process the cream cheese and buttermilk.
Add in the dry ingredients and process until a smooth glaze forms.

Wonder Woman

IMG_5756

Disclaimer: this post contains explicit words, but it also contains chocolate.  Read at your own discretion, my loves.

Wake up ready to kick this day’s ass.

Put on those leggings that make you feel like fucking wonder woman
pull them up up up
snap the waistband
choose your warmest wool socks and your favorite sports bra.
Admire your butt in those leggings.

Ready to yoga this day away.

Om, motherfucker, om.

IMG_5806

Get to your bike
jiggle the key into the lock
key won’t turn shit shit shit
take it out, try again.
No luck.  Contemplate forcing it open, worry that it will break.
Pull off your gloves with your teeth, smash the key but no, it’s really fucking stuck.

Check the time: you’re too goddamn late for class anyways.
Stream off all the curse words you know.
Blame the bike;
blame the cold;
blame the key,
just not yourself.
Decidedly not yogic.  Fuck it.

IMG_5761

Back inside, strip off the scarf, jacket, socks, gloves.
Back into the warmth of the kitchen.

Retreat into your head.
Slice gorgeous little Concorde pears, whip eggs with a touch of sugar,
brown butter, stir in heaps of dark chocolate until it’s smooth and shiny.
Dip in a finger and then another.
Dance around listening to Van Morrison, spoon in mouth, chocolate smeared down your chin.
Talk to your father on the other side of the Atlantic; try to make yourself seem calmer than you really are; pretend you have your shit together.
Switch to Stevie Wonder as you munch on gingersnaps.

IMG_5788

Bake the cake for half as long as all of the Stones songs in your library.
Work on yet more goddamn chemistry problems while you wait.
Celebrate the correct ones with a piece of chocolate.

Paint your toes electric blue.
Wish for the ocean.

Braid your mile-long hair and notice that your arms are tired by the end of it;
resolve to do 10 extra chuttarungas today.
Pick all of the crispy, crunchy bits off the cake: they were going to fall and burn anyway.
Wish for a cup of milk,
settle for your water bottle.

IMG_5817

Shudder when Christmas music comes on;
no no not ready too much too soon Jesus let me take it one fucking holiday at a time.
Watch the cake rise rise rise
and then fall in the center, cooling into a gooey pudding.  What the fuck.

Giggle and agree when your friend says it’s kinda ugly;
gracefully declare it “rustic” but secretly plan to hide its hideousness with globs of whipped cream and a shower of powdered sugar.
Call it a torte and explain that it’s supposed to look that way.  Pick the pears off the top when no one is around.

Laugh at your ugly fucking cake through the lens of your camera.
Serve that motherfucker with love, gratitude, humility, and a chocolaty smile.

Om.

IMG_5733

This cake is utterly simple, almost flourless, and full of lovely chunks of pear, whose juices turn it into a pudding.
The center will collapse in; fill in the crater with whipped cream and no one will be any the wiser.
It’s almost brownie-like in its texture, and the sweet pears play a beautiful foil to the rich chocolate.
Serve it in mugs with spoons.  Feed your heart; feed those you love.

Much love from my full heart to yours.

IMG_5752

Pear and Dark Chocolate Torte
adapted from Cook Eat Love
makes 1 6×3 inch cake

ingredients:
170 grams (6 ounces) dark chocolate, chopped
140 grams (1/2 cup plus 1 tablespoon plus 2 teaspoons) butter
pinch kosher salt
120 grams (1/2 cup plus 1 tablespoon plus 2 teaspoons sugar
3 large eggs
25 grams (3 tablespoons) flour
1 teaspoon baking powder
5 small pears, peeled, cored, and chopped and tossed with an extra 25 grams (3 tablespoons) flour
360 mL (1 1/2 cups) whipping cream, beaten to soft peaks
powdered sugar, to taste, and for dusting

directions:
Preheat oven to 325 degrees F and grease and flour a 6×3 inch springform pan.
In a saucepan, brown the butter; stir in the chocolate and whisk until a smooth ganache forms.
Whisk in a pinch of salt.
Meanwhile, beat the eggs and sugar until they are tripled in volume and very pale in color, about 7 minutes.
Sift the flour and baking powder over the eggs, then fold it in.
Fold in the chocolate mixture, then fold in the flour-covered pears.
Spread the batter into the prepared pan and bake for an hour, until the center is barely jiggly; immediately transfer it to the freezer.
Softly whip the cream with a touch of powdered sugar, if desired, then spread over the cooled cake.
Dust with chocolate shavings and powdered sugar.
Eat with a SPOON.

Superstar

IMG_5221_01

Who wants to be a millionaire Thanksgiving superstar?

IMG_5158_01

Cause, like, this pie, yo.

GodDAMN.

Good gracious gravy!

Sorry.  I got excited.

IMG_5174_01

This pie… There’s just so much good stuff going on!  Yummy, delicious stuff.

First, let’s talk crust.  I know.  It’s the scariest part for most people.  But crust is your friend!

Buttery, flaky, tender crust.  How could it NOT be your friend?

The trick to a good pie crust is not a food processor, I’ve decided.

YesokokIknow, the food processor revolutionized pie crust because it shaved 5 minutes off the preparation time and allowed people to keep their hands clean.
Newsflash: you’re cooking and baking, your hands are going to get dirty sometime.  Pie crust is a good excuse to play around in flour and butter.
(BUTTER.  Not shortening.  As you can see in this pie, I’ve swapped my usual buttermilk for water to give a more sturdy crust, since it’s a custard pie that will not have par-baking.  That said, I could have swapped butter for shortening.  But why, oh why, would I want to sacrifice that flavor?  Oh, right.  I wouldn’t.  And neither would you.  I won’t have it any other way.)

By making your pie crust by hand, you get a good feel for the texture.  In a food processor, an extra 3 pulses gives you a gummy crust that will be tough and shrink during baking.  (Insert sad face here.)

Let’s take this chance to play with our food, no?  It’ll be fun.

Dump your flour, salt, and a pinch of sugar into a big bowl.
Cube your butter into little chunky chunks, then throw it back in the fridge for 5 minutes to re-chill.
Meanwhile, fill a small bowl with cold water, and chuck 2 ice cubes in it.  Keep a tablespoon near the ice water.
Stir the flour n’ stuff around with your hands.
Take your butter chunks and place them all in the flour, all snuggly and nested down in there.
Now, with your fingers and palms, start to smash the cubes into flat sheets.  Rub about half between your hands to create a coarse meal.  The others, leave as small, flattened chunks, the size of peas.
You should have a rough mish-mash of butter and flour and butter-flour meal.
Here comes the fun: dunk the tablespoon measure in the ice water and put 2 measures into your butter/flour.
Using your hands, gently stir the mixture together.  Some will stick to your hands.  Just scrape it off and put it back in the mix.
If there are still a lot of dry chunks at the bottom of your bowl, add up to 2 more tablespoons of water, but go slow.
When your crust is done, it will hold together and all of the flour will be hydrated, but it won’t be very sticky or gooey.  It should be smooth.
Give it a couple kneads, a little massage, and wrap it up nice and snug in some plastic wrap.
Back in the fridge she goes!

To roll the crust out, liberally sprinkle a clean countertop with flour, then place your crust in the middle.
Sprinkle the top with flour, and gently, starting from the middle, roll towards the edges, creating a rough circle shape.
Once it’s 3 inches larger in all directions than the bottom of your pie dish, roll it up on your rolling pin (like a roll of paper towels) and place it in the dish.  Crimp the edges by rolling the excess up underneath, then pinching to create pretty little ruffles.
Back to the fridge!  Keep it COLD, y’all!

IMG_5180_01

So you’ve got your awesome all-butter pie crust made and ready and chilling.

Let’s fill it with heavenly goodies.

Start with brown sugar and a friendly pinch of salt, and add the ambrosia of the gods nutty brown butter.

Whisk whisk whisk in warm, autumnal spices and six (6!) egg yolks to ensure a silky, custard-like texture.

Stir in 70% bittersweet chocolate, melted and luxurious.

Finish with a sprinkling of pecans and turbinado sugar.

You’ll smell this pie long before it emerges from the oven.  It’s fragrant with the best things in life: butter, spices, and chocolate.
Once it’s partially cooled, you’ll stick it in the freezer and it will thicken into a custard-y pie, the smooth and gooey chocolate interrupted only by crisp pecans.

Serve this pie sprinkled with a touch of powdered sugar, and unsweetened whipped cream or barely sweetened vanilla ice cream.

I might have to make this again for Thanksgiving.

It is among the 3 best pies I’ve ever made.

It is that good, people.

tl;dr: MAKE THIS.

P.S. I posted this on 11/11 at 11:11.  My wish is for you to make this (JK! Then it wouldn’t come true!!)

IMG_5190_01

Pumpkin Spice Brown Butter Chocolate Pecan Pie

ingredients:
for the crust:
165 grams (1 1/2 cups)flour
8 grams (2 teaspoons) sugar
pinch salt
113 grams (8 tablespoons) butter, cut into small pieces and cold
45 grams (3 tablespoons ice water, or as needed)

for the filling:
140 grams (scant cup) bittersweet chocolate chunks or chips
220 grams (1 cup plus 2 scant tablespoons) sugar
150 grams (1/2 cup plus 3 tablespoons) brown sugar
17 grams (2 tablespoons plus 2 teaspoons) nonfat dry milk powder
1 1/2 teaspoons pumpkin pie spice, or a big pinch each cloves, nutmeg, and star anise, plus 2 pinches each cinnamon and ginger
big pinch kosher salt
180 grams (13 tablespoons) butter, browned
120 grams (1/2 cup) milk
6 egg yolks
approximately 300 grams (2 1/2 cups) pecan halves, the pretty ones saved for garnish and the rest chopped roughly
turbinado sugar, for sprinkling, if desired

directions:
Make the crust: stir the flour, sugar, and salt together in a large bowl.
Add the butter cubes in and cut them in with a pastry blender or your fingers, flattening some and rubbing others into the flour.
Leave pieces the size of peas; the rest should resemble a coarse meal.
Stir in the water, starting with 2 tablespoons, until the dough comes together; it shouldn’t be sticky or crumbly, but just barely hold together.
Knead gently 3 or 4 times, then pat into a disk and refrigerate.
Meanwhile, make the filling: begin by melting the chocolate, gently; do this in a microwave on partial power or over a double boiler.
When the chocolate is 2/3 melted, remove from heat and stir until all melted; set aside to cool slightly.
Whisk the sugar, brown sugar, milk powder, spices, and salt together until no little lumps remain.
Whisk the brown butter in vigorously. Whisk the yolks and milk together, then vigorously whisk them into the butter/sugar mixture.
Finally, whisk in the melted and cooled chocolate and stir in the chopped pecans.
Set aside to thicken and rest while you finish the crust.
Preheat oven to 350 degrees F. Roll the crust out, gently, to a 1/8 inch thickness.
Place it in a 9-inch pie pan that is about 2 inches in depth.
Flute or crimp the edges as desired, then place in the freezer until it is hardened, about 10 minutes.
Pour filling into the crust and decorate with the reserved pecan halves.
Top with a little turbinado sugar, then place on a cookie sheet in the oven.
Bake for 40 minutes, until top is shiny and filling is set; you may need to cover the top with aluminum foil to prevent the pecans from burning (mine got a little toasty…).
Remove from oven and allow to cool almost completely, then finish the chilling in the freezer to make the filling extra dense.
Enjoy with unsweetened whipped cream and a little powdered sugar!

Between Two Lungs

IMG_4859_01

“I’m so glad I live in a world with Octobers.”

-L.M. Montgomery, Anne of Green Gables

IMG_4838

Happy Halloween, y’all!

Have some cake.

Go ahead; dig right in.

IMG_4814_01

This cake won first place in a “study break”  competition in my residence hall!
Meaning it won my house points in the house cup (yes, just like the Harry Potter house cup!)!
!!!!!!!!!!!!!!

(DGH fo’ lyfe.)

I was so nervous/excited.
Now I’m excited/proud/tired.
Writing this at 2 am 3 am 4 am 10 am. FML.

(Yes, I actually tried to write this at all those times… I don’t want to talk about it.  I want to whine about it.)

IMG_4852

Guyyyyzzzzzz I was supposed to be doing a 12 problem calculus p-set last night, but I was at the study break celebration/competition (study break is a tradition at uChicago: it’s any treat that someone volunteers to make on Wednesday for the house to enjoy and take a break with) until 11, so I didn’t start the problem set until around then.

I did 6 problems in about an hour…

and then realized

that I did them

in the wrong section.

like WHAT I am taking calc at uChicago you would think I could tell the difference between

12.2 and 12.3 but NOPE no way so

I was up until 4am last night finishing this damn p-set for my 9am class this morning.

Moral of the story: I am a zombie and more so than ever, I want to eat this bloody heart cake.

IMG_4862

Let me give you a brief overview of this cake: (don’t be overwhelmed!)

it is a 12 inch, 5 layer cake

3 layers of tangy red velvet
2 layers of rich chocolate
enrobed in fluffy, silky Italian meringue buttercream
topped with a bleeding heart sculpted from rice krispies treats and covered in homemade marshmallow fondant.

It’s over the top, and somewhat grotesque.
But isn’t that what Halloween is all about?
I mean, c’mon.

Creepy bloody hearts are prime Halloween subjects.
Grab a fork and knife and tuck in!

IMG_4860

Bleeding Heart Cake

You’ll need:
3 batches red velvet cake (recipe below), baked in a 12×2 inch pan
2 batches chocolate cake (recipe below), baked in a 12×2 inch pan
2 batches Italian meringue buttercream (recipe below)
1 1/2 batches classic rice krispie treats (recipe from the Rice Krispie website, here) (I recommend only using a total of 2 tablespoons butter, instead of 4.5, to firm up your krispie treats)
1/2 batch royal icing (Bridget is the queen of royal icing… Go forth and prosper with her amazing and fail-proof recipe)
1/2 recipe marshmallow fondant, tinted red with a touch of green and purple (Annie’s directions are AWESOME and you should check them out… As well as the rest of her blog… It makes me swoon.  Love!)
Raspberry jam mixed with corn syrup and red food coloring to create a purple-red, thick fake blood (you have to eyeball this to your best ability)

directions:
While your krispie treats are warm, crunch them up a bit with oiled hands.
Begin to work the treats firmly, packing tightly, into an egg shape.
Mold a small, rectangular lump on the upper right “corner” of the heart; this will be your pulmonary artery and vein.
Make a slight indent that cuts from the upper right side to the middle/lower left side (refer to pictures!!!).
Freeze until hard; meanwhile, roll your fondant out to 1/4 inch thickness.
Cover the krispies with royal icing to smooth out any lumps, then cover in fondant, making sure there are no gaps where royal icing may seep through.
Seal the edges with a little bit of water and the dull side of a butter knife.
Begin to add on fondant on either sides of the diagonal indent to create slightly raised ventricles; adhere 3 balls at the top left “corner” and smooth them into cylinders to create your aorta- stick a dowel or pinky finger into the center to create the interior.
Do the same ball technique for the pulmonary vein and artery on the right upper corner.
Continue to smooth with water and a knife.
Once you are content with the shape (again, refer to pictures!), use the remaining fondant to roll tiny little veins, arteries, and capillaries.
Use a little bit of water to adhere the blood vessels to the outside of the heart, mapping them out so that all of the smaller vessels stem from a larger, central artery or vein.
Drape with plastic wrap and allow to dry slightly- I recommend overnight, but make sure it is covered in plastic lightly so that it doesn’t crack and dry out too much.
For the cake itself, layer a red velvet, then 1/3 cup frosting (the filling is very thin between the layers- they are moist enough that it is unnecessary, and too much filling will compromise the structure, so beware.), then a chocolate layer, then red velvet, and so on and so forth.
For red velvet and chocolate, a crumb coat is key.
Apply a thin layer of frosting to trap the crumbs, then refrigerate until completely set- about 30-45 minutes.
Ice the cake with the remaining buttercream, piping on details if you wish.
Place the heart in the center of the cake and stab it with a fork or knife, if desired.
Strategically drip some of your fake blood on the cake to give the illusion of a bleeding heart.
Go scare people!

Red Velvet Cake
adapted from the Food Network
makes 1 12×2 inch layer
ingredients:
150 grams (1 1/4 cups) flour
150 grams (3/4 cup) sugar
1/2 teaspoon baking soda
pinch salt
5 grams (1 tablespoon) cocoa powder
150 grams (1/2 cup plus 2 tablespoons) oil
120 grams (1/2 cup) milk, plus 1 tablespoon vinegar
1 egg
14 grams (1/2 ounce) red food coloring (the liquid kind)
directions:
Preheat oven to 350 degrees F and grease and flour a 12×2 inch pan.
Whisk the flour, sugar, baking soda, salt, and cocoa powder together.
Whisk the oil, milk, vinegar, egg, and food coloring together.
Whisk the wet into the dry ingredients and whisk well to combine.
Pour into pan and bake for 25-30 minutes, until a tester comes out clean.

Chocolate Cake
adapted from the Kitchn
makes 1 12×2 inch layer
ingredients:
200 grams (1 cup) sugar
105 grams (3/4 cup plus 2 tablespoons) flour
30 grams (1/4 cup plus 2 tablespoons) cocoa powder
3/4 teaspoon baking powder
3/4 teaspoon baking soda
big pinch salt
1 egg
60 grams (1/4 cup) oil
120 grams (1/2 cup) hot water
directions:
Preheat oven to 350 degrees F and grease and flour a 12×2 inch pan.
Whisk the sugar, flour, cocoa powder, baking powder, baking soda, and salt together.
Whisk the egg and oil into the dry ingredients.
Whisk the hot water into the batter; it will be very, very thin.
Pour into prepared pan and bake for 25-30 minutes, until a tester comes out clean.

Italian Meringue Buttercream
more in-depth directions here
ingredients:
5 egg whites
200 grams (1 cup) sugar, plus 20 grams (scant 2 tablespoons) (divided)
56 grams (scant 1/4 cup) water
500 grams (4 1/2 sticks) butter, cut into chunks and softened but still quite cool
directions:
Whisk the egg whites with 20 grams of sugar.
Meanwhile, heat the rest of the sugar with the water in a saucepan until it reaches 240 degrees F.
At this point, the meringue should be at softly stiff peaks.
Drizzle the hot syrup over the meringue and beat until cooled to body temperature.
Beat in the butter 1 tablespoon at a time; keep beating until frosting is light and silky.

Scavenged

IMG_4739_01

This cake soothed some of my OCD tics for a beatific hour or so.

IMG_4750_01

It was very fulfilling to separate the Reese’s Pieces by color.  I felt good, even though it ate away at 45 minutes of my free time, which is precious little here in college.

I ended up sorting through almost twice as many as I needed.  Oh well.

While I was mindlessly dropping each color into its own bowl, I stopped biting my lips, something which has become quite a subconscious and destructive tic.

Cake works wonders, I tell ya.

IMG_4736_01

The inspiration for this cake hit me in a CVS candy aisle, like all good ideas do.
I was buying Robitussin for this ridiculous cold I still have.
They were selling bags of Reese’s Pieces, 2 for $6.

My first thought was

CAKE.

IMG_4782_01

Reese’s Pieces have never been among my top candy choices.
To be honest, I would almost certainly choose m&ms over them any day.
That being said, they are purrrfect for Halloween treats.

Other times of the year, the colors leave something to be desired.
When Halloween rolls around, though, it’s go time.

Armed with lots of Reese’s Pieces, I began to plan for a Halloween cake.

Obviously, it had to be peanut butter

and therefore

also chocolate.

But most recipes I found were chocolate cakes covered in some sort of peanut butter frosting.
I had my heart set on the opposite- peanut butter cake with chocolate frosting.

Mainly because, well, have you seen how many chocolate cakes are on this blog?  It’s a little ridiculous.
I feel like I make a chocolate cake every two weeks.

I needed change.

IMG_4733_01

In the end, the cake was a two layer peanut butter cake which was soft and flavorful, covered in whipped peanut butter and bittersweet chocolate ganache, and decorated with Reese’s Pieces and PB cups.

It was supposed to be three layers

but

I dropped one of the pans and it fell on the ground and broke into a million pieces and my friends and I gobbled it up, fresh and hot, right then and there.  RIP.

This is a scavenged cake because I swiped the peanut butter for it from the dining hall.
I convinced my friends to each grab me a few of the little tablespoon-sized packets.

I myself grabbed a few and the resultant ridiculous amount of PB was smuggled out in my backpack, which ended up being the perfect amount for this cake.
Hooray!

P.S. note that this is another Halloween post sans pumpkin.  Ahem.

IMG_4735_01

Peanut Butter Cup Cake
cake portion adapted from Simply Gloria
ingredients:

for the cake:
1 cup creamy peanut butter
1/2 cup butter, softened
1 1/4 cup sugar
big pinch kosher salt
2 eggs
splash vanilla
1 cup milk, plus 1 1/2 teaspoons apple cider vinegar
2 1/4 cup flour
1 1/4 teaspoon baking soda
1 teaspoon baking powder

for the ganache:
1/2 cup plus 2 tablespoons cream
6 tablespoons butter
8 ounces (1/2 pound) chocolate, chopped
1/2 cup peanut butter

for decoration (optional):
Reese’s pieces
peanut butter cups, chopped

directions:
Make the cake: preheat oven to 350 degrees and grease and flour 3 6-inch pans.
Whisk flour, baking powder, and baking soda together; set aside.
Beat peanut butter and butter together until completely smooth, about 4 minutes.
Add in the sugar and salt and beat until combined well, about 2 minutes.
Scrape the sides of the bowl and add the eggs and vanilla; beat until completely combined, 2 minutes more.
While mixing very slowly, stream in the buttermilk while simultaneously shaking in the flour mixture.
Mix until completely combined then scrape the sides of the bowl and mix a little more.
Spread into your pans and bake for 25-27 minutes.
Allow to cool completely.

Meanwhile, make the frosting: melt the cream, chocolate, and butter together in a microwave safe bowl; gently stir together and put in fridge to cool.
Once the ganache is semi solid and chilled, whip it until it becomes fluffy; add the peanut butter and whip until the ganache is fluffy, light-colored, and spreadable.

Decorate to your heart’s content!