So Question

IMG_8332_01

Much wonder.
Such searches.
Wow.

“my olive oil bottle had some slimy things”
Eeew.

“is little debbie oatmeal cream pies good for chakras”
Probably not?

“lets make marscarpone ourselves for once”
Yes, let’s.  God.

IMG_8303_01

“dumb jokes”
“dysfunctional family funny”
“dumb shit jokes”
I think you’re in the right place, my friend.

“homogeneous motor for milk and mango juice”
“gothic baking dishes”
“fairy hand cream mango butter switzerland”
“brass triangle fruit ripener”
“picture of willy wonka marshmallow pillow”
“ready to bake cheese marscapone croissants wholesale”
“kids throwing cookie dough on ceiling”
“plate with some fruits two toothbrush one small pot drawing in pencil”
“lime green fat baby boots with white fluffy stitching on the toe”
What?  No.  How did you manage to end up here?

IMG_8349_01

“comfy belly pumpkin roll”
“christina tosi maple”
“nigella frangelico tiramisu grams”
“michael laiskonis silpat”
“dorie greenspan is too soft and crumbly cheesecake”
Nope nope nope not me.  Wrong person.

“why is my mississippi mud pie still runny in the middle”
“2c heavy cream 4 tsp matcha 3/4 c sugar 6 egg yolk 1 c milk where is it books”
“how to bake cake in a 5 burner gas cooktop candy”
“660grams of chocolate buttons = cups?”
“should a pumpkin roll cake be wet still when you take it out of the oven”
“why do my meringue cookies always end up with a syrup like crust on the bottom???”
“can u use buttercream piping for a dummy cake or will it rot? cake central”
“creme brulee didn’t set congeal can i freeze it”
“3cups cocoa powder 4sticks butter layer cake”
“why gateau cake didn’t rise”
“do they have pumpkin butter in sweden”
“why does creaming butter and sugar in more than one direction, get curds”
“260 grams flour and sugar and butter cake making how many eggs i use”
“i like to make it my own pomelo powder tall me how”
“i am looking for a recipe that used nutter butter cookies and butter as a crust, and then you melt marshmallows then make a layer of candy using cornsyrup and peanut butter chips”
I wish I could tell you the answers to all these existential questions, but…

IMG_8301_01

“best ice cream scoopers activated by body heat”
“brown butter cookie nutella fill kitchen dink w/ 2″ of cold water”
“waterproof nut pie crust”
“she made a graham with childish decorated toppings”
“pressure ulcers cooker de leche condensed milk”
“glitter sprinkle french macaron vanipla”
“whot. can. you yes. hef. coleur perpar”
“no egg no milk no butter cookiesh ki,o.lpo.ol”
“cheese lava guna kracker magic”
“like golden ray butter”
“drama psheat”
“pepar fool ke banana”
What?!?

“la peche fraiche”
“lapechefraiche”
“lapechce fraiche”
“la pache frasche”
“la pilche frache”
“peche freche”
“lapechefraige”
“la peche peach”
“rachel sally pastry blogs”
“rachel sally blog”
“ithaca rachel sally”
Lol hai.  Welcome.

IMG_8336_01

You guys search such silly things and manage to end up here, at my doorstep.
I can only begin to understand my readership through searches like “cheese lava guna kracker magic.”
Conclusion: you guys are weird.  And poor typists.  And are therefore in good company.

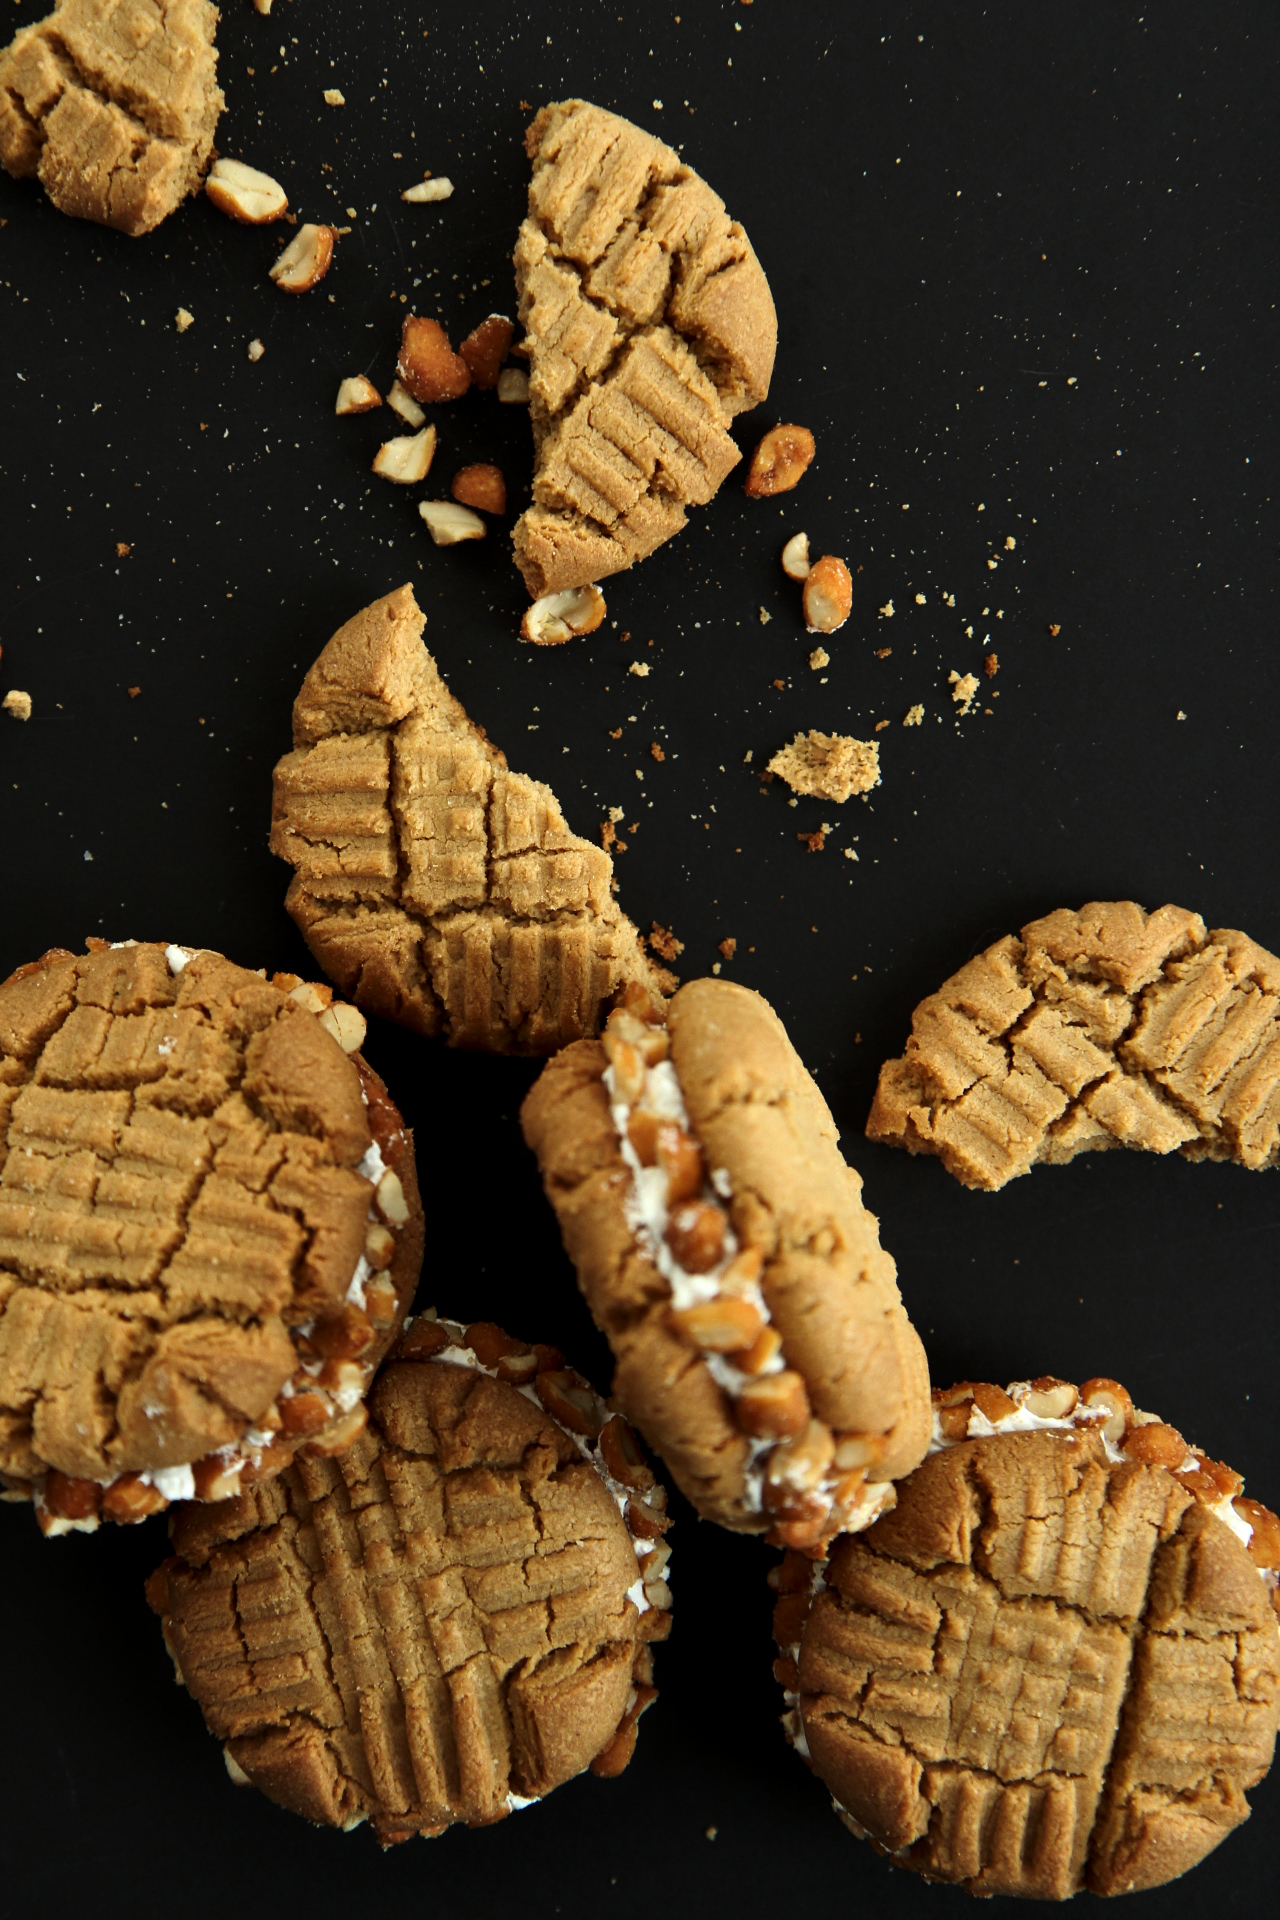
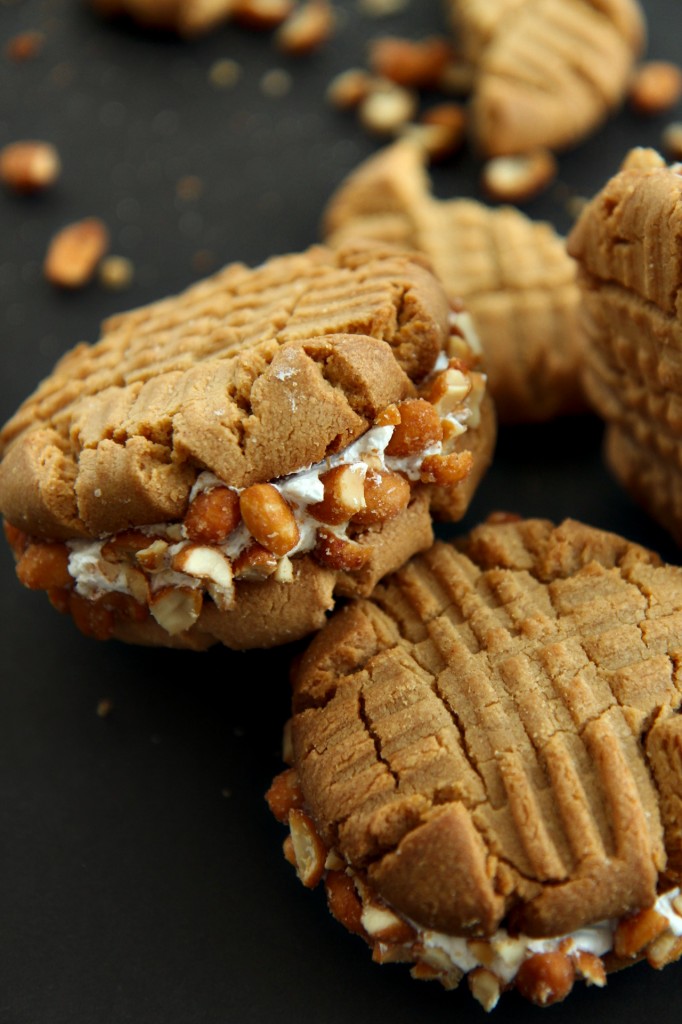
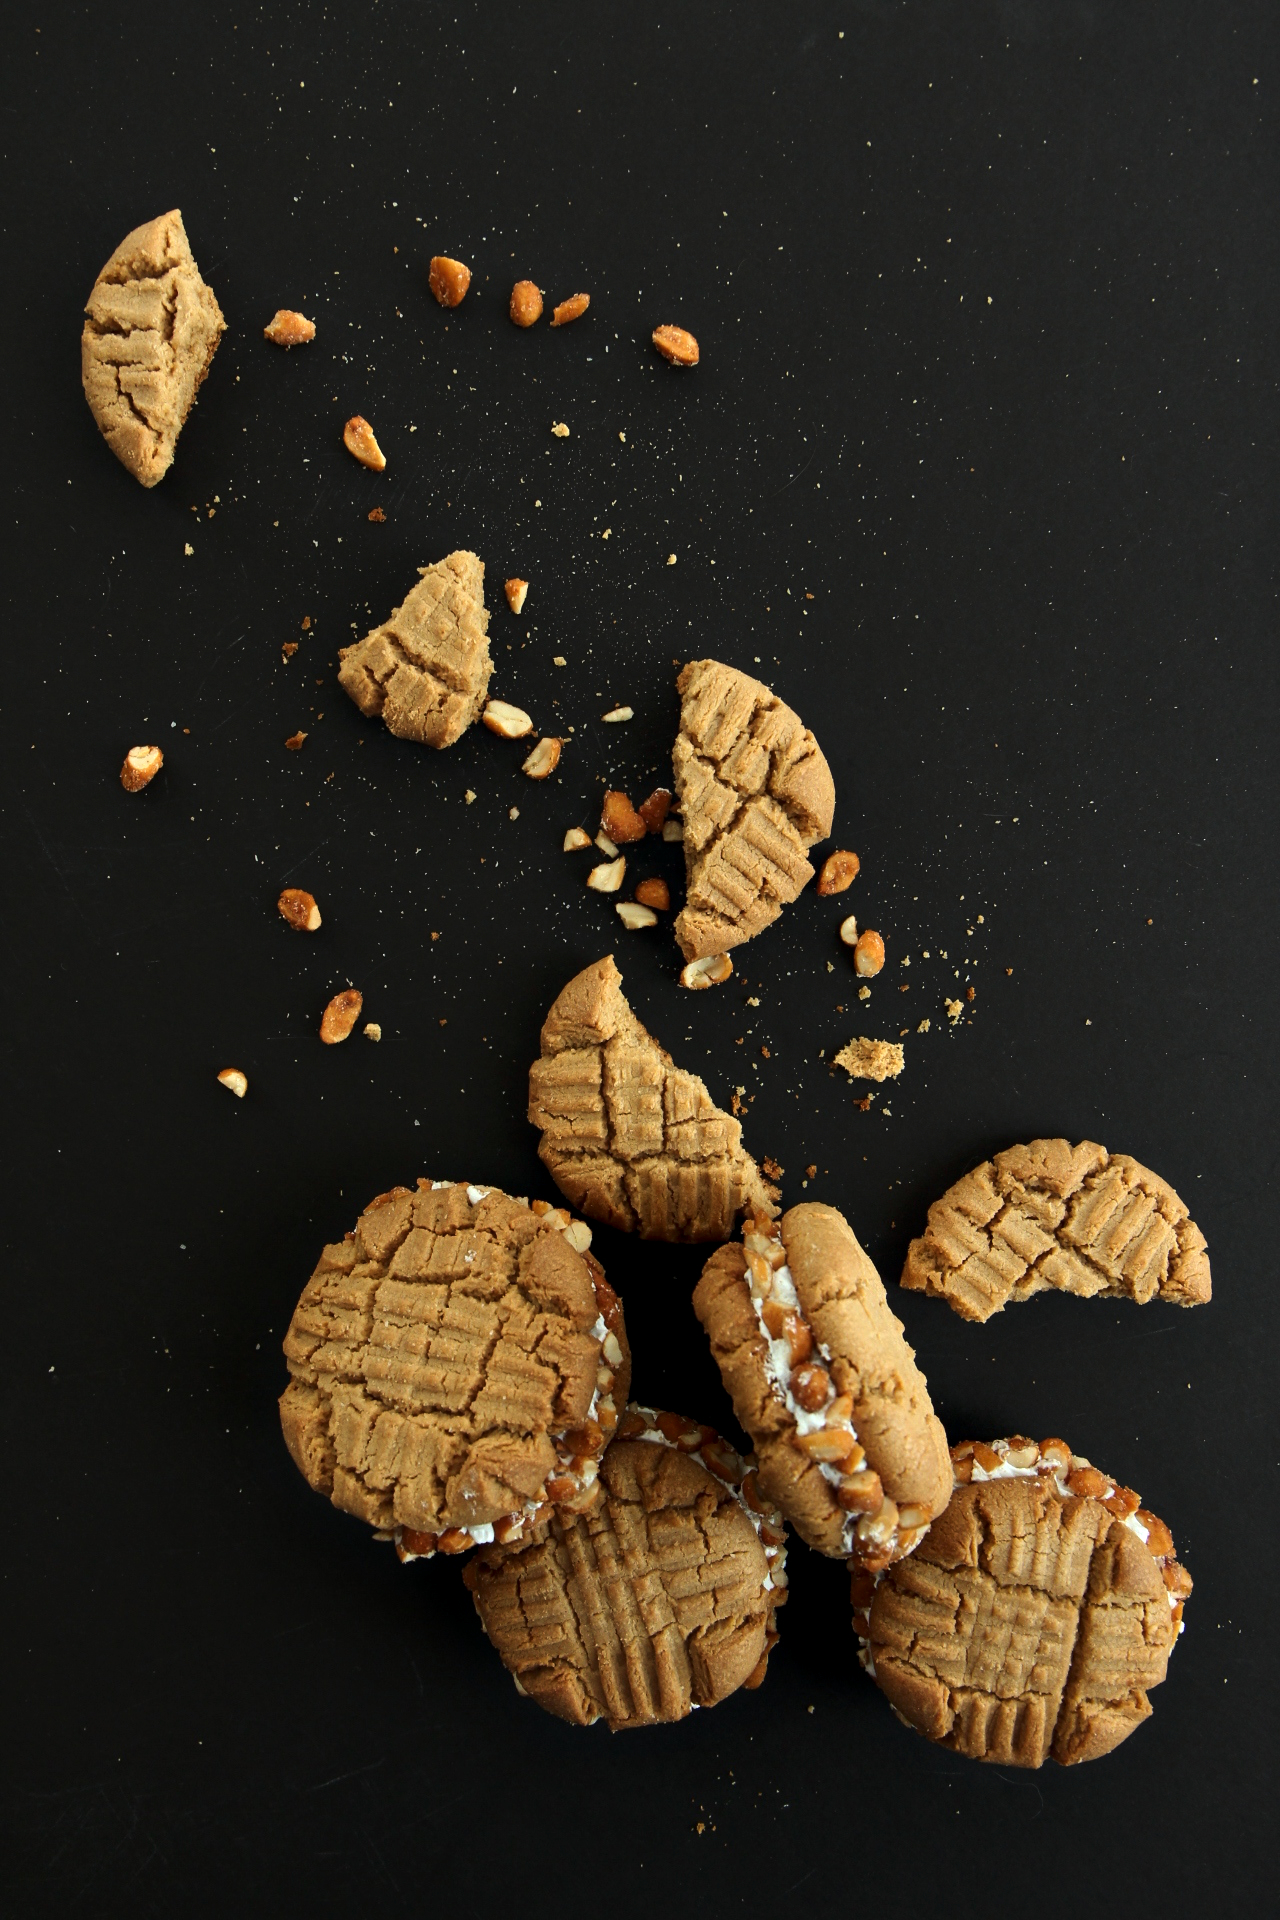
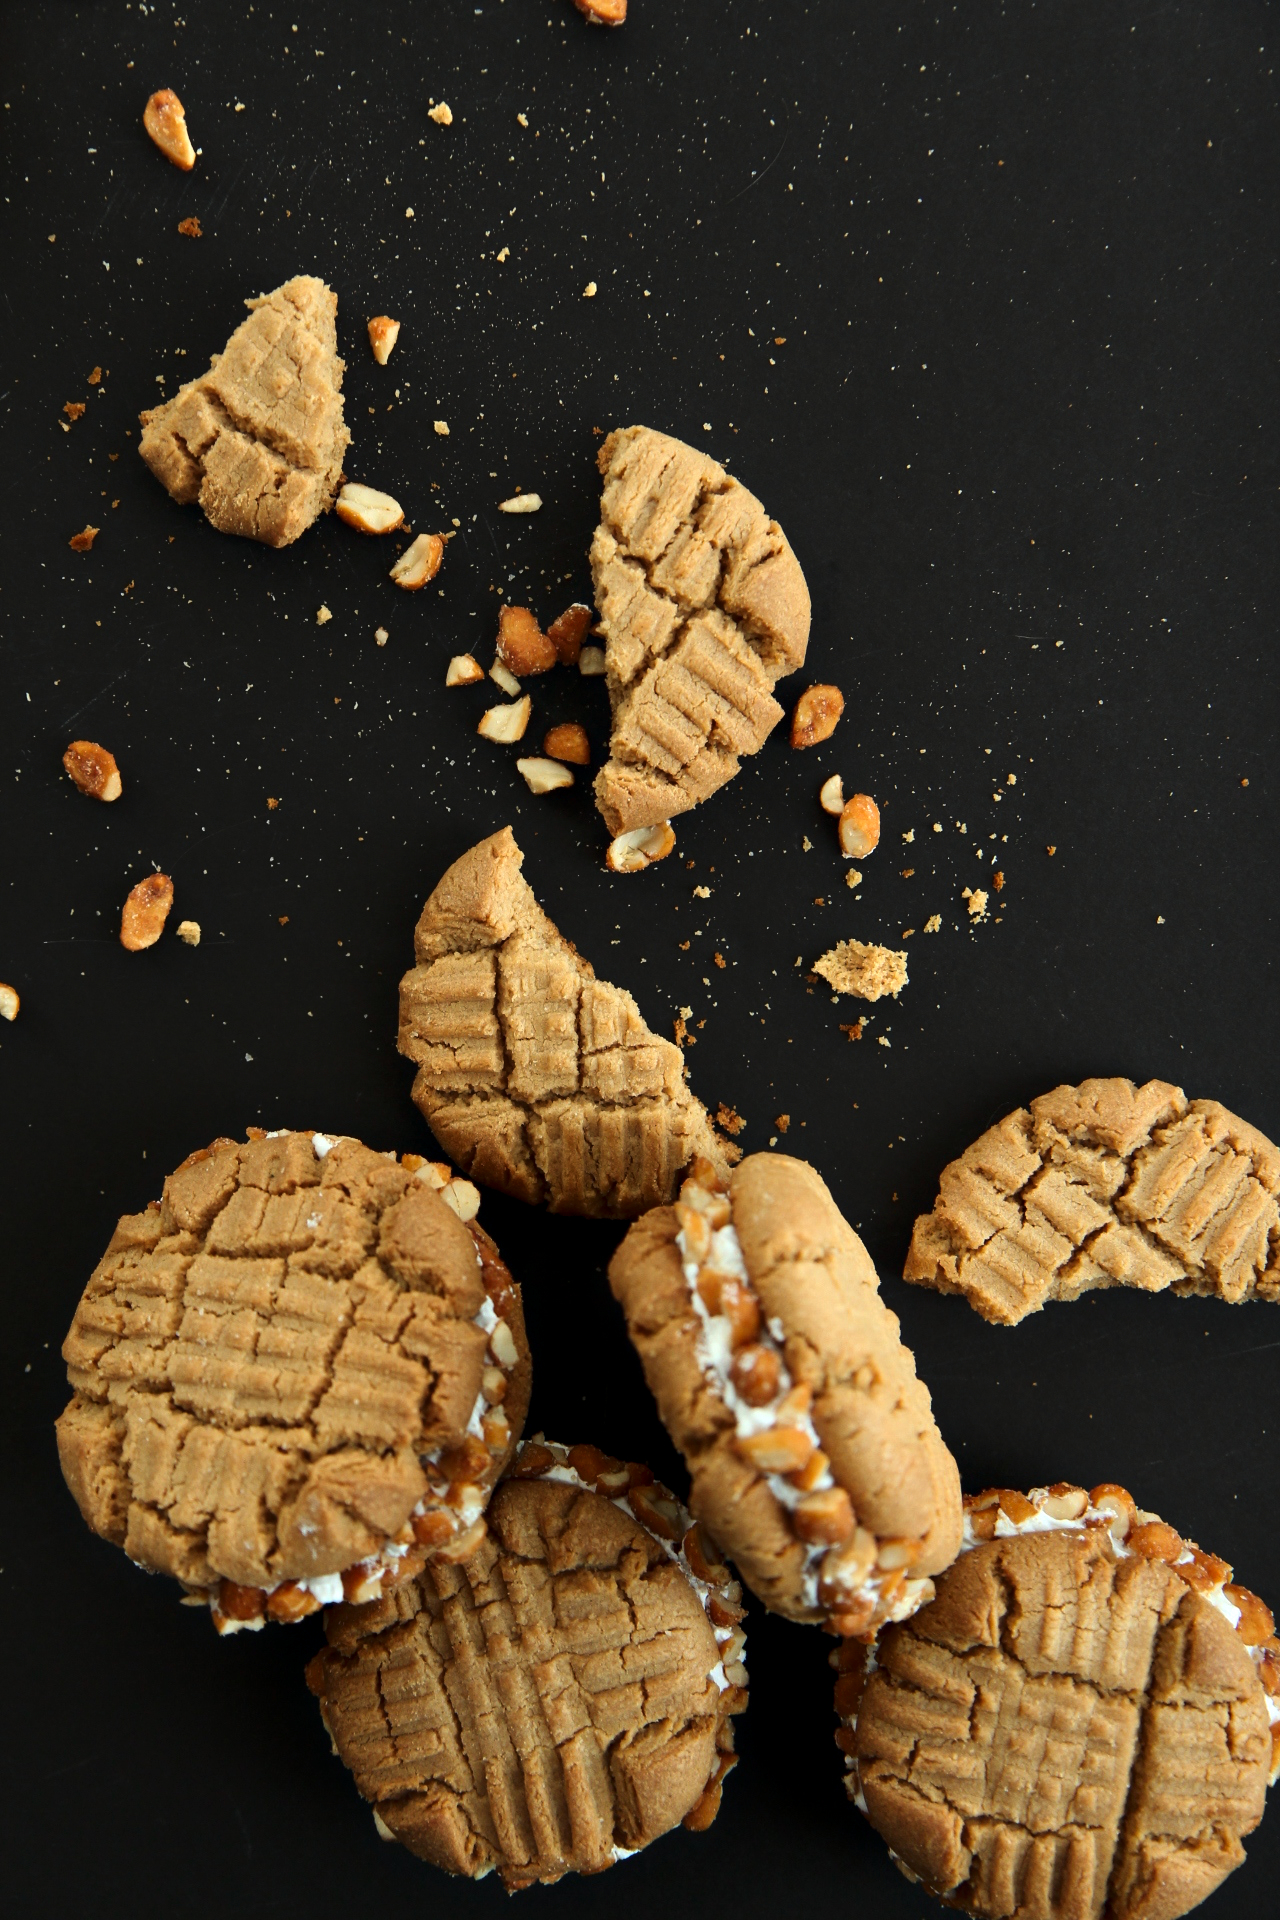
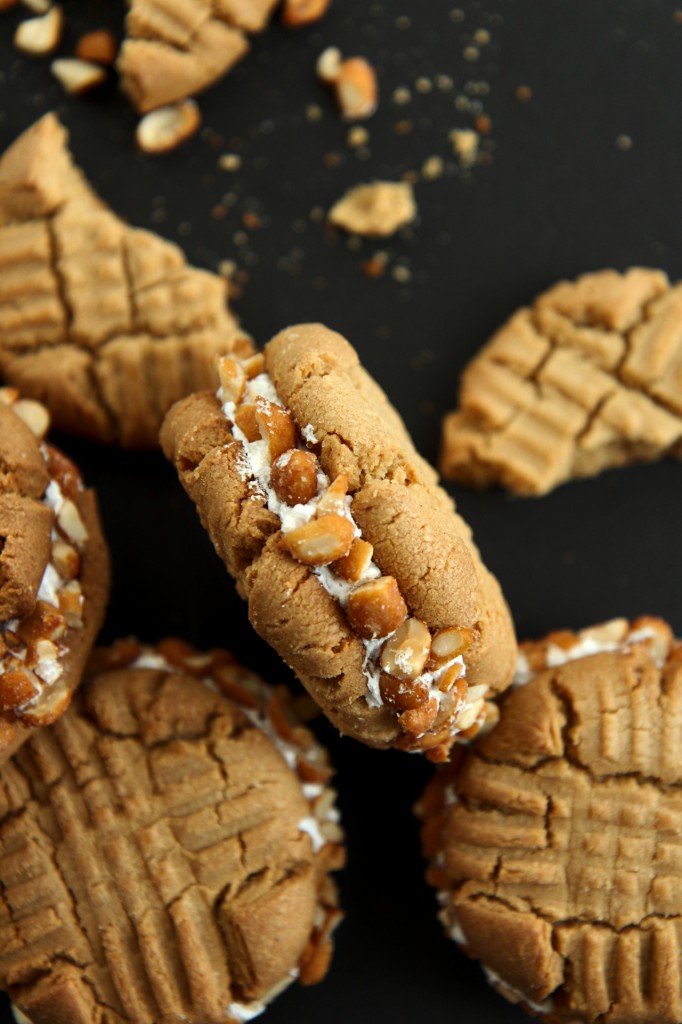
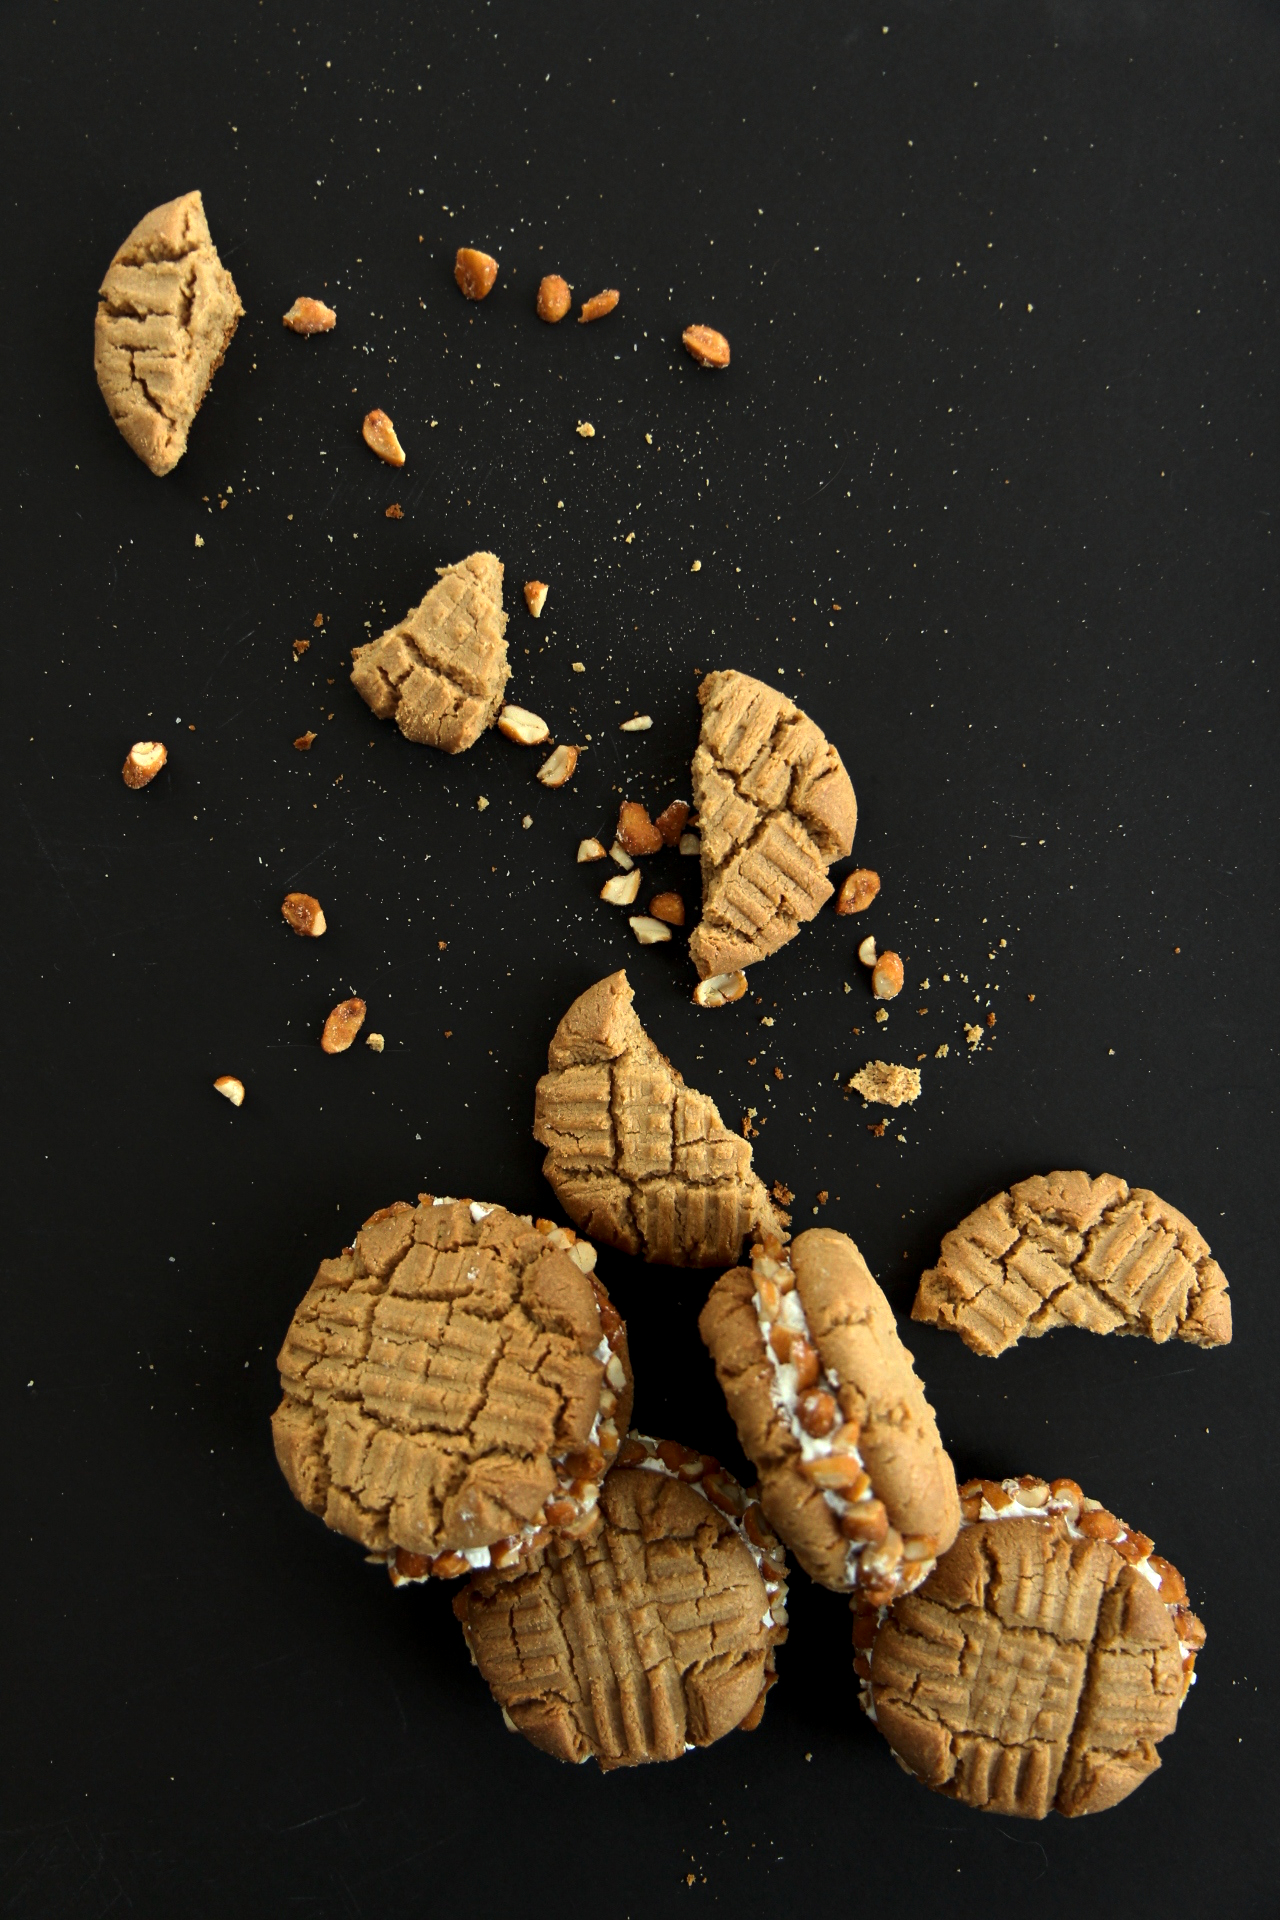
These cookies are delicious, fat, bakery-sized peanut butter sandwiches, filled with fluffy marshmallow and rolled in honey roasted peanuts, in honor of whoever searched
“i am looking for a recipe that used nutter butter cookies and butter as a crust, and then you melt marshmallows then make a layer of candy using cornsyrup and peanut butter chips”
Sadly, this is the best I can do for you.  I hope you enjoy them, mystery googler.
(I have a feeling they’re more delicious than this suspect nutter butter-corn syrup pie…)

The cookie base has edges that are crispy and crunchy, like a nutter butter, but a thick, soft center.  Perfect for sandwiching, and not too brittle or crumbly, like most PB cookies.
A cookie with bite.
Even better, they can be frozen for later!  Only use what you need, and stick the rest in the freezer for emergencies.
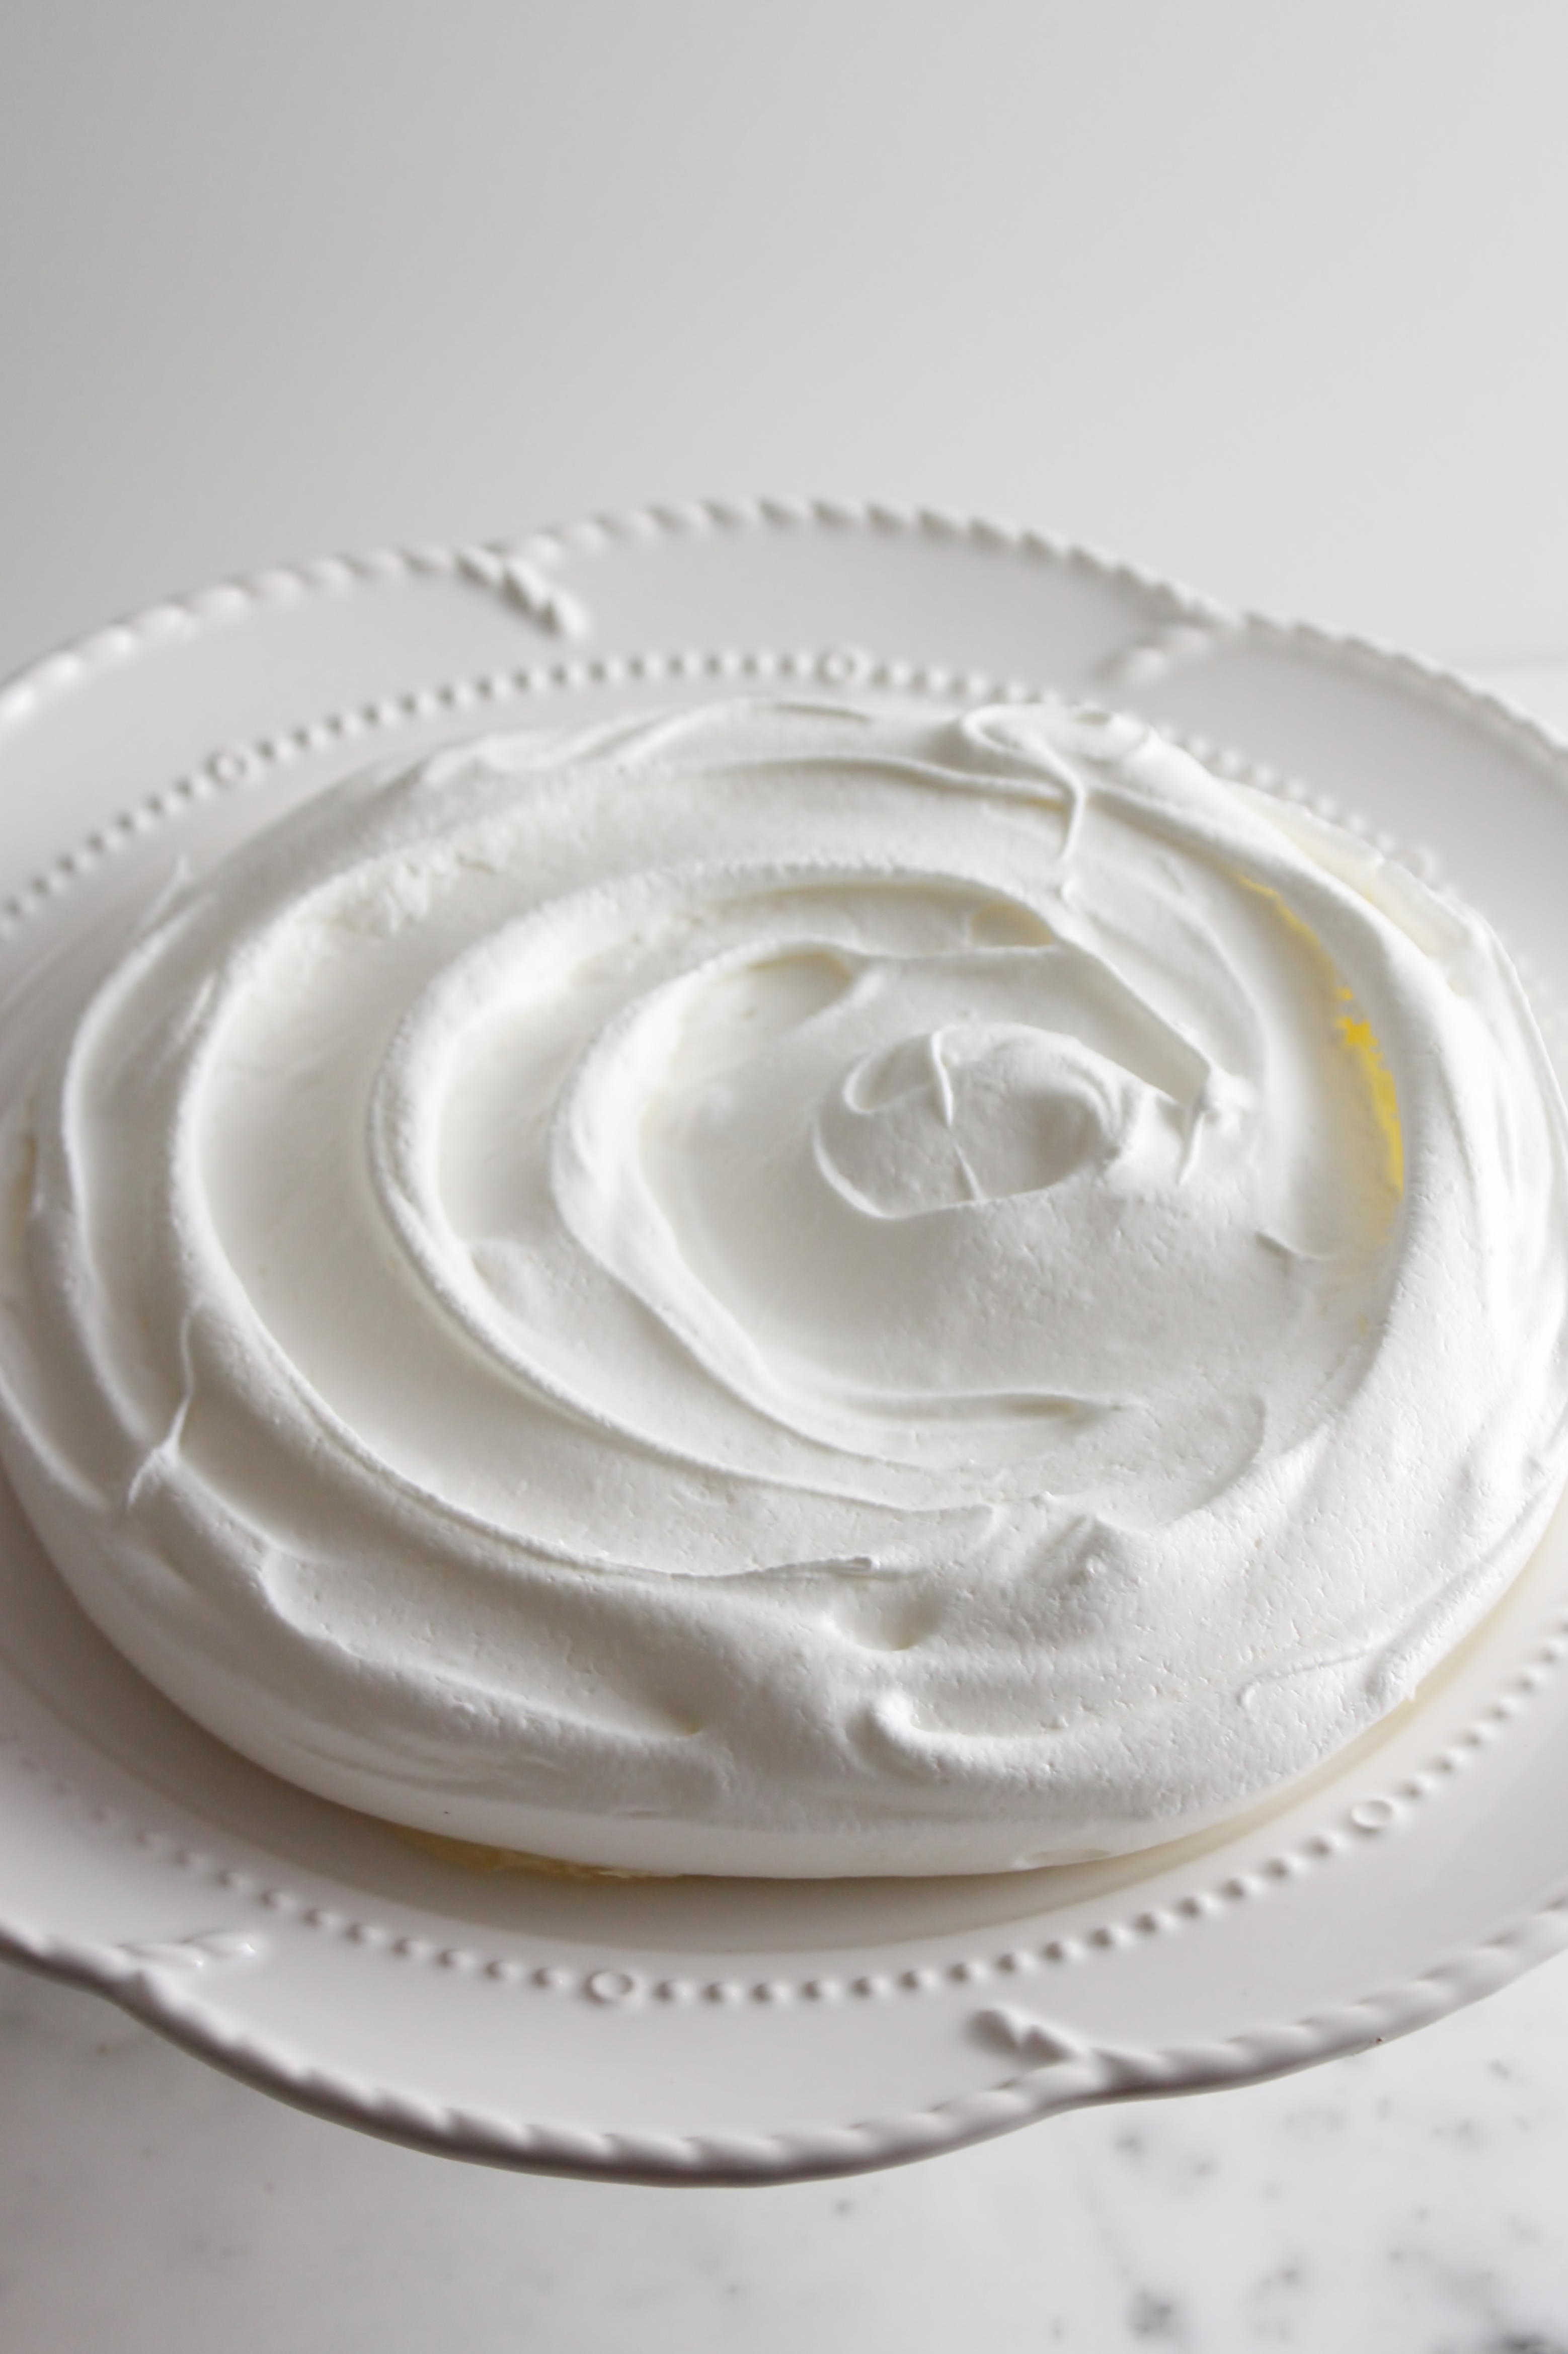
The marshmallowy filling is a billowy Italian meringue, whipped to sticky perfection.
Annnnnd this cookie sandwich is then rolled in
salted honey roasted peanuts.

These are like fluffernutters, only made with cookies.
Fluffernutter cookies.  Do I need to say more?

Perhaps just this: make these, you weirdos.  Ok.  That is all.

IMG_8324_01

Fluffernutter Cookies
makes 6 very large cookie sandwiches, or 12 cookies
cookie portion adapted from Miette

ingredients:
for the cookies:
113 grams (8 tablespoons) butter
1/2 teaspoon kosher salt
100 grams (1/2 cup) granulated sugar
70 grams (1/3 cup packed) brown sugar
1 egg
160 grams (1/2 cup plus 2 tablespoons) smooth peanut butter
1 teaspoon baking soda
180 grams (1 2/3 cups) flour

for the Italian meringue:
1 egg white
50 grams (1/4 cup) granulated sugar
pinch of salt
15 grams (1 tablespoon) water

to assemble:
about 3/4 cup honey roasted peanuts, chopped
pinch or two kosher salt

directions:
Make the cookies: beat butter on high speed until softened, about 2 minutes.
Add in the salt and sugars and beat for 3 minutes, scraping the bowl halfway through.
Add the egg and beat for 3 more minutes.
Scrape the bowl and add the peanut butter; beat for 1 more minute.
Scrape the bowl and add in the flour and baking soda all at once.
Mix on low speed until homogeneous.
Scoop out generous (1/3 cup) portions, then roll into smooth balls.
Press a cross-hatch pattern onto the cookies with a fork (or gently press them with a meat tenderizer) to flatten them slightly.
Place on a baking sheet and freeze for at least 15 minutes, and up to a month, wrapped very tightly in plastic and aluminum foil.
When ready to bake, preheat oven to 375 degrees F.
Bake cookies for 12 minutes, rotating the sheet halfway through.
Allow to cool completely, then assemble the sandwiches.
Make the Italian meringue: place egg white in the bowl of a stand mixer fitted with the whisk.
Place the salt, sugar, and water in a small sauce pot.
Begin to whip your egg white while heating the syrup on medium heat.
When your syrup reaches 200 degrees F, the egg white should be all foam; at 240, it should be at soft peaks.
Carefully pour the hot syrup into the egg white; beat the meringue until cooled to body temperature, about 5 minutes.
Spread onto one cookie and sandwich with another.
Mix the honey roasted peanuts with the extra salt, then roll the edges of each cookie in the mixture.
Enjoy with milk!

Waiting, Wishing

IMG_8215_01

“into a star splintered
silence
I reach
with hopeful fingers
into the light
of distant
mornings
captive in the
unbloomed
flower.”

Paul Matsumoto

IMG_8224_01

Here is my feeble attempt to feed my soul warmth, sunshine, and goodness while the cold continues to bring Chicago Chiberia to its sorely frozen knees, joints creaking and complaining on the way down.
While the cold continues to send me racing in search of a hot tea, a hot coffee, a hot salted soy mocha steamer, prepared slowly, lingered over, enjoyed, a hot drink in a cold cold room.
While the cold continues to keep me bundled up, wool socks, shearling lined boots, down vests, coats, giant woolen scarves, thick mittens, layers layers layers for survival.
While the cold continues to leach any pleasure I derive from the weak winter sun that has been shining more often, that has been teasing, teasing always, fickle and teasing.

It’s so fracking cold here, y’all.

IMG_8235_01

Yes.  It’s cold.  And I’ve been busier than ever, nonstop work nonstop studying nonstop demands to be alert awake alive enthusiastic, wishing no more than sleep and rest and relaxation.

School has been overwhelming, with one big assignment following on the heels of the last: midterms, papers, psets, reading.  Labs, responses, eating (?), sleeping (?).
Last weekend was crazy.  My dad was visiting (lovely), there were big social events (that’s a nice change), and I had a million and one academic demands on my plate (which has become a miserably constant equilibrium).

I survived, though.  I survived.  And then came the cold.
And then came the weekend of 8th/9th week, when course requests are due, final midterms are spoken about in hushed tones, the whisper of finals and final papers forms on the tongue.

School, man.  It never ends here at UChic.  It’s like we like it or something.  I dunno.  Don’t ask me.

IMG_8230_01

Planning my schedule=major stress.
Finishing up big assessments=major stress.
Trying to make sense of my major= major stress. (lol)

All of these are acting as the boot behind me, as the sweet, crunchy carrot of SPRING BREAK entices me forward, forward, forward.

I am going somewhere warm, damn it.
Forget Chiberia and this ridiculous winter.  It’s time for me to revel in Vitamin D and wear less than 4 layers of clothing at any one time.
Forget UChicago and this ridiculous winter quarter.  It’s time for me to sleep and nap and read a book on a beach.

Where, I don’t yet know.  Somewhere southron.

This cake allows me to focus on something other than tropical dreams, one bite at a time.
This cake is my tropical dreams, lush and rich and satisfying.

(Here, listen to this while you read this post.)

IMG_8237_01

This cake embodies all the sunny flavors for which I am so desperate.

The cake base is not a pound cake.  Rather, it’s a supremely light and fluffy cake, made sans butter, but oil for moisture and whipped eggs for lightness.  (I wish I had had coconut oil!  I was all out when I made the cake, but the coconut flavor still came through.)

A spot of creamy coconut milk, threads of lime zest, and chewy, finely shredded coconut are stirred into the batter.  Tangy lime syrup is poured over the hot cake, then it’s topped with swirls of cream cheese frosting.

I’ve never met a loaf cake with better texture than this one.  It’s got a firm bite, soft crumbs, and manages to hold together well while still maintaining plenty of moisture, thanks to the lime syrup.
Where the syrup pools, the cake turns into luscious soaked bites, full of flavor and fall-apart-tender in your mouth.

This cake is easy, pretty, and delicious.  It’s exciting and enticing, and conjures up feelings of sandy toes, warm sun, and tanned skin.  You should try it.

Lime in the coconut, baby.

IMG_8226_01
Lime and Coconut Soaked Cake
adapted from Ad Hoc at Home
makes 1 9×5 or 10×4 inch loaf cake

ingredients:
for the cake:
240 grams (2 cups) flour
1 3/4 teaspoons baking powder
2 large eggs
1 teaspoon kosher salt
zest from 3 limes
370 grams (1 2/3 cups) granulated sugar
240 mL (1 cup) coconut milk
180 grams (3/4 cup) canola oil, or coconut oil, melted but cool
1 teaspoon vanilla extract
3/4-1 cup finely shredded coconut

for the lime soaking syrup:
120 mL (1/2 cup) lime juice
70 grams (2/3 cup) granulated sugar

for the cream cheese frosting:
60 grams (4 tablespoons) butter
170 grams (12 tablespoons) cream cheese
1/2 teaspoon kosher salt
30 mL (2 tablespoons) coconut milk
150 grams  (1 1/2 cups) powdered sugar
70 grams (2/3 cup) nonfat powdered milk

directions:
Make the cake: line your loaf tin with parchment paper, then grease and flour the parchment.
Preheat oven to 350 degrees F.
Whisk flour and baking powder together.
Place eggs in the bowl of a stand mixer fitted with the whisk attachment with salt, lime zest, and sugar.
Whip on high speed for 5 minutes, until the mixture has tripled in size and is pale yellow.
Stir in the coconut milk, oil, and vanilla; when partially incorporated, place flour mixture on top and coconut on top of that and use gentle folding motions to fully homogenize the batter.
Pour into prepared pan and bake for 1 hour on a baking sheet, checking for doneness at around 50 minutes.
A tester should come out with just a few crumbs.
While the cake is baking, make the syrup: place the lime juice and sugar in a small pot and bring to a boil; allow to simmer for 3 minutes.
Make the frosting: whip butter on high speed until it is completely soft, about 5 minutes.
Add in the cream cheese and beat for at least 4 more minutes.
Add in the rest of the ingredients and slowly mix to combine; beat on high for a few minutes to ensure that everything is incorporated and prevent lumps.
Refrigerate until ready to use to allow it to set up.
As soon as the cake comes out of the oven, poke it with a skewer or thin chopstick all over, about halfway through the cake.
Pour the syrup all over the hot cake, and allow it to cool completely.
Frost the cooled cake with the chilled cream cheese frosting.
Serve in generous slices.

Between Two Lungs

IMG_4859_01

“I’m so glad I live in a world with Octobers.”

-L.M. Montgomery, Anne of Green Gables

IMG_4838

Happy Halloween, y’all!

Have some cake.

Go ahead; dig right in.

IMG_4814_01

This cake won first place in a “study break”  competition in my residence hall!
Meaning it won my house points in the house cup (yes, just like the Harry Potter house cup!)!
!!!!!!!!!!!!!!

(DGH fo’ lyfe.)

I was so nervous/excited.
Now I’m excited/proud/tired.
Writing this at 2 am 3 am 4 am 10 am. FML.

(Yes, I actually tried to write this at all those times… I don’t want to talk about it.  I want to whine about it.)

IMG_4852

Guyyyyzzzzzz I was supposed to be doing a 12 problem calculus p-set last night, but I was at the study break celebration/competition (study break is a tradition at uChicago: it’s any treat that someone volunteers to make on Wednesday for the house to enjoy and take a break with) until 11, so I didn’t start the problem set until around then.

I did 6 problems in about an hour…

and then realized

that I did them

in the wrong section.

like WHAT I am taking calc at uChicago you would think I could tell the difference between

12.2 and 12.3 but NOPE no way so

I was up until 4am last night finishing this damn p-set for my 9am class this morning.

Moral of the story: I am a zombie and more so than ever, I want to eat this bloody heart cake.

IMG_4862

Let me give you a brief overview of this cake: (don’t be overwhelmed!)

it is a 12 inch, 5 layer cake

3 layers of tangy red velvet
2 layers of rich chocolate
enrobed in fluffy, silky Italian meringue buttercream
topped with a bleeding heart sculpted from rice krispies treats and covered in homemade marshmallow fondant.

It’s over the top, and somewhat grotesque.
But isn’t that what Halloween is all about?
I mean, c’mon.

Creepy bloody hearts are prime Halloween subjects.
Grab a fork and knife and tuck in!

IMG_4860

Bleeding Heart Cake

You’ll need:
3 batches red velvet cake (recipe below), baked in a 12×2 inch pan
2 batches chocolate cake (recipe below), baked in a 12×2 inch pan
2 batches Italian meringue buttercream (recipe below)
1 1/2 batches classic rice krispie treats (recipe from the Rice Krispie website, here) (I recommend only using a total of 2 tablespoons butter, instead of 4.5, to firm up your krispie treats)
1/2 batch royal icing (Bridget is the queen of royal icing… Go forth and prosper with her amazing and fail-proof recipe)
1/2 recipe marshmallow fondant, tinted red with a touch of green and purple (Annie’s directions are AWESOME and you should check them out… As well as the rest of her blog… It makes me swoon.  Love!)
Raspberry jam mixed with corn syrup and red food coloring to create a purple-red, thick fake blood (you have to eyeball this to your best ability)

directions:
While your krispie treats are warm, crunch them up a bit with oiled hands.
Begin to work the treats firmly, packing tightly, into an egg shape.
Mold a small, rectangular lump on the upper right “corner” of the heart; this will be your pulmonary artery and vein.
Make a slight indent that cuts from the upper right side to the middle/lower left side (refer to pictures!!!).
Freeze until hard; meanwhile, roll your fondant out to 1/4 inch thickness.
Cover the krispies with royal icing to smooth out any lumps, then cover in fondant, making sure there are no gaps where royal icing may seep through.
Seal the edges with a little bit of water and the dull side of a butter knife.
Begin to add on fondant on either sides of the diagonal indent to create slightly raised ventricles; adhere 3 balls at the top left “corner” and smooth them into cylinders to create your aorta- stick a dowel or pinky finger into the center to create the interior.
Do the same ball technique for the pulmonary vein and artery on the right upper corner.
Continue to smooth with water and a knife.
Once you are content with the shape (again, refer to pictures!), use the remaining fondant to roll tiny little veins, arteries, and capillaries.
Use a little bit of water to adhere the blood vessels to the outside of the heart, mapping them out so that all of the smaller vessels stem from a larger, central artery or vein.
Drape with plastic wrap and allow to dry slightly- I recommend overnight, but make sure it is covered in plastic lightly so that it doesn’t crack and dry out too much.
For the cake itself, layer a red velvet, then 1/3 cup frosting (the filling is very thin between the layers- they are moist enough that it is unnecessary, and too much filling will compromise the structure, so beware.), then a chocolate layer, then red velvet, and so on and so forth.
For red velvet and chocolate, a crumb coat is key.
Apply a thin layer of frosting to trap the crumbs, then refrigerate until completely set- about 30-45 minutes.
Ice the cake with the remaining buttercream, piping on details if you wish.
Place the heart in the center of the cake and stab it with a fork or knife, if desired.
Strategically drip some of your fake blood on the cake to give the illusion of a bleeding heart.
Go scare people!

Red Velvet Cake
adapted from the Food Network
makes 1 12×2 inch layer
ingredients:
150 grams (1 1/4 cups) flour
150 grams (3/4 cup) sugar
1/2 teaspoon baking soda
pinch salt
5 grams (1 tablespoon) cocoa powder
150 grams (1/2 cup plus 2 tablespoons) oil
120 grams (1/2 cup) milk, plus 1 tablespoon vinegar
1 egg
14 grams (1/2 ounce) red food coloring (the liquid kind)
directions:
Preheat oven to 350 degrees F and grease and flour a 12×2 inch pan.
Whisk the flour, sugar, baking soda, salt, and cocoa powder together.
Whisk the oil, milk, vinegar, egg, and food coloring together.
Whisk the wet into the dry ingredients and whisk well to combine.
Pour into pan and bake for 25-30 minutes, until a tester comes out clean.

Chocolate Cake
adapted from the Kitchn
makes 1 12×2 inch layer
ingredients:
200 grams (1 cup) sugar
105 grams (3/4 cup plus 2 tablespoons) flour
30 grams (1/4 cup plus 2 tablespoons) cocoa powder
3/4 teaspoon baking powder
3/4 teaspoon baking soda
big pinch salt
1 egg
60 grams (1/4 cup) oil
120 grams (1/2 cup) hot water
directions:
Preheat oven to 350 degrees F and grease and flour a 12×2 inch pan.
Whisk the sugar, flour, cocoa powder, baking powder, baking soda, and salt together.
Whisk the egg and oil into the dry ingredients.
Whisk the hot water into the batter; it will be very, very thin.
Pour into prepared pan and bake for 25-30 minutes, until a tester comes out clean.

Italian Meringue Buttercream
more in-depth directions here
ingredients:
5 egg whites
200 grams (1 cup) sugar, plus 20 grams (scant 2 tablespoons) (divided)
56 grams (scant 1/4 cup) water
500 grams (4 1/2 sticks) butter, cut into chunks and softened but still quite cool
directions:
Whisk the egg whites with 20 grams of sugar.
Meanwhile, heat the rest of the sugar with the water in a saucepan until it reaches 240 degrees F.
At this point, the meringue should be at softly stiff peaks.
Drizzle the hot syrup over the meringue and beat until cooled to body temperature.
Beat in the butter 1 tablespoon at a time; keep beating until frosting is light and silky.

16 September

IMG_3302

It’s my 18th birthday, today.

IMG_3352

Today is the only day of the year

where everyone writes

on my facebook wall.

Rejoice.

IMG_3306

I secretly hate my birthday.

IMG_3373

This may seem trite coming from a teenager, but I’ve always been acutely aware and afraid of growing older.

Each birthday that passes, a wave of fear and anxiety passes over me.  I’ve always been the baby.
I’m the baby of my family; I’m almost always the baby among friends.

Getting older makes me feel uneasy scares the shit out of me.

IMG_3358

Birthdays have hung heavy with regret, especially as I come close to adulthood.  (Am I an adult yet?)

I’m a worrier.  It’s my nature.

I worry that I haven’t done enough
haven’t enjoyed enough
haven’t appreciated enough
haven’t taken each and every last moment of my life, this precious and fleeting thing, and lived it to the fullest.

It’s futile, of course.

IMG_3314

That doesn’t stop me from thinking about it, waking in the dead of night, sweating, crying, scared, worried, tangled in the sheets, blinking like a bird roused from its nest.

IMG_3364

So, yes.  But birthdays come with cake.

And I love cake.

So.

IMG_3374

This was my birthday cake.

It’s a pavlova, which means it’s a baked meringue base, topped with whipped cream and fruits.

Mine is a simple French meringue, baked until the outside is crispy but the inside is still billowy and marshmallow-y, topped with a coconut/mascarpone whipped cream and pucker-inducing passion fruit sauce, and finished with raspberries and coconut flakes.

I love meringue cakes; this one is exactly how I like my cakes: light, airy, but packed with a walloping punch of vibrant flavors.

It was divine.

It almost made me like my birthday.

IMG_3235

Pavlova

ingredients:
4 large egg whites
pinch cream of tartar
1 cup sugar
2 teaspoons cornstarch
1 teaspoon white vinegar

1 cup passion fruit purée, liquid
1/3 cup sugar
1/2 teaspoon cornstarch

1 can of full-fat coconut milk, refrigerated and UNSHAKEN (see here)
1 cup of heavy cream, cold
2 tablespoons mascarpone
1 tablespoon confectioner’s sugar

1 pint of raspberries
coconut flakes, optional

directions:

Preheat oven to 175 degrees F.
Draw a 8 inch circle on a piece of parchment with a pencil and place it pencil side down on a sheet pan.
Combine egg whites and cream of tartar.
Beat until soft peaks form, then slowly stream in the sugar while beating at high speed.
Beat until stiff peaks form, then beat in the cornstarch and vinegar.
Spread out on the parchment, staying within the circle.
Bake for 2 hours, then turn the oven off and allow to cool completely in the oven.
Meanwhile, make the passion fruit sauce.
Place passion fruit, 1/3 cup sugar, and 1/2 teaspoon cornstarch in a saucepan and whisk to combine.
Bring to a boil and allow to boil for 1 1/2 minutes.
Remove from heat and allow to cool completely before using.
Make the coconut whipped cream by beating the separated coconut fat (detailed instructions here or here) until soft peaks form, then beating in the mascarpone and confectioner’s sugar.
Beat the heavy cream to stiff peaks separately, then beat it into the coconut/mascarpone mixture.
Chill until you need to use it.

Assemble the pavlova no more than 30 minutes before serving (don’t worry, it’s really simple).
Place the meringue on a serving dish, then pile the coconut whipped cream high on top of it.
Drizzle with the passionfruit sauce, and top with raspberries and coconut flakes, if desired.
Enjoy!

P.S.
As you may have noticed, you can now pin my photos simply by rolling over them and clicking the Pinterest symbol.
In addition, there are social media buttons at the bottom of each post.
You can share posts via twitter, linkedin, Google+, instagram, Pinterest, facebook, and email.
(Right below this!)

Hipsternation

My Korean grandmother is a hipster.  
(Hi Grandma!)
A few weeks months ago, while she was visiting, a conversation about hipsters was sparked by God knows what.
In a feeble attempt to explain this large sector of the populous, I explained, 
hipsters live in Brooklyn and make their own pickles.
 
My grandma just stared at me.  I was probably eating some of her kimchi at that very moment.
Then: a revelation from my irreverent always wise father- 
Grandma is the ultimate hipster.
 
Lives in Brooklyn? Check.
Makes her own pickles?  Oh good Lord you betcha.
Best kimchi I’ve ever tasted.  Not to mention the tens of other types of pickles she makes, stuffed in her fridge at home and here in both of our fridges.
 
(Find something floating in a brown liquid in my fridge?  Keep your paws off and certainly don’t throw it out.  It’s probably some pickles.  
My favorite are chayote pickles.
Funny story about these pickles: none of my family knew what exactly the pickle even was; we couldn’t figure it out, even after poking around in the murky container for a few days.  Unfortunately, my grandma wasn’t quite so helpful, because her pronunciation of chayote left us all puzzled.  It sounded like she was sneezing.  
Ach aye OH tay.  What?!  
Eventually, I realized what she was saying- but none of the rest of my family knew what chayote was, even when pronounced correctly.  Whatever.  More for me.)
We all found this hilarious, including my grandma.
Still not sure if she understands what a hipster is, although we expanded the definition to “also really liking food trucks.”
 
Hipsters also like these rice krispie treats.
They’re the snobbiest krispie treats in the history of rice krispie treats.
First of all, everything is homemade, save for the rice krispies themselves (although, to be completely honest, I did quite a bit of googling for “homemade rice krispies”).
Secondly, the flavors are very different from your regular ole run of the mill krispie treats:
the marshmallows are made with maple syrup and an entire vanilla bean,
the caramel is heavily salted with miso,
and the whole shebang is tied together with brown butter.
(Remember when I made snobby krispies?  Yeah, these up the ante even further.)

I made these a while back, and they’ve waited quite some time in the “draft” stage of my posts, but nevertheless, they’re a chic little bar, definitely worth mentioning.  
My friend, le français, said they tasted like croissants.
I’ll take it.

P.S. Luv u gramz.

Hipster Krispiez
marshmallow adapted from smittenkitchen, inspired/adapted from A Cozy Kitchen
ingredients:
for the marshmallow:
1 tablespoon plus 1 1/4 teaspoons gelatin
1/2 cup water, divided
1 cup sugar
1/4 cup maple syrup
scrapings of a vanilla bean
big pinch salt
for the caramel:
1/2 cup sugar
2 tablespoons water
2 tablespoons butter
1/4 cup heavy cream
2 tablespoons shiro miso
to assemble:
3 tablespoons of butter, browned
6+ cups of rice krispies
melted chocolate for drizzling, if desired
directions:
First, make the caramel.
Bring the sugar and water to a boil, allowing them to cook until the mixture turns deep amber, about 7 minutes.

Immediately remove from heat and whisk in butter; mixture will foam.
Stir in the cream; mixture will bubble violently- keep whisking.
Stir in the miso, whisking until everything is smooth.
Set aside; if it sets while you are making the marshmallow, just reheat it gently in the microwave or over a low flame.
Next, make the marshmallow.
Place 1/4 cup of the water in the bowl of a stand mixer.
Sprinkle the gelatin on top to allow it to soften and bloom.

Mix the maple syrup, sugar, salt, and second 1/4 cup water in a heavy bottomed pot over medium heat.
Bring the syrup mixture up to 240 degrees F, about 10 minutes over medium heat.
Pour the hot syrup over the bloomed gelatin and whip until mixture has tripled in volume and is very fluffy and white.
Sometime while the mixture is whipping, add in the vanilla bean scrapings.
Meanwhile, prepare your pan; grease a 13×9 pan with a little butter and set it aside.
Once your marshmallow is ready, transfer it to a large pot with the browned butter; heat gently to mix the butter into the marshmallow, then stir in miso caramel until everything is homogeneous.
Stir in the rice krispies, adding more only if the mixture is very wet still; you won’t need much more than 8 cups, maximum.
Scrape the mixture into your prepared pan and press firmly all over to even out the tops.
Refrigerate about 30 minutes to set, or leave it at room temperature for a bit longer.
Cut into bars or squares, and drizzle with chocolate if desired.

That’s The Way

Uh huh uh huh, I like it, uh huh uh huh.

You’re welcome! That song will be stuck in your head for at least 5 minutes and up to a few days.
Then it’ll probably be Call Me Maybe.
Raspberry (actually, all berries) and lemon is like the ultimate ultimate combo for me (add some rhubarb and I’m done.  Seriously.  Done.)
 
Methinks it’s because I’m a photic sneezer. (whosamawhatsit?!)
 
photoptarmosis: uncontrollable sneezing in response to numerous stimuli
(Thanks, wikipedia.)
I sneeze when I eat chocolate.  And strong mint, like altoids or strong gum.  I sneeze when I look at the sun.
It’s kind of fun, and mildly entertaining.  Chocolate and gum are especially funny, seeing as I am nearly constantly snacking on one or the other.
Milk chocolate is less stimulating, I suppose, due to its lower cacao content, and I am less likely to sneeze when sneaking a taste of a Hershey bar than say, a dark chocolate cake or chocolate chip cookie.  
With dark chocolate, I’m sneezing all over the place.  
The longest sneezing fit I’ve ever had from chocolate was like 6 sneezes long.
My sneezes are especially dramatic (I mean, c’mon, it’s me.  Of course I’m going to be loud and obnoxious.), making these sneezing fits very… um… drawn out.
Achoo!  Pay attention to me!  Achoo!  Achoo!
So anyways, I think that’s why chocolate is not my favorite flavor.  
Don’t get me wrong, I love the stuff.  
It’s heaven sent (Theobroma cacao, literally “chocolate food of the gods,” and yes, I know the taxonomic name for chocolate without looking.  What kind of pastry-obsessive would I be if I didn’t?)
 
I would take a fruit-based dessert, especially one with citrus, over chocolate any day.
Curd over ganache, always.
(Actually, I would put them together.  I’m a greedy little pig.  Oink.)
It’s taking a while to get around to the moral of this story.
Moral of this story:  these sticky buns are right up my alley.
They’re sweet and very sticky, caramelized on the bottom and redolent with lemon zest.
The tangy cream cheese pairs well with tart lemons and raspberries, all of the sourness being balanced by the sweet, sugary filling and buttery dough.
These are yeasted buns, but they go from mind to oven to belly in less than 2 hours, most of it being hands-off, and none of it being labor intensive.
 
Mix the dough with a mixer, plop it into a bowl and let it rest, roll it out, fill it with the simplest filling ever (butter+sugar+lemon zest), roll ’em up and slice ’em, let ’em rise, bake, glaze, eat.
 
Be not afraid of yeast!  We love yeast!  Yeast loves us!
And the yeast will behave, I promise.
They smell fear.  Don’t be afraid and you will be just fine.  
I would hold your hand, but mine is very sticky from this sweet bun.


Lemon Raspberry Sticky Buns
adapted from here
ingredients:
3/4 cup milk
4 tablespoons butter, browned
3 1/4 cups flour
2 1/4 teaspoons yeast (.25 ounce, 1 packet)
1/4 cup sugar
Heaping 1/2 teaspoon kosher salt
1/4 cup water
1 egg
Zest of 1 1/2 lemons
3/4 cup sugar
4 tablespoons butter, browned
Raspberries
For the glaze:
Juice of 1 1/2 lemons
1 cup powdered sugar
4 ounces cream cheese, softened
Directions:
Bring milk to a simmer, remove from heat, and combine with 1st measure of butter and water.
Allow to cool to 110 degrees F.
Meanwhile, mix 2 1/4 cups of the flour, salt, yeast, and 1st measure of sugar in the bowl of a stand mixer with the dough hook.
Once milk mixture cools, pour over dry ingredients, mix briefly, and then add egg and last cup of flour.
Allow dough to knead until very smooth and pulling away from the sides of the bowl.
Place a slightly damp tea towel over the bowl and allow to rest for 10 minutes.
Meanwhile, rub lemon zest together with 2nd measure of sugar.
After 10 minutes, roll dough out into a rough rectangle.
Dough should be rolled very thinly, no thicker than 1/4 of an inch.
Brush the dough with the 2nd measure of brown butter, then sprinkle the lemon sugar over.
Break up raspberries and dot them all over the dough.
Roll the dough up and pinch the seam firmly shut.
Cut the roll into 1 1/4 inch thick buns.
Brush a 6×12 pan with butter and place the buns snugly in.
Place a slightly damp tea towel over the pan and allow to rise until doubled in size, about 30 minutes.
Meanwhile, preheat oven to 375 degrees F.
Bake buns until the interior reaches 190 degrees F, about 30-35 minutes.
If the top starts to brown, cover with foil and continue baking.

For the glaze, simply beat everything together until smooth.
Spread over warm buns right out of the oven.

Can’t Stop, Won’t Stop

Short and sweet today, y’all.
(I have a nap penciled in in about 15 minutes.  I’m very busy.  Island time.  It happens.)
This is a cake I made a few months back, to celebrate (mourn?) the end of my basketball season.
Yes, it’s taken me that long to get around to writing this post.  I’m a little slow on the uptake.
  
It was pretty ridiculous, ridiculously indulgent, and indulgently delicious.  
I don’t know anyone who doesn’t like the combination of chocolate and orange.
Seriously.  One of my favorite things in the entire world, ever, is those chocolate-orange things.  You know, the chocolates which look like oranges and have orange in them and separate into little orange wedges?
Chocolate and cheesecake, a match made in heaven, is only made better by the addition of orange.
But I didn’t stop there.  I have no self-control, remember?  
Nay, I kept going.  “What else can I add into this cake?”
Well, nutella… 
Ugh.  Dead.  I’m dead.  That’s it.  There’s no going back; my tastebuds will no longer accept anything but this.
Here’s a secret, just between you and me:
These photos were taken the night before our last practice, meaning that I cut a slice out of the cake just to take photos- not the most, erhm, proper behavior in the world.
How rude!  I do de-clay-uh.
So, I took the photos, and slid it back in place.
Spackled the frosting back together, strategically placed some chocolate curls over the evidence, and served it the next day.
No one noticed.  
Victory!
 
Can you tell how badly I want to be a southern belle?  
(The font I always use, for the record, is Georgia.)

Mouthful (Chocolate-Nutella-Orange-Cheesecake) Cake
For the cheesecake layer:
(from Piece of Cake via RecipeGirl)
ingredients:
16 ounces of cream cheese, softened
2/3 cup granulated sugar
pinch of salt
2 eggs
1/3 cup sour cream
1/3 cup heavy cream
1 teaspoon vanilla extract
directions:
Preheat oven to 325 degrees F. 
Place a large roasting pan on the lower third rack of the oven. 
Place a kettle of water on the stove to boil. 
Spray a 9-inch springform pan with nonstick spray and line the bottom with a round of parchment paper. 
Wrap a double layer of foil around the bottom and up the sides of the pan (you want to seal it so the water from the water bath doesn’t seep into the pan). 
In a large bowl, use an electric mixer to mix the cream cheese- blend until it is nice and smooth and creamy. 
Mix in sugar and salt and blend for 2 minutes, scraping down sides of the bowl as needed. 
Add eggs, one at a time, blending after each addition. 
Finally, mix in sour cream, whipping cream and vanilla. 
Mix until smooth. 
Pour the batter into the prepared pan. 
Set the pan into the roasting pan in the pre-heated oven. 
Carefully pour the hot water from your kettle into the roasting pan (it will fill the pan surrounding the cheesecake). 
Pour enough water so that there is about an inch of water coming up the foil along the sides of the cheesecake pan. 
Bake the cheesecake for 45 minutes. 
It should be set to the touch and not jiggly. 
Remove the cheesecake from the roasting pan and let it cool on a wire rack for at least an hour. 
When it has cooled, place the pan into the freezer and let the cheesecake freeze completely. 

For the cake layers:
adapted from Gourmet via epicurious
ingredients:

2 1/2 cups flour
1/4 cup cornstarch (you can also use 2 3/4 cups cake flour, omitting the cornstarch and AP flour)
2 1/2 teaspoons baking powder
1/2 teaspoon salt
1 1/2 sticks unsalted butter
1 1/2 cups sugar
4 large whole eggs
zest of one entire orange
1 1/2 teaspoons vanilla
1/3 cup orange juice, freshly squeezed
1/3 cup sour cream or buttermilk
1/3 cup milk
handful of mini chocolate chips; enough for a healthy sprinkling on two 9 inch layers
directions:
Preheat oven to 350 degrees F.
Grease and flour two 9-inch cake pans.
Rub the sugar and zest together with your fingers until very fragrant.
Beat the butter until softened, then add in the orange sugar.
Cream together until very fluffy and light, about 3 minutes.
Beat in eggs one at a time, scraping after each addition, then add in the vanilla.
Stir the sour cream, juice, and milk together.
Stir the flour, cornstarch, baking powder, and salt together.
Either alternate adding the wet and dry or slowly dump them in at the same time (my preferred method… Just go slow so the flour doesn’t go all over).
Mix just until homogeneous, then pour into prepared pans.
Sprinkle the mini chocolate chips over the batter, and bake until golden and springy to the touch, about 20-25 minutes.  A cake tester should come out nearly clean, with perhaps just a few crumbs sticking on.
Allow to cool completely before assembling the cake.
For the frosting:
ingredients:
2 sticks butter
1 3/4- 2 cups confectioners’ sugar
big pinch salt
3/4 cup Ovaltine
1/2 cup nutella
splash vanilla extract
splash cream, if needed
directions:
Beat butter until soft, about 2 minutes.
Add in the ovaltine, nutella, salt, and vanilla, and beat to combine.
Slowly add in the powdered sugar, tasting to check the sweetness. (If you need more powdered sugar to thicken the consistency, be sure to add in a pinch more salt; you can also add in some more ovaltine for thickening.)
Play with the amount of powdered sugar to thicken the frosting; environments differ and really affect the thickness/pipeability.  If you need it to really thicken, don’t add too much more sugar or ovaltine, instead, stick it in the freezer for a few minutes to firm up.
If your frosting is too thick, add a splash of cream, about 2 teaspoons at a time, to thin it out a bit.  Don’t add too much, and wait between additions, because if it becomes soupy, there’s no going back.
To assemble:
Apply a thin layer of icing on the chocolate chip side of the first layer.
Place the frozen cheesecake layer on top, and spread another thin layer on top of that.
Place the second cake layer, chocolate chip side up, on top of the cheesecake.
Crumb-coat the whole cake in a thin layer of frosting, then chill it, either in the freezer or fridge, for 10-15 minutes in the freezer or 15-20 in the fridge.
Take the cake out and generously frost it with the remaining icing.
To smooth out the sides, dip an offset spatula in hot water, wipe it off, and gently run it on the outside of the cake.

Top with chocolate curls, if desired.

Googolplexian

 
A googolplexian is 
 
1010100 .
 
For a rough estimate, just count the number of layers in this cake. 
I mean, really.
I’m an exaggerator.  It’s true.  Always have been, always will be.
 
Now, my family calls it being a drama queen, diva, prima donna, etc.
 
They’re exaggerating.
Just who do you think I got it from?!
 
But seriously, guys.  
When I make crêpes, I feel like I’ve made a hundred thousand million and I look at the stack and there’s like six sitting there, plus the one in my mouth.
Talk about disheartening.
 
I’ve tried to make crêpe cakes before.
 
I must will myself not to eat them fresh and hot from the pan and I must will myself to stay at the stove making stupid pancake after pancake until I can take no more.
(And/or have had my fill of fresh, hot crêpes.)
 
Then, after hours and hours of tending to a flaming hot stove, I, ever stoical and composed goddess of patience, must wait for them to cool.
HA!  Fooled you, didn’t I?
Like heck I’m waiting for crêpes to cool… I’ve got things to do and places to see.
 
Ain’t nobody got time for dat.
 
I slap those suckers together with some filling, then stand back to admire what I expect to be a lovely little French pastry.
I’m never happy with what I behold.
 
It’s like getting a hairless cat instead of that damn poodle I was promised at the beginning of this whole ordeal.
 
They never stand above two inches tall, and they’re always droopy instead of ruffly and prim.  They’re not flavorful enough.
They’re boring AND ugly.  
A real winning combination…
 
So why are you staring at a haphazard, not very ruffly, somewhat off-kilter crêpe cake right now?
Because I couldn’t stop thinking about layered crêpes.
Because I couldn’t get the flavor combination of banana and vanilla and apricot out of my head.
Because I wanted cake for breakfast, brunch, lunch, and linner that day.
Because I wanted said cake to be a semblance of something healthy.  Ya know.
This cake is whole-wheat, has very, very little sugar in it, less than a teaspoon of butter, and is chock full of protein and healthy fats, thanks to the greek yogurt, ricotta, hazelnuts, and coconut oil; most of the sweetness comes from the bananas, vanilla seeds, and tart California apricots.

This cake is thus approved for every meal of the day. 
 It’s not the shiniest spoon in the drawer, to be sure, but it tastes good.  It tastes real good.
 
(I can’t describe how much the asymmetry of that one darned hazelnut bothers me. 
Whyyyyy didn’t I fix it while the cake was still in existence?  
It will haunt me for the rest of my life.)


Banana Apricot Crêpe Cake
for the banana crêpes:
adapted from Smitten Kitchen
ingredients:
4 tablespoons coconut oil, melted
1 6 ounce banana, peeled
1 cup almond milk
1/4 cup plus 2 tablespoons white whole wheat flour
1/4 cup plus 2 tablespoons all purpose flour
4 eggs
2 tablespoons natural sugar
splash vanilla
big pinch sea salt
pinch each cinnamon, cloves, and nutmeg
directions:
Whir all ingredients together in a food processor.  
Let batter rest for at least 20 minutes.
To make the crêpes, heat a 6 inch skillet up on medium high heat.
Brush with coconut oil- you should only have a thin film.
Pour about 2 tablespoons of batter into the pan and immediately swirl to coat the bottom of the pan.
Cook for 1 to 2 minutes until the top is cooked and the bottom is golden brown.  
To flip, use a spatula to pick up the edge, then gently use your fingers to pick up and flip the crêpe.  (Don’t be a baby.  It’s not that hot.)
Continue until all batter is used up.

for the Greek yogurt and ricotta filling:
ingredients:
1/3 -1/2 cup Greek yogurt, depending on how loose you want your filling and/or how thick you want the filling layers to be.  I used closer to 1/2 a cup.
1/3 cup part skim ricotta
1/3 cup powdered sugar
splash vanilla
pinch salt
directions:
Whisk all ingredients together.  Set aside and let thicken slightly.

for the apricot-vanilla compote:
ingredients:
15 dried California apricots
1 vanilla bean or 2-3 already used pods (I fished some used ones out of my sugar)
boiling water
directions:
Roughly chop the apricots.  
Place in a heat safe bowl with the vanilla pod (cut the pod up into 2 1/2 inch chunks if it is whole).  
Pour boiling water over to cover completely.  
Allow to sit for 15 minutes, until the apricots are softened and there are vanilla seeds floating in the water.
Drain most of the water, reserving 2-3 tablespoons.  
Scrape the insides of the vanilla beans out and place in a food processor along with the reserved water and the apricots.  
Pulse until a slightly chunky paste forms.  Set aside.

for the caramel sauce:
adapted from the NYT
ingredients:
1/4 cup sugar
1 tablespoon water
2 tablespoons light cream
1/2 tablespoons butter
big pinch of sea salt (around 3/4 teaspoon)
directions:
Add the sugar and water to a heavy bottomed saucepan and cook on medium heat until light amber, 5-7 minutes.  
Remove from heat and immediately stir in cream.  
Mixture will bubble and steam, so beware.  
Whisk in butter and salt; use before completely cooled.  
To loosen it up again before use, microwave it for a few seconds until it is liquid.

to assemble:
Cut up a large banana into thin slices.  
Begin layering the crepes, spreading each with yogurt filling, then either banana slices or apricot filling.  
Alternate the banana and apricot.  
Once your last crêpe is on the cake, pour the caramel over top.  
If desired, you can stack some toasted hazelnuts on top before pouring the caramel.  
Allow the caramel to set slightly, then serve.

Knockoff

Not all knockoffs are like that fake Juicy Couture bag I bought at the Silk Market in Beijing.
 
The one which turned out, once inspected in a brighter lighting and clearer mindset, to be a brown-and-pink diaper bag with a malfunctioning zipper.
Take these cookies, for example.  They’re a take on those lovely, pillowy “Lofthouse” style sugar cookies that you can buy in every single supermarket in America.
You know the ones… They come in packages of six or ten or so, generally with pink or blue Crisco-based “butter”cream icing adorned with heaps of sprinkles, which, during appropriate holiday rushes, change into seasonally themed icing and sprinkles.
 
They’re so bad…. But so very, very soft.  And hard to resist.
 
Editor’s note:
[While perusing their website, which took an inordinately long time to load, discovered that they now come in red velvet [?!] and frosted with nerds [?!!].  Suspicious whether this is good idea or very, very bad one.  Must say, nerds are great.  
Therefore still on fence about nerd-frosted sugar cookies.
 
Also noted: holidays featured are Easter, Halloween, 4th of July, Christmas, Valentine’s Day, St. Patrick’s Day, and Thanksgiving.
Wonderful!!! All imaginable holiday cookie needs covered! 
 
Perusing further, discovered watermelon and sugar plum flavored sugar cookies (and, of course, ubiquitous and gratuitous pumpkin).
 
Must ask what a sugar cookie designed to mimic sugar plum even tastes like?
Best guess: saccharine.
 
Watermelon?  Can only think of sticking Hubba Bubba into a cookie and dyeing the whole thing bright green.  Mmmmm refreshing.
 
Nearly done with snottiness.  
Blue-, pink-, yellow- and white-frosted cookies considered disparate flavors/groups?!
Found one difference: which number dye goes in at end of mixing time.
 
Last and most important point: how does “purple-boo” icing taste?  And why not kosher?]
Oh, and actually…  Props to Lofthouse for trying to be more eco-friendly.  It’s hard for me to love the cookies anymore, but I sure as heck appreciate that.
 
Here.  Now that you’ve endured an entire post of whining and carrying on, why don’t you enjoy a big, fat, soft cookie with a sweet, buttery swirl of icing on top?
These cookies are wonderful.  So soft and fluffy, perfectly offset by a mound of buttercream.  I also made free-form rose flavored sprinkles/shards to top the whole thing off.
Subtle, and not overly perfume-y.  Just what I was going for.  
I don’t want people thinking I poured a bottle of my nicest Chanel into my cookies.  Feel me?

I loved this recipe… Easy and produced great results.  I highly recommend it!


Faux Lofthouse Sugar Cookies
ingredients:
6 cups flour
1 teaspoon baking powder
1 teaspoon baking soda
1/2 teaspoon salt
8 ounces( 16 tablespoons) butter, softened
2 cups granulated sugar
3 eggs
1 teaspoon (I added much more… I like vanilla) vanilla extract
1 1/2 cups sour cream
directions:
Stir together the flour, baking powder, soda, and salt.  
In the bowl of a mixer, cream the butter and sugar together.  Scrape the sides.
Beat in the eggs, one at a time.  Scrape the sides.
Beat in the vanilla and sour cream just until combined.
Mix in the dry ingredients just until the dough comes together and is fully mixed.
Divide into 2 disks and refrigerate for at least two hours.
Preheat oven to 425 degrees F.  Line sheet pans with parchment or silpats.
Lightly dust a clean surface with flour, and turn one of the refrigerated disks out. 
Roll out to a thickness of 1/4 inch, then cut out desired shapes.
Bake for 7 minutes, then let cool on wire racks.
Gather scraps, refrigerate for a little (10 minutes) if they are becoming warm and elastic, then re-roll.
Repeat with other dough.
 
American Buttercream Frosting
ingredients:
1 stick butter
1 cup plus 1 tablespoon confectioner’s sugar, sifted
big pinch of salt
splash of vanilla extract
1 tablespoon of cream, as needed
directions:
Beat the butter until smooth and fluffy.  
Sift in the sugar, add the salt and vanilla extract, and beat on low speed until incorporated.
Beat on high speed for about 20 seconds, until everything is homogeneous.  If the frosting is thick, add some cream or milk in small increments until it is spreadable.
Spread a thick layer onto each cookie, leaving a slight mound in the center of the cookie.  Spin the cookie while lightly pressing down in the center to create a small well for your sprinkles!
 
Rose Shards:
Use this recipe (brilliant!), but add in a drop of rosewater and spread it very thinly and evenly over a sheet of parchment instead of piping lines out.  Let dry completely, then break apart into little shattered pieces.  Use it to garnish the frosted cookies.